
In the context of a call center, an automated notification system is an automatic alert system that independently makes or receives calls and plays a pre-recorded or synthesized voice message without an agent’s participation.
In simpler terms: a “robot” calls the customer and delivers information.
Today, the automated notification system is a universal assistant for call centers. It is necessary for automating calls and simple dialogs to free up the agent from routine tasks and give them time for more complex calls.
What an automated notification system does in a call center
An automated notification system can:
- make calls to a database of customers;
- play a voice message (static or dynamic);
- accept key presses (DTMF) – “press 1 if…”;
- transfer the call to an agent if the customer selects the desired option;
- operate according to schedules and scripts;
- record call results).
In call centers, an automated notification system is used for:
- reminders about payments or debts;
- notifications about delivery, visit, appointment;
- mass alerts (promotions, schedule changes);
- appointment confirmations (“press 1 to confirm”) and so on.
Below we have described six simple steps on how to set up an automated notification system in Oki-Toki.
Connecting a SIP provider
To do this, you need to:
- Go to the “SIP Telephony” section — “SIP providers” and click “Connect”;
- Enter a name and save. The created SIP provider acts as a “folder” for SIP gateways. These folders can be used to route telephony across different projects without mixing all SIP connections in different business processes;
- In the created tile, you need to add the first SIP gateway by clicking “Add SIP profile”;
- Almost always “SIP-Client” is used. If the SIP provider suggests a connection variant where Oki-Toki exchanges IP addresses with them, then “SIP-Trunk” template is used;
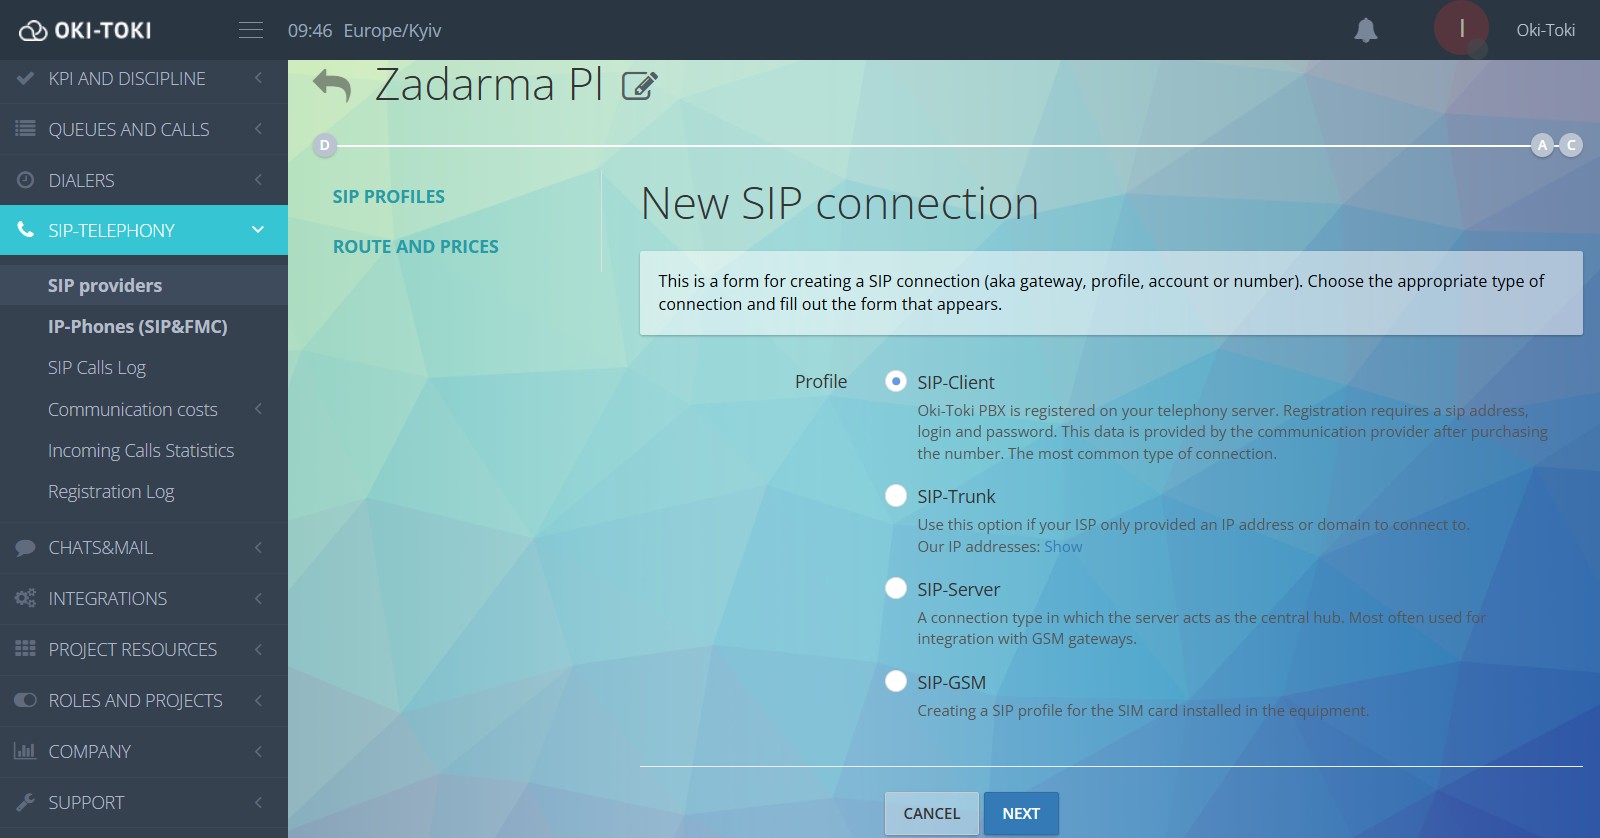
- Enter the connection details from the SIP provider. For SIP-Client, it is usually enough to enter the login, password, and domain. Leave the rest as default;
- As a result of successful connection, the status REGISTERED will appear in the right column; if registration fails, the status EXPIRED will appear. If the status does not appear immediately, try refreshing the page after a few seconds, as SIP providers do not always register the connection instantly.
- At the end of the SIP provider connection, specify the numbers with which prefix (first digits) it can make calls (for example: numbers of Kazakhstan start with “7”, Ukraine with “380”, etc.).
Creating a script
In the “Call scripts” section, we create a logic scheme according to which the call will proceed when the customer picks up the phone. This script will consist of several blocks (call stages).
- “Start” – where the script begins when the customer picks up the phone;
- “Message” – playing a recorded sound message to inform the customer.
- “Say phrase” – synthesizing a voice message using cloud services. Variables can be used to form sentences.
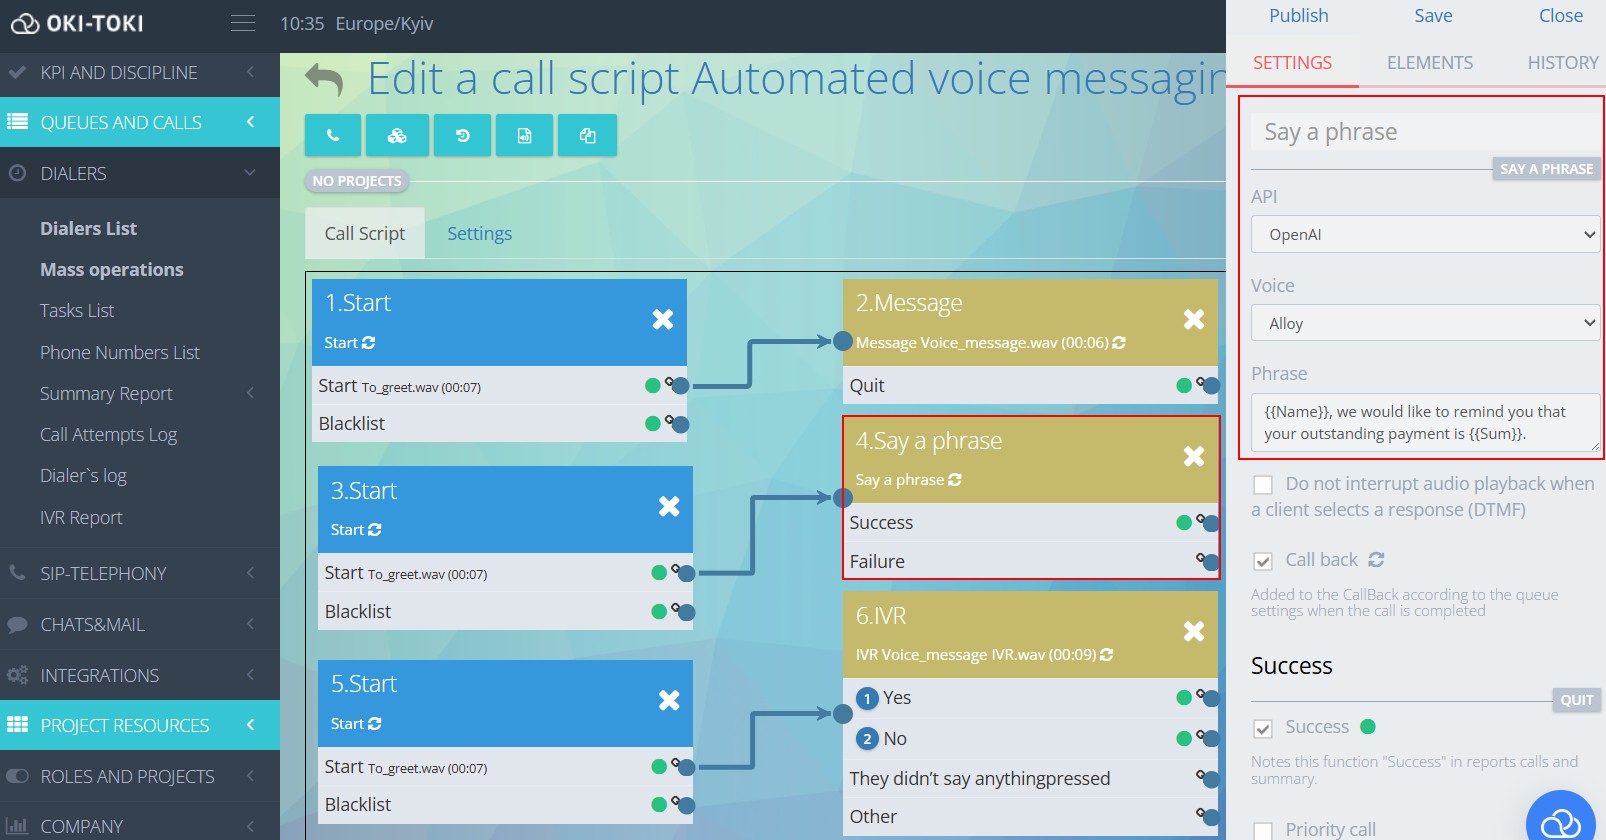
- “IVR” – plays an attached audio recording and recognizes digit presses by the customer or voice responses;
To add a voice message, you need to click on the block, after which a settings window will open on the right side and there will be a note “Sound file”. Below are additional settings to fill in. All changes need to be saved and published to take effect.
Creating a dialer
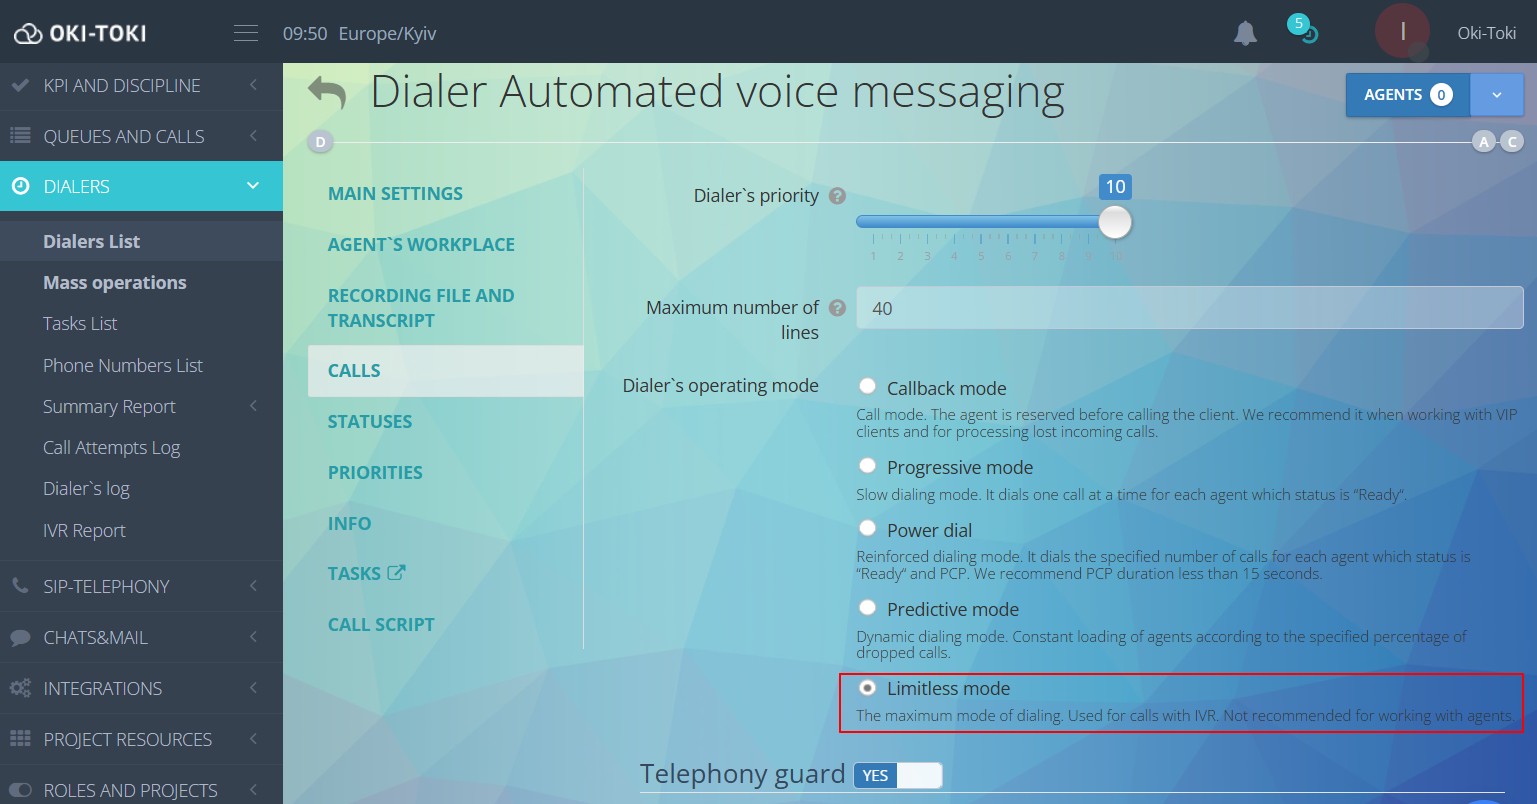
Go to the “List of dialers” section and click “Create”. Fill in the main settings, select the provider and the created script with IVR.
In the “Calls” tab, choose “Limitless mode”. This mode is used only in the operation of the automated notification system (without agent participation). Specify the maximum number of lines that the dialer can occupy, and save the settings at the bottom of the page.
Detailed dialer settings can be found in a separate article “How to set up an automatic dialer for clients with a robot”.
Importing a contact database
After creating everything necessary for operation, the remaining step is to upload the database that the dialer will be calling. This is done in the “Mass operations” section.
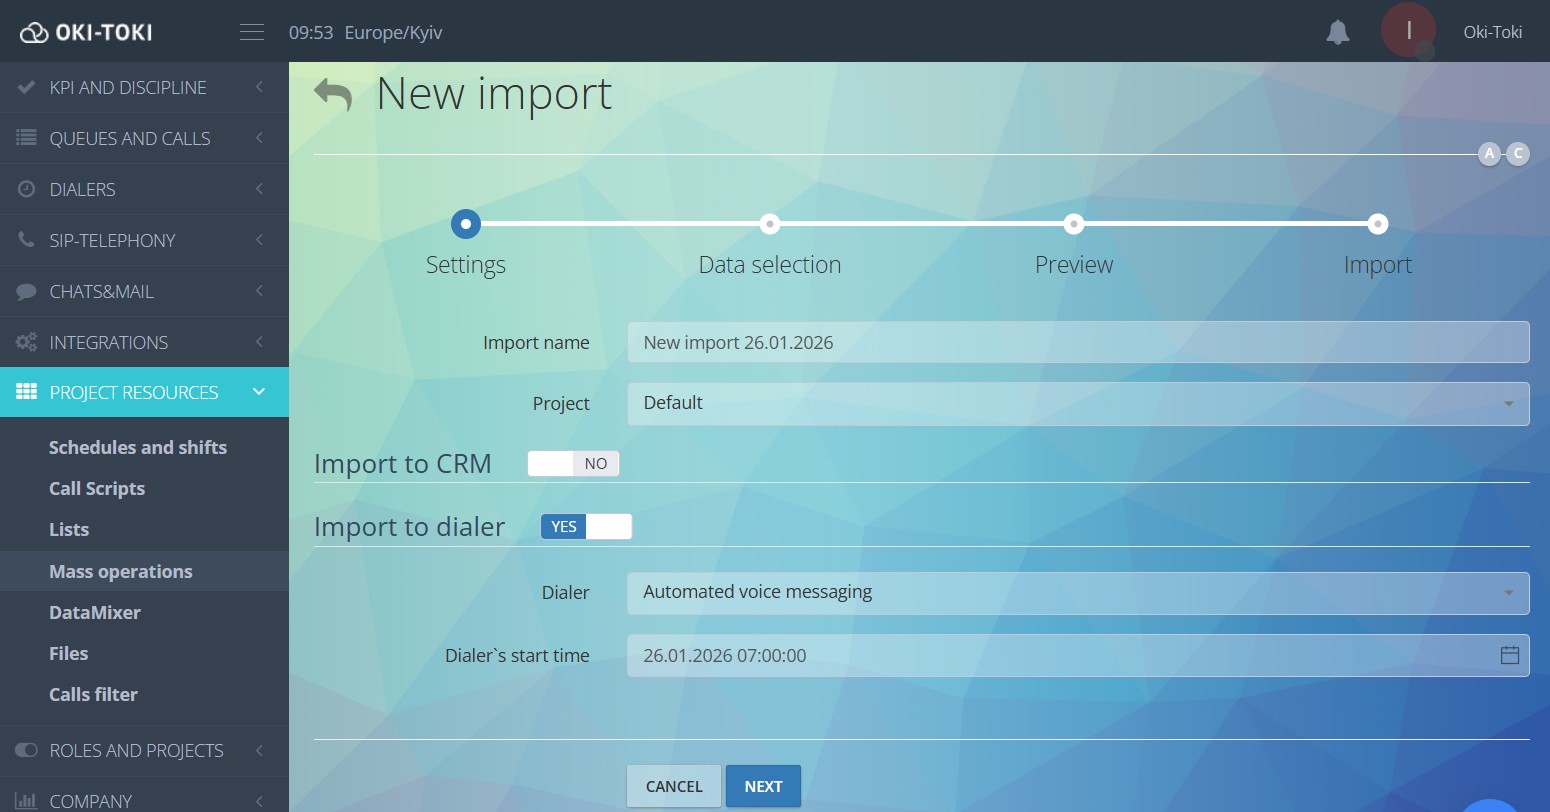
Choose “Import to dialer”, fill in the settings and click “Next”. A table window for numbers will appear. Copy the column with phone numbers from your Excel document into it. After the preview, confirm the import by saving changes at the bottom of the page.
Step-by-step instruction for importing contacts into CRM – in a separate article. It provides a detailed description of how to specify additional contact fields, for example, so the robot pronounces specific data: the client’s name, etc.
This completes the settings for the automated notification system. To view the results – go to the reports on the work of dialers.
Read more in the article “How to make a report on the work of a call center?”.
Additionally
- The number of dialing attempts and the duration of auto-confirmation are configured in the dialer.
- By default, duplicate numbers will not be uploaded to the dialer, which will prevent calling the same number multiple times.
- In the “Info” tab, you can view statistics and activity of the dialer;
- You can activate automatic disconnection of the dialer in case of telephony failure. If all calls in a row start ending with a telephony error, then the dialing will automatically stop.
If you followed all the steps, then the “Automated Notification System” will definitely work and perform its functions in the call center operation. If some problems remain unsolved or some questions unanswered — the support service will certainly help!