
What is an IVR voice menu
Calling a contact center, you’ve no doubt encountered an IVR (Interactive Voice Response) voice menu. IVR is an automated incoming call processing system that offers the client to select the necessary option using the keys on the phone or voice commands. The automatic voice menu helps to route calls to the right agent, identify the type of call, and provide a fast and accurate response to the client’s request.
Why IVR is necessary in a contact center
The IVR voice menu helps expedite call processing, reduce agent workload, and enhance customer service quality. Thanks to IVR, clients can quickly and easily obtain the information they need, leave a request, or connect to the necessary department without waiting in a queue.
The voice assistant can perform various functions depending on the company’s needs. It can provide clients with service data, route calls to the appropriate agent, take requests, confirm orders, and even conduct customer surveys.
Advantages and disadvantages of an IVR voice assistant
An IVR voice menu is a technology that can optimize contact center operations and boost customer service quality. If your company has not yet adopted this technology, it’s high time to think about its implementation. The benefits of IVR for your contact center:
- Optimization of call processing time
The IVR automatically identifies and classifies client calls, directing them to the appropriate agent. This reduces the customer’s waiting time on the line.
- Decreased workload on agents
The voice autoresponder can provide customers with answers to the most frequently asked questions, such as information about the company, its products and services, as well as descriptions of additional options and features. This helps agents to concentrate on more complex and unique customer inquiries.
- Automated call distribution
The voice menu for telephony can determine and distribute calls between agents based on their specialization and availability, which allows more effective usage of staff time.
- Enhancement of customer service quality
The automatic voice system processes customer calls rapidly and accurately, enhancing service quality while reducing complaints and dissatisfied customers.
- Multilingual communication
The IVR can be configured to work with various languages, making it a versatile tool for servicing clients in different regions.
- 24/7 request processing
The voice system can be configured to work autonomously, allowing customers to gather information and solve problems at any time convenient for them, without the participation of call center agents.
The IVR voice menu will accelerate the processing of incoming calls and minimize the number of unanswered calls, thereby, enhancing customer satisfaction and bolstering the company’s reputation.
Drawbacks of the IVR voice menu
Despite an array of advantages, the IVR system has some drawbacks that should be considered:
- Proper use: IVR can be confusing or inconvenient for customers, especially those who have no experience interacting with such systems.
- Limitations: The voice menu of the PBX can be restricted to a certain number of options, which may not cover all the clients’ needs.
- Low personalization: IVR does not allow for the consideration of individual customer needs, which could lead to a deterioration in the quality of service.
- Brand risks: If the IVR voice menu is not correctly organized, it can negatively affect the company’s image, causing customer dissatisfaction and disappointment.
In conclusion, it can be said that the IVR voice menu has many advantages that can significantly improve call center operations and enhance customer service quality. However, its drawbacks should also be considered. Overall, the IVR voice assistant can be a useful tool for optimizing call center operations, but its use should be considered with the company’s specific needs and requirements in mind.
What is IVR in Oki-Toki
The Interactive Voice Response (IVR) system from Oki-Toki is a telephony tool that allows you to:
- set up a greeting for incoming calls with the option of transferring the subscriber to an agent;
- automatically provide the customer with the necessary information;
- determine the purpose of the call and channel it to the relevant group;
- streamline the process of handling calls.
At Oki-Toki, we’ve developed flexible call scripts for both automated dialing and incoming calls. Here are a few handy examples of voice menu settings for typical tasks:
IVR for incoming calls
Setting up scripts for incoming calls with Oki-Toki involves creating a sequence of elements – ‘blocks’ that are interlinked.
For instance, the most basic conversation script consists of three blocks: ‘Start’, ‘Queue’, and ‘Agent’.
When a customer calls and is placed on hold, under such scripts, they are transferred to the first available agent. If not all incoming calls should be directed to an agent, but only those where the customer needs to speak to a live expert – we can use a voice menu, hence we add an “IVR” block to the script.
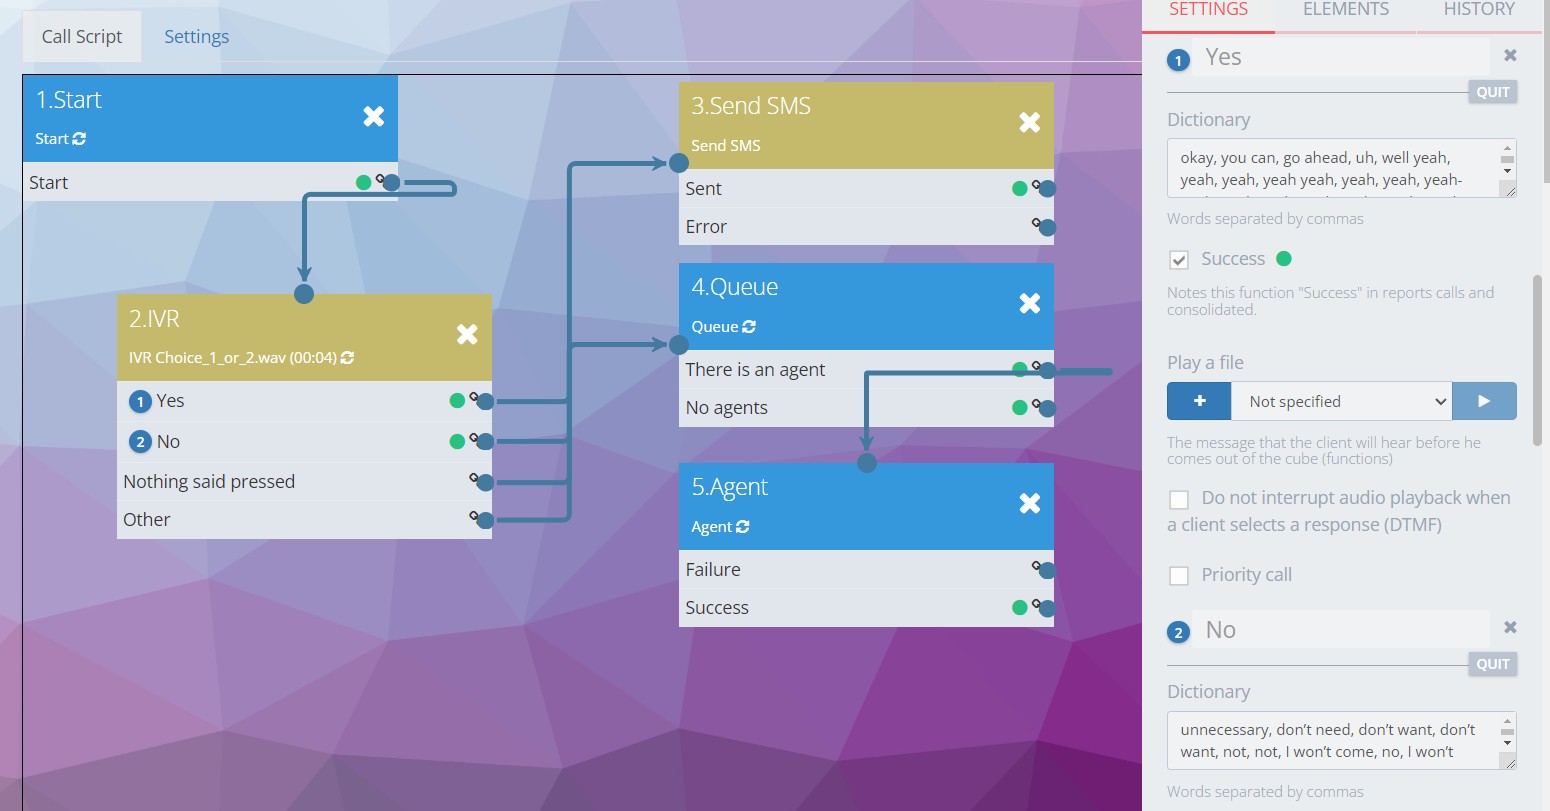
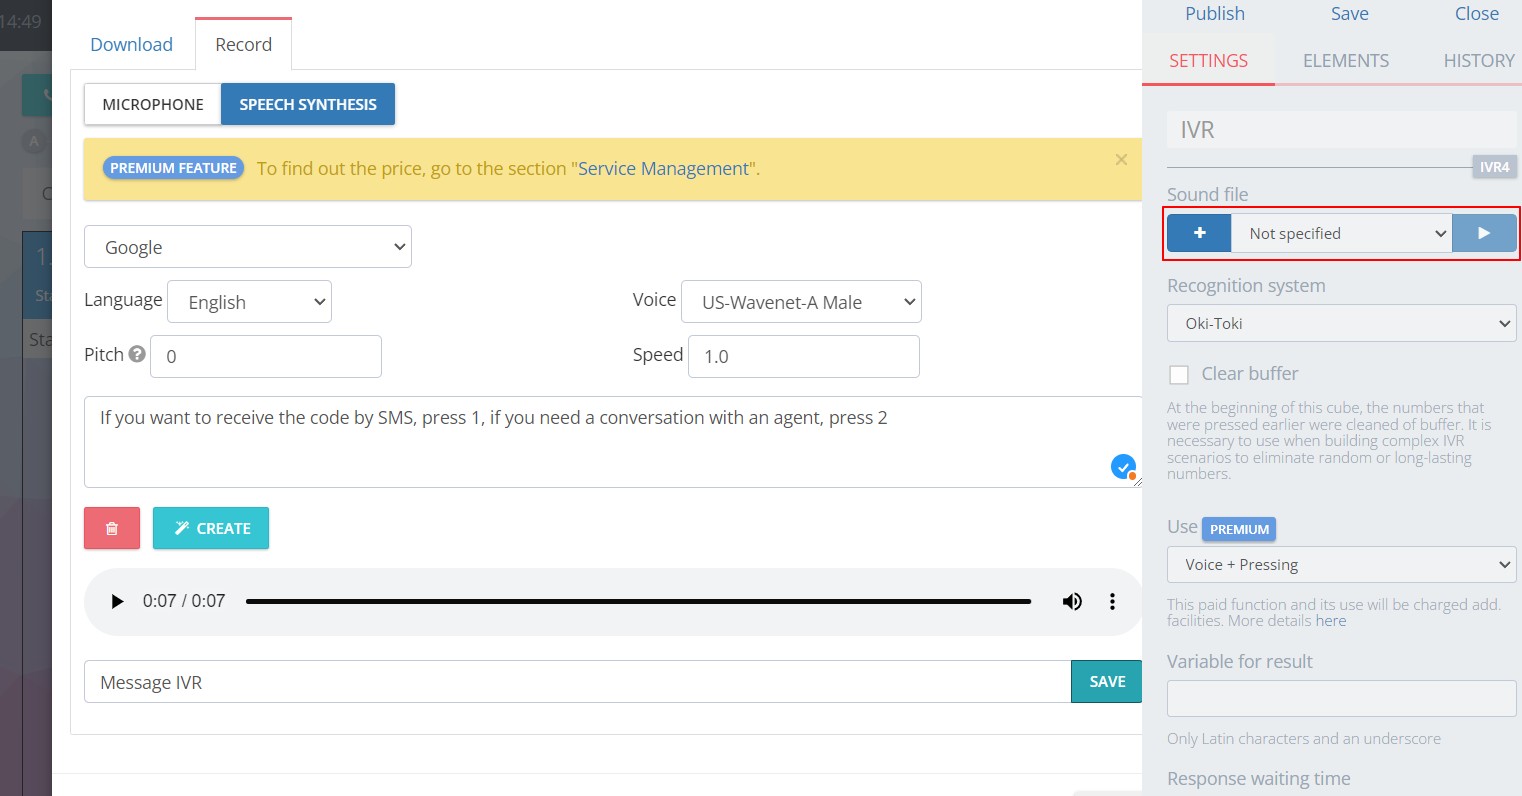
In the IVR block, you can add response options and record a message for the subscriber. The audio message can be uploaded separately, recorded through a microphone or synthesized using a robot.
You can create an audio message for each response and add it to the IVR block.
Now the customer, who called the incoming line, will hear the message and, if necessary, will be connected with an agent. This is the simplest script for using IVR.
IVR for dialer
IVR during dialer allows for automatic calls to subscribers without the participation of agents, and is most often used for transmitting non-personalized messages. An dialer call script with the “Start” and “IVR” blocks would perfectly fit into this scenario. You can also add additional blocks, like “Send SMS”, “Message”, “Forwarding”, etc., depending on the tasks of the dialer system.
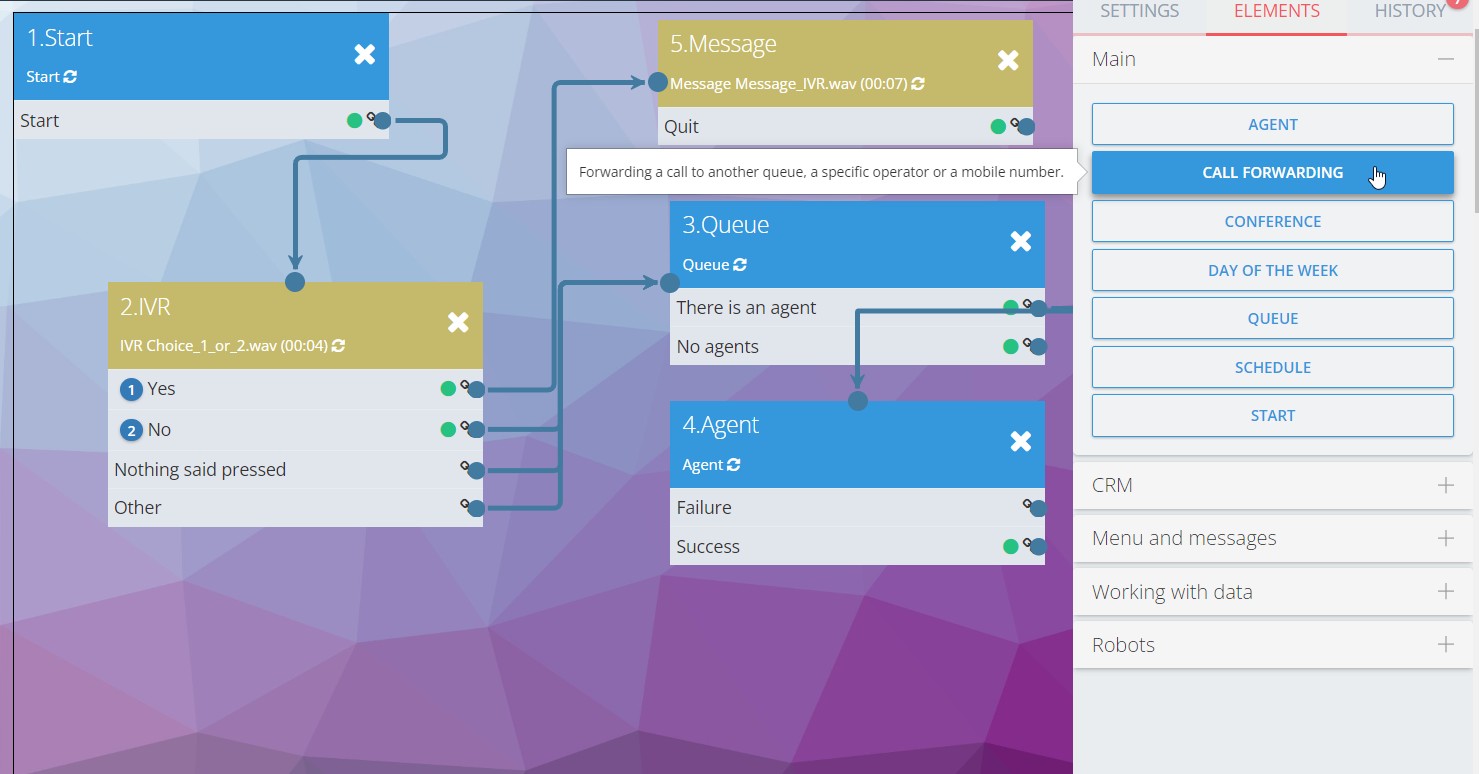
If you need the option to transfer to an agent, you can add “Queue” and “Agent” blocks to the call script settings and assign agents to dialer.
How the IVR voice menu works during dialer, you can read in a separate article on our blog.
IVR with voice recognition
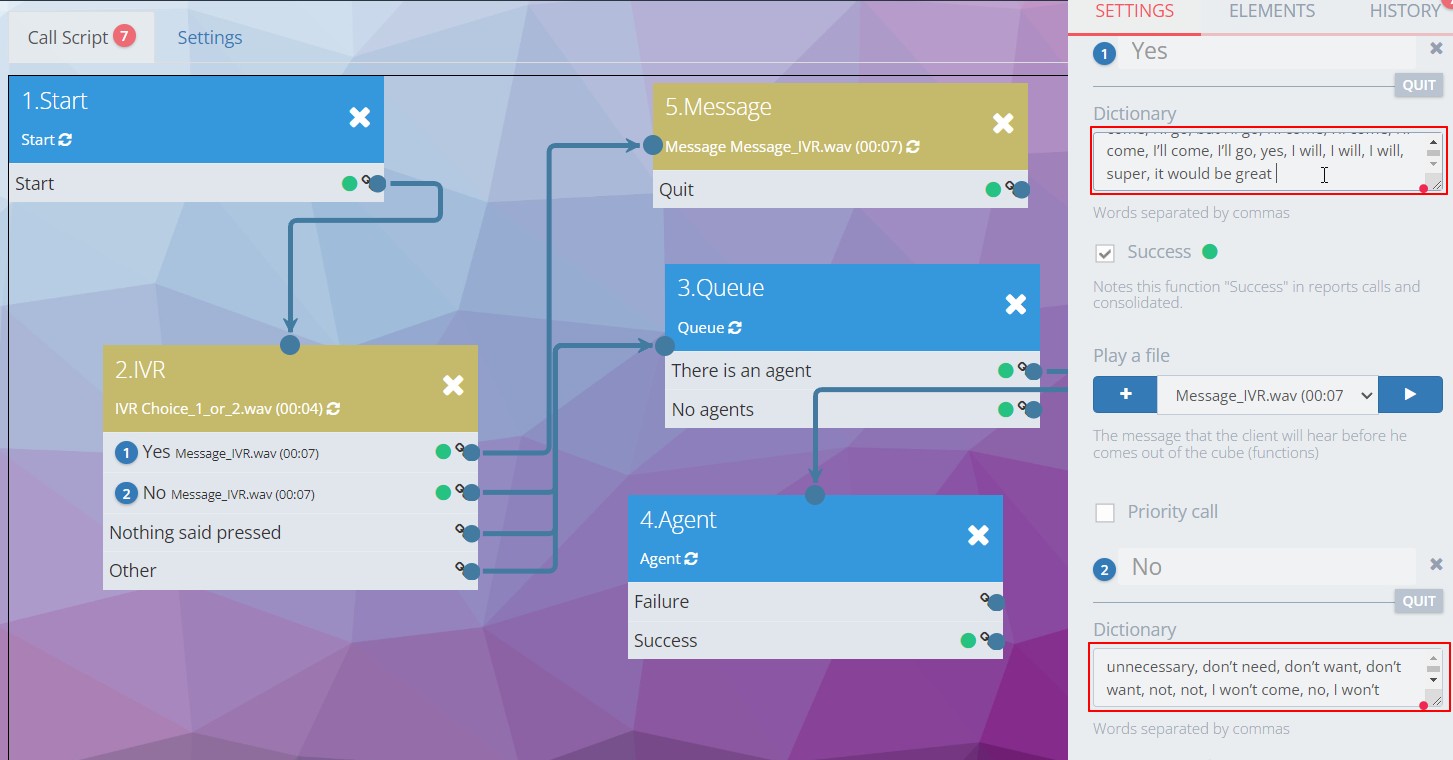
In the call script with IVR, there is voice recognition from Oki-Toki or Google. Customers do not have to press buttons after listening to the message “Press 1, if …”, but simply tell the robot their response. You can also choose in the settings to recognize both button pushes and voice responses from customers concurrently.
Include an IVR cube into the script and manage response options; complete the vocabulary and formulate customer proposition in a way that enables clear and unequivocal responses. If anything does not work as planned, the question can be repeated.
Read more about voice recognition and rates in a dedicated article on our blog.
A couple of tips that will help you improve your IVR system
- Avoid making your message or greeting too long, as customers dislike listening to prolonged IVR recordings.
- Don’t build multi-tiered menus. It’s better to break the menu down into 3-4 sections, so your customers won’t waste time on unnecessary information.
- Use minimal jargon and professional terms when recording audios.
- Use a neutral melody instead of ringing when transferring a customer to an agent’s waiting queue.
- Activate the “Do not interrupt audio playback” setting only when absolutely necessary, as customers should have the option to make a choice in advance.
- Plan the logic of your IVR scripts, taking into account both business and non-business hours. Consider the possibility of using a separate message branch for non-working hours.
- Use IVR reports to diagnose how your auto secretary is functioning and improve its performance.
For more information, how to set up a Voice Menu for a call center Read more in a separate blog post.
IVR reports in Oki-Toki
The “IVR report” is a handy tool for analyzing the operation of the voice menu. It allows you to glean data about which responses are most frequently encountered and also group data by calls, numbers, dates, and agents.
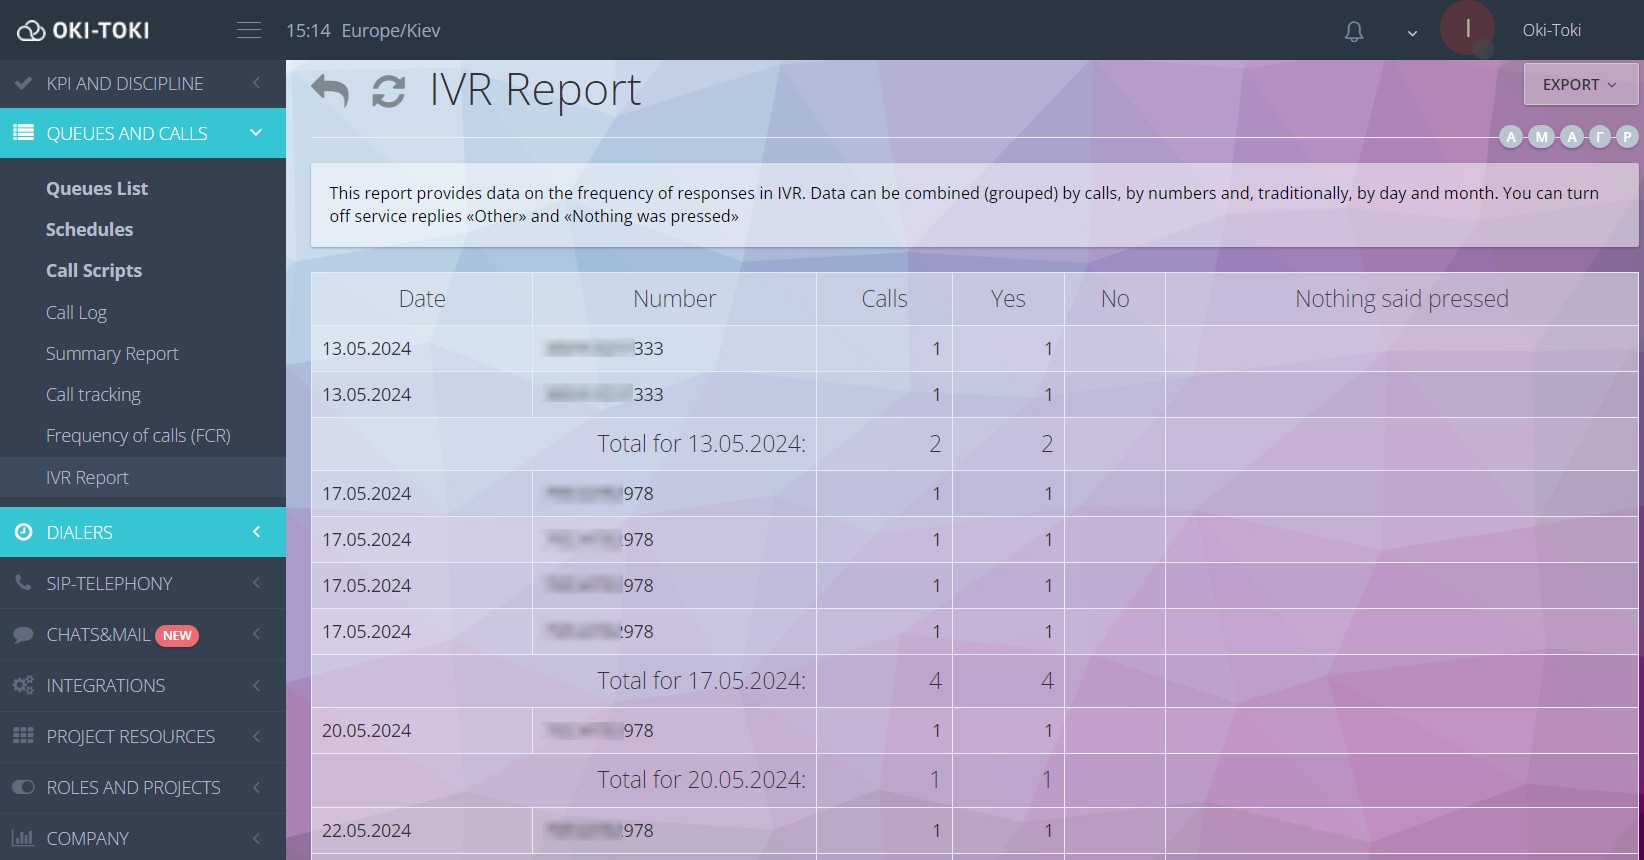
Reports can be useful in identifying problems with IVR functions and enhancing customer service quality. For instance, if a particular response is frequently encountered, this could indicate that customers are encountering difficulties in a specific area or there is a need for voice menu improvement.
The Oki-Toki service also comes with the option to disable service responses like “Other” and “Did not press anything”, providing more accurate data about response frequency. Additionally, you can add the recognized text for each block in the selected scripts when using speech recognition.
In general, IVR Report In the Oki-Toki service, it is a convenient tool for analyzing voice menu performance and enhancing customer service quality. Using the report will help optimize call center operations and boost its efficacy.
The IVR report can also be beneficial in improving internal company processes, such as analyzing the effectiveness of marketing campaigns and identifying customer behavior trends.