
In the stream of endless calls in a call center, it’s important to properly distribute clients. You can set up specific queues, groups of managers, or even assign a customer to one agent who is familiar with their history and requests. Such an approach will make the service consistent.
In Oki-Toki, all this is configured using “stickiness” and routing. We’ve described methods that will make communication with clients more flexible and personalized, and also prepared interesting cases at the end of the article.
What is stickiness?
Stickiness is assigning a specific client to a particular agent or a group of managers.
What are the benefits of stickiness?
- Personal service — the client communicates with one manager who knows his history and requests;
- Higher conversion — the agent leads the client from the first contact to the deal, not losing context;
- Motivation — the manager’s earnings directly depend on “their” clients;
- Less repetition — the client doesn’t need to explain everything over again each time;
- Responsibility control — it’s always clear who is responsible for a particular client.
Where does stickiness work in Oki-Toki?
- In the call script — when a client calls the incoming line, the system automatically connects them with the agent with whom the last successful conversation was had;
- During mass import of tasks into a dialer — the contact field specifies the agent’s email, and when launching a dialer in Callback mode, the call will go specifically to this manager;
- Named callback tasks and group stickiness — when creating tasks for callbacks and processing missed calls.
Stickiness turns one-off calls into a systematic work with a client.
How to set stickiness in Oki-Toki call script
To ensure that on subsequent calls to the incoming line, the client gets connected to the agent they have already spoken with, there is a “Stickiness” setting in the call script. Simply enable this in the settings of the “Queue” cube. After that, the system will automatically assign the client to the last agent who processed their call.
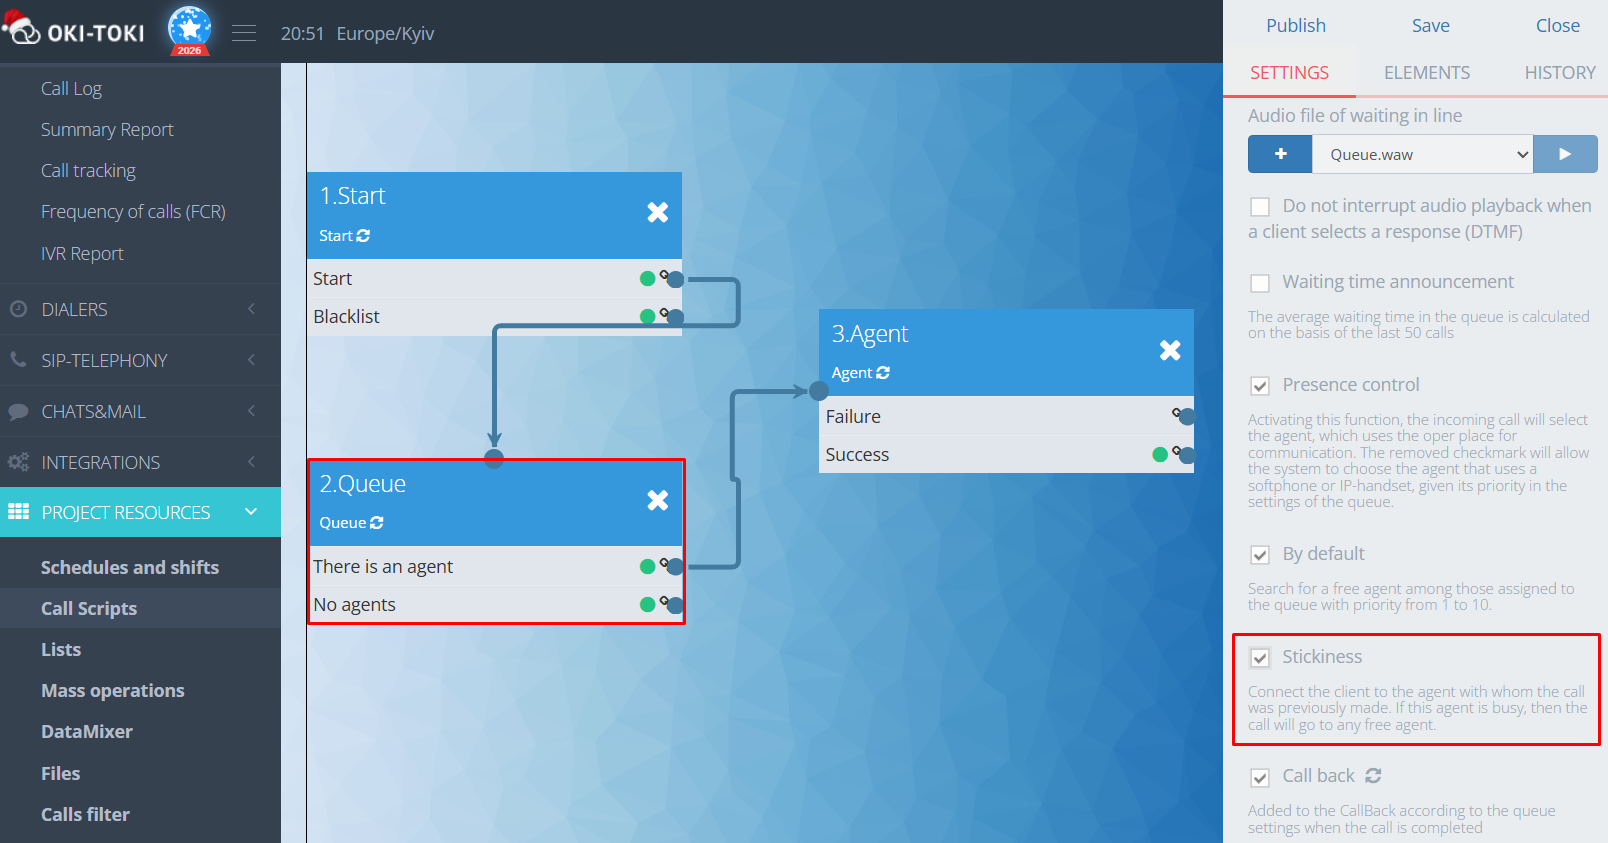
If the agent is busy at that moment, the call will be transferred to any free employee assigned to the queue.
How to assign an agent to a client when importing tasks into a dialer?
When mass importing contacts into a dialer, you can specify a responsible agent for each task. To do this:
- Prepare the import file with a column containing the responsible agent’s email;
- Select “Import into Dialer”, specify the name of the dialer and its start time (if necessary);
- On the preview page of the import, match the email column with the “Agent” field;
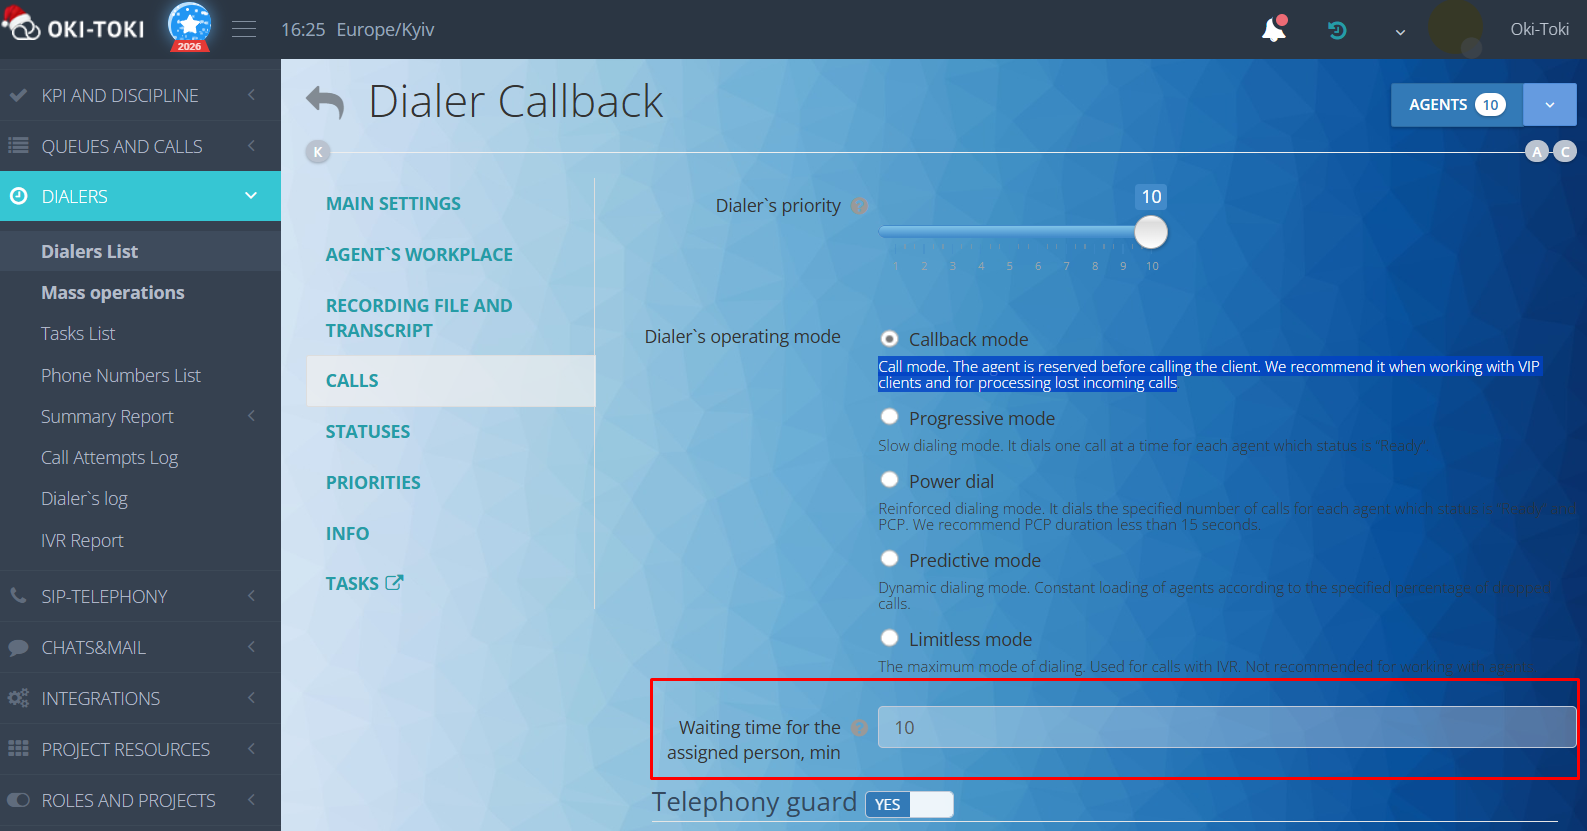
- Ensure that in the dialer settings, “Callback mode” is selected and the duration of the responsible wait is indicated.
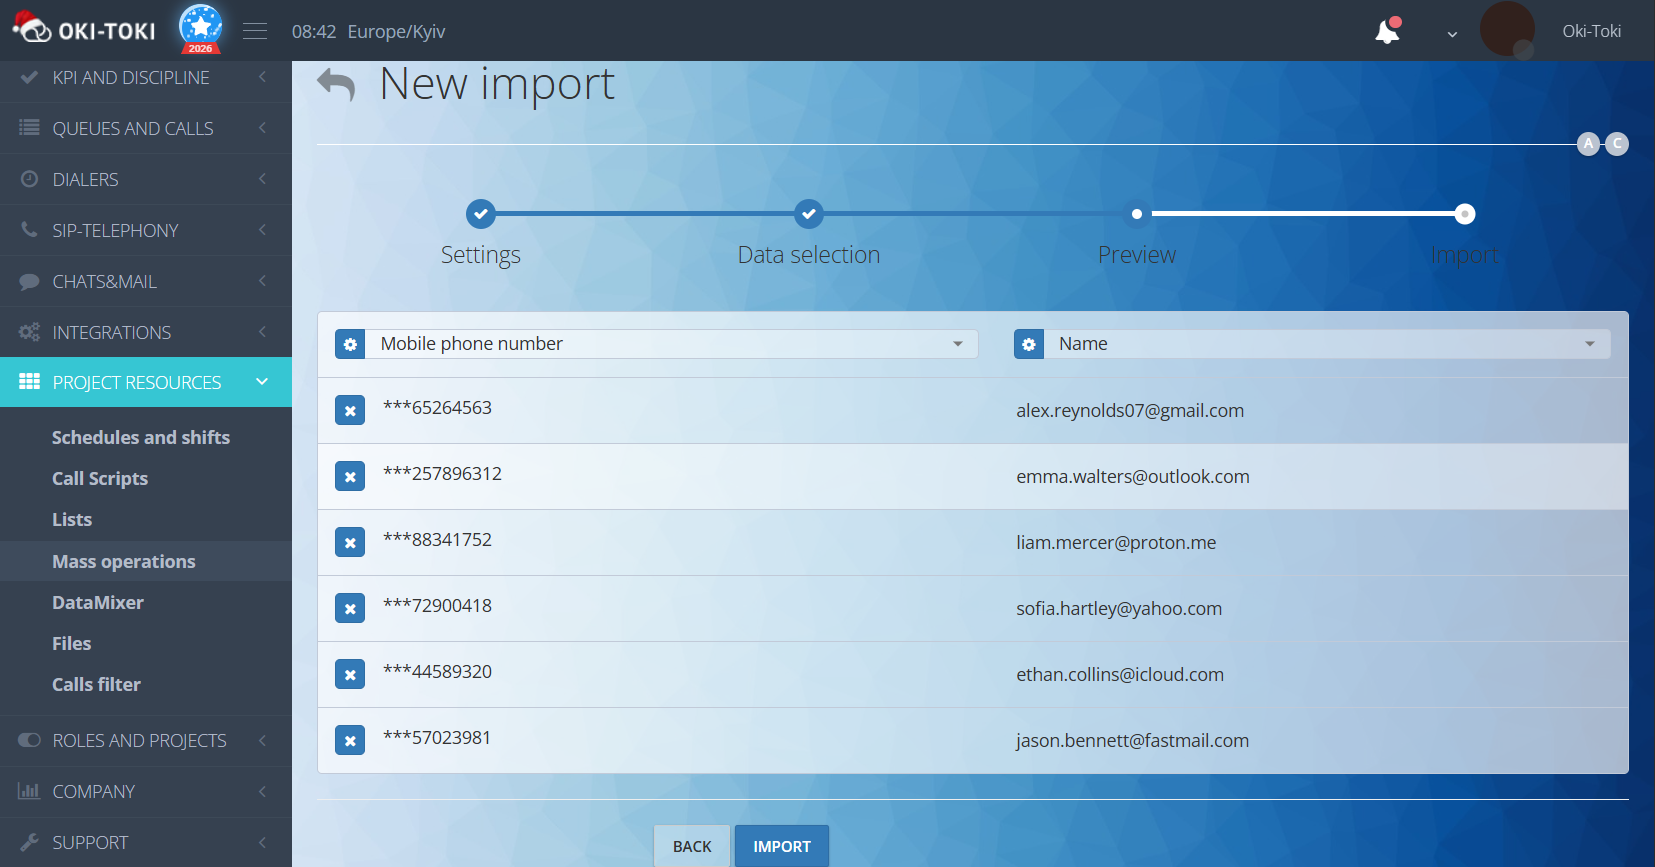
After the import, the task will “attach” to the agent whose email was specified for that client. When the waiting time ends, the task will go to any free employee assigned to the dialer.
Named callback tasks and group stickiness
A named task is a callback assigned to a specific agent. The client won’t end up with a random manager — the system will wait for the one who is handling them.
There are two ways to set it up:
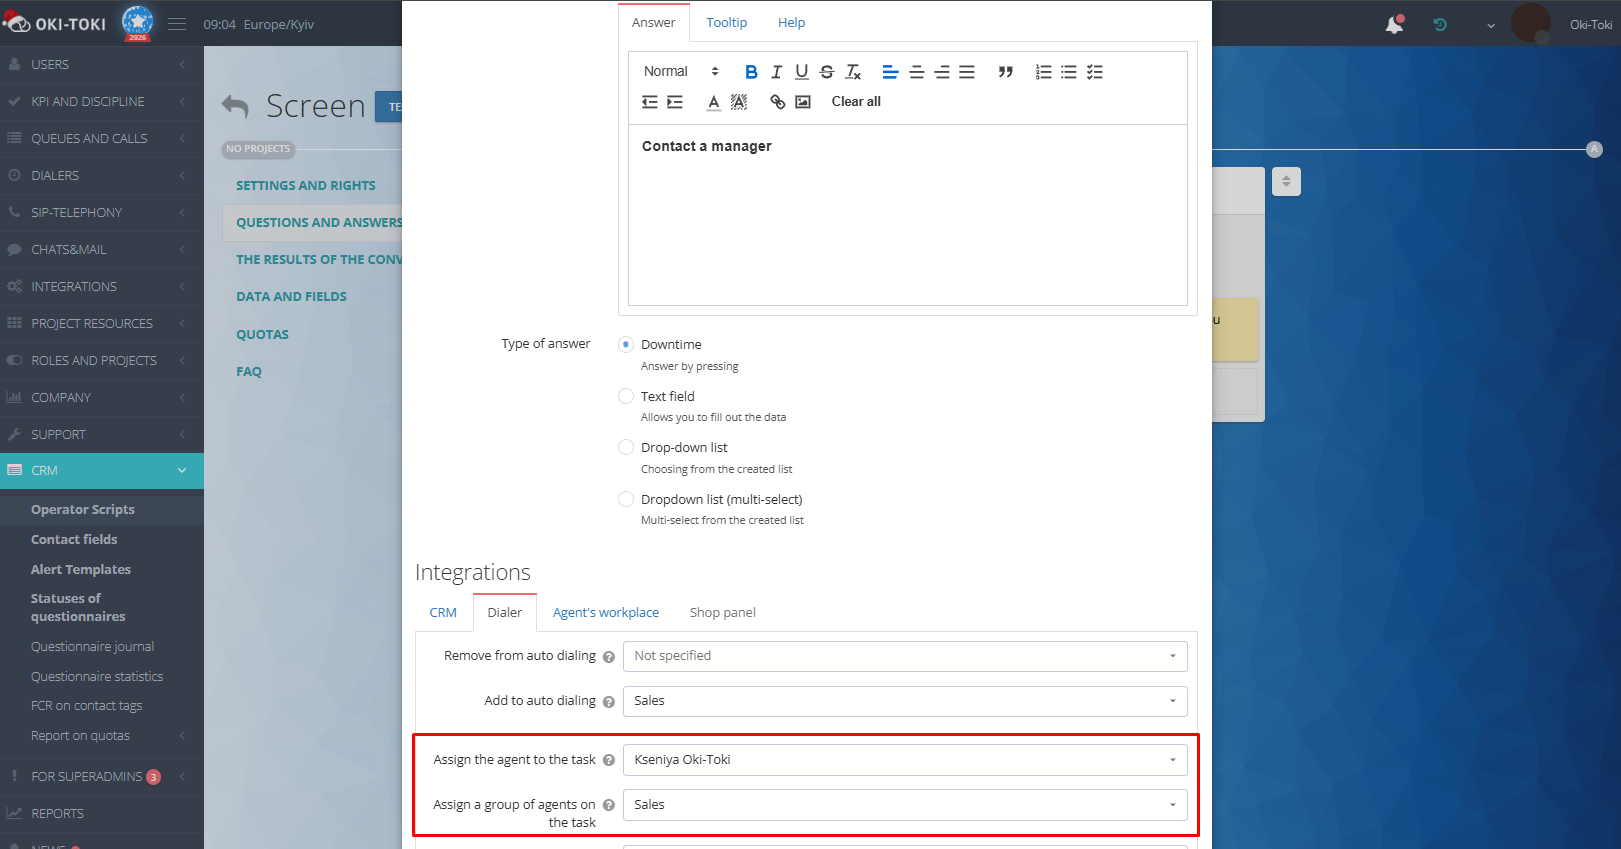
- Adding a task to the callback from the CRM form. You can assign a callback task to a specific user in “Agent Script”. In the response settings in the form, specify a particular manager.
There’s a safety net — group stickiness. The client is attached not only to the agent but also to their team. If the personnel manager is unavailable, a colleague from the same skill group will take over the client. This increases the chance of a successful deal. You can add a group of responsible agents in the response settings of the agent script.
For more information on how to set up a user group, see a separate article.
- Processing missed incoming calls. You can assign a client by activating “Stickiness” in the “Queue” settings when you set up callback. The client will be attached to the agent with whom they had the last successful conversation. After the waiting period for the responsible party expires – the call will be distributed to another employee.
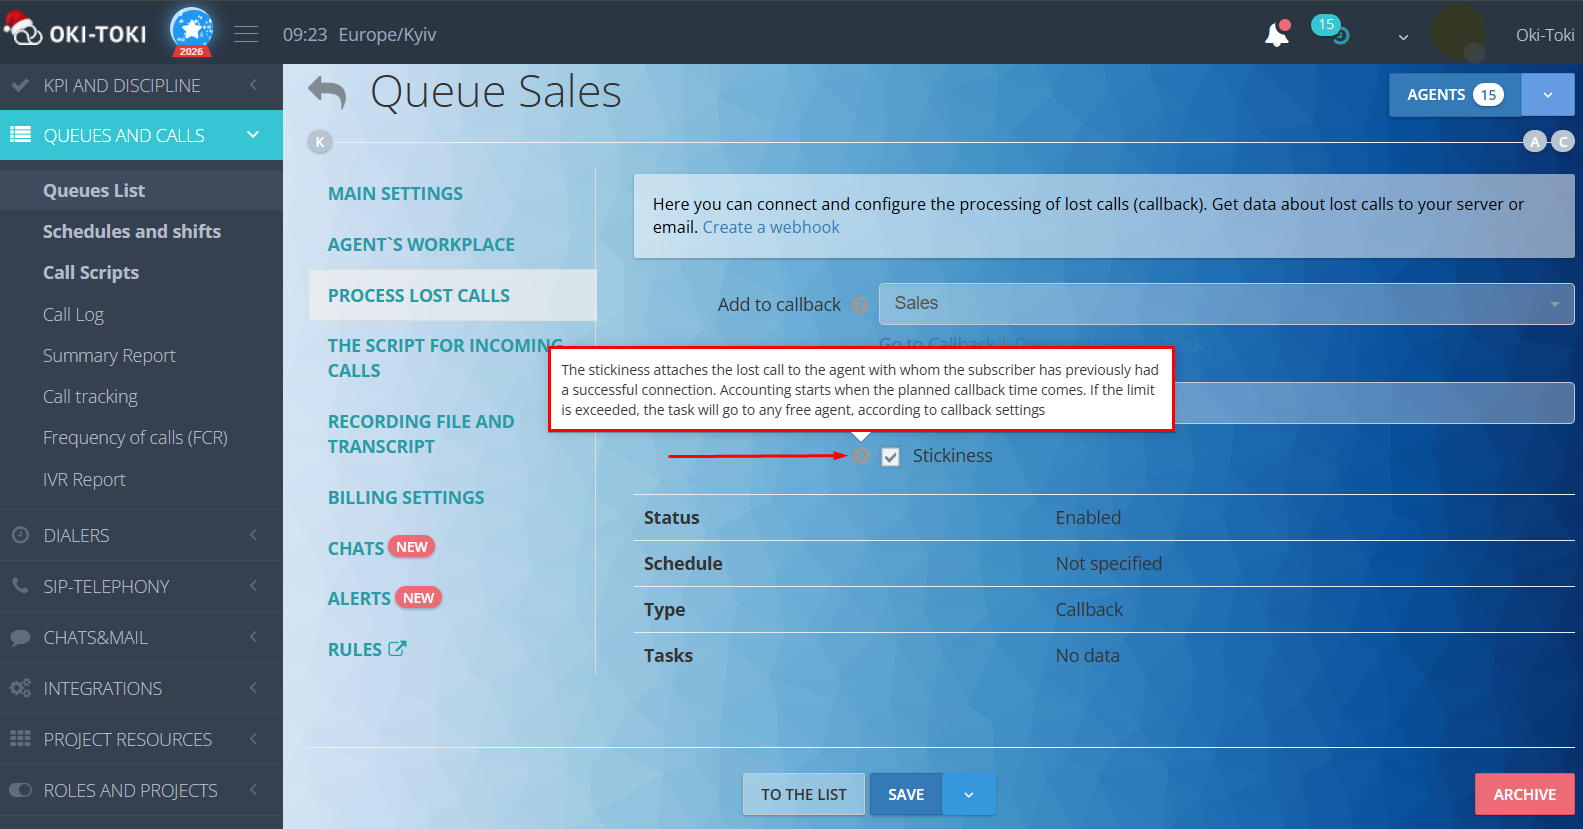
The waiting time for the responsible party is specified in the callback settings. When it’s time for a callback, a timer will start. If the responsible agent doesn’t become available within the specified time — the task will “detach” and go to the first available agent.
Named tasks and group stickiness can be combined. The client first waits for “their” agent, then moves to their group. It’s important to consider that in combined mode, the overall waiting time for a free manager is doubled.
Where to track who is responsible?
In Oki-Toki, you can see who was assigned to the client in the “Task List” and “Attempt History”.
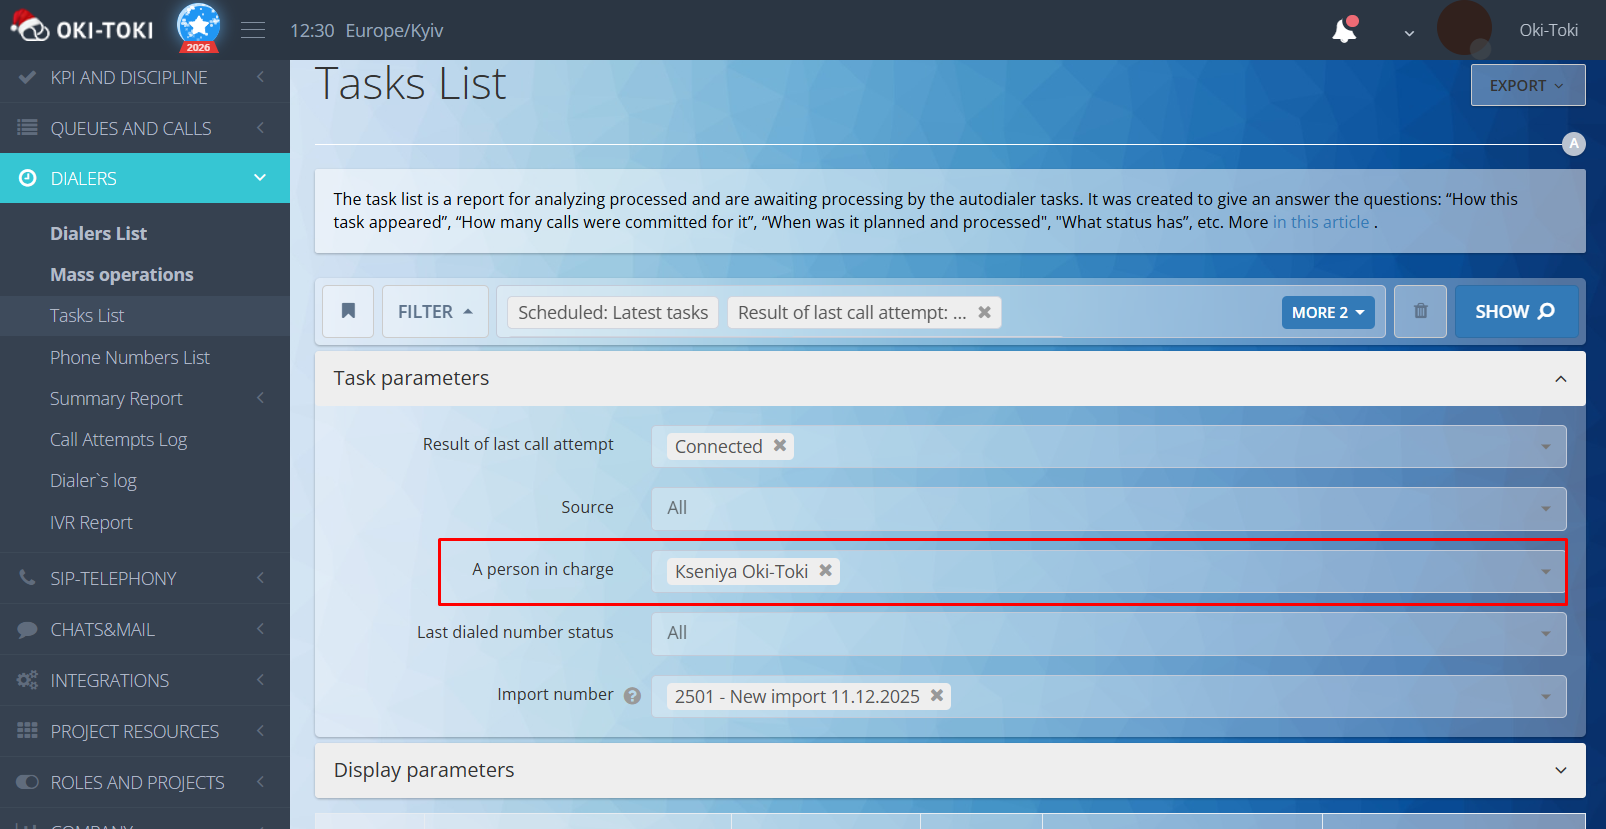
Task List — a report that shows all dialer tasks: both processed and awaiting. There’s a filter by “responsible” — you can quickly find tasks for a specific agent.
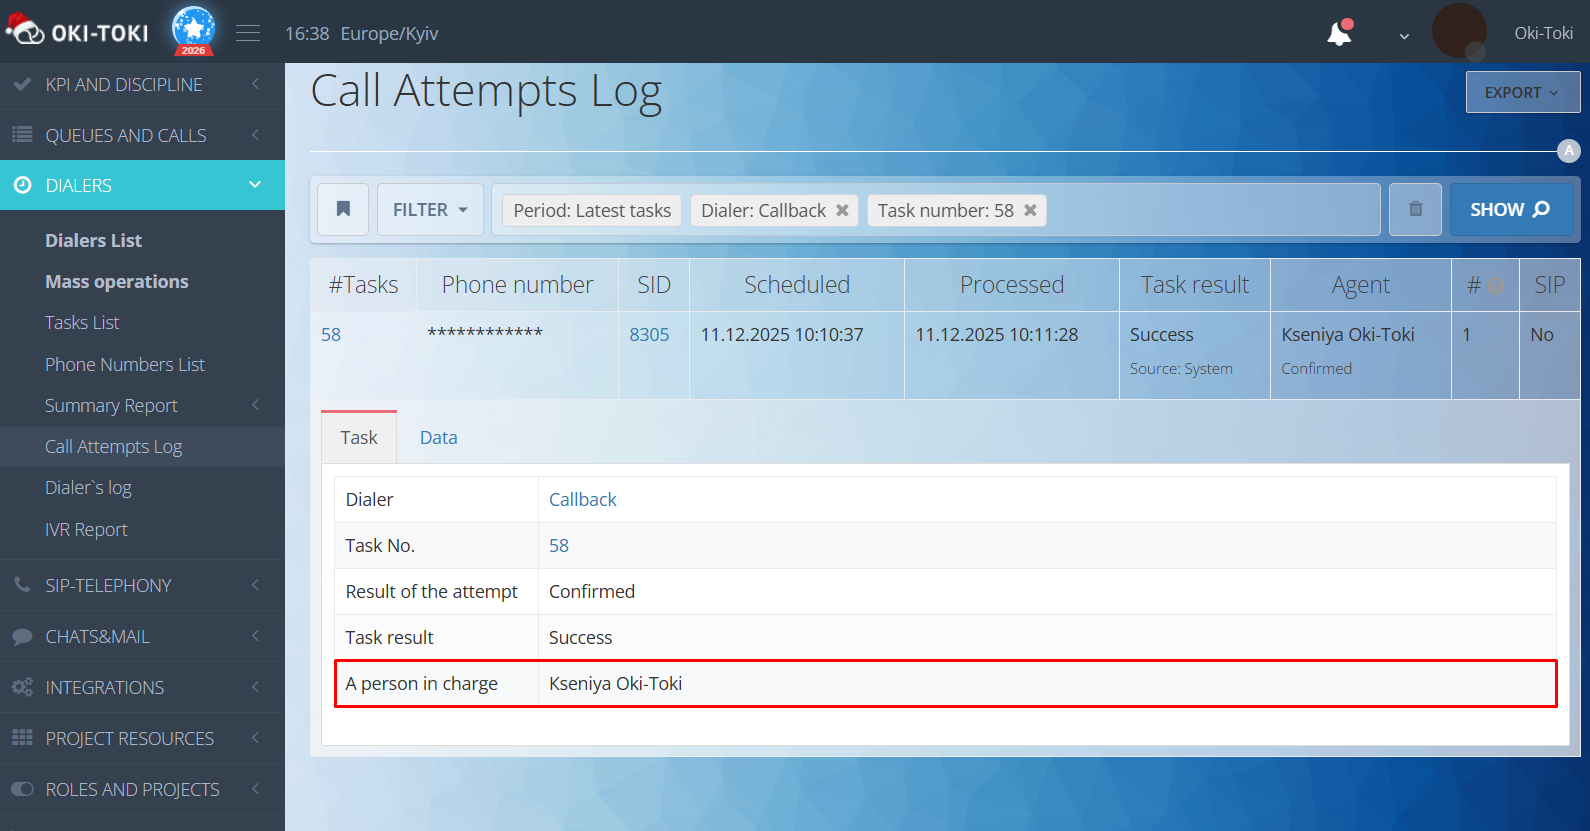
Attempt History — the task card shows who are responsible and the result of the dialing attempt.
Client Routing
We’ve dealt with stickiness, but what if you need to distribute clients who have never contacted the call center before? In such cases, routing helps.
In the Oki-Toki call script, you can set up different branches, conditions, and priorities, so the client is directed to the appropriate queue or a specific specialist. Below, we will discuss popular cases.
Case 1. Number verification
If the company works with different countries, it will be convenient to route calls to specific queues of agents. For example, based on the client’s number prefix, you can determine which country they are calling from and send the call to the department where agents consult in that language.
Advantages:
- The client speaks with an agent who knows their language;
- Minimizes transfers and the search for the right manager;
- Reduces waiting time in the queue.
In Oki-Toki, this is solved by the “Number verification” feature.
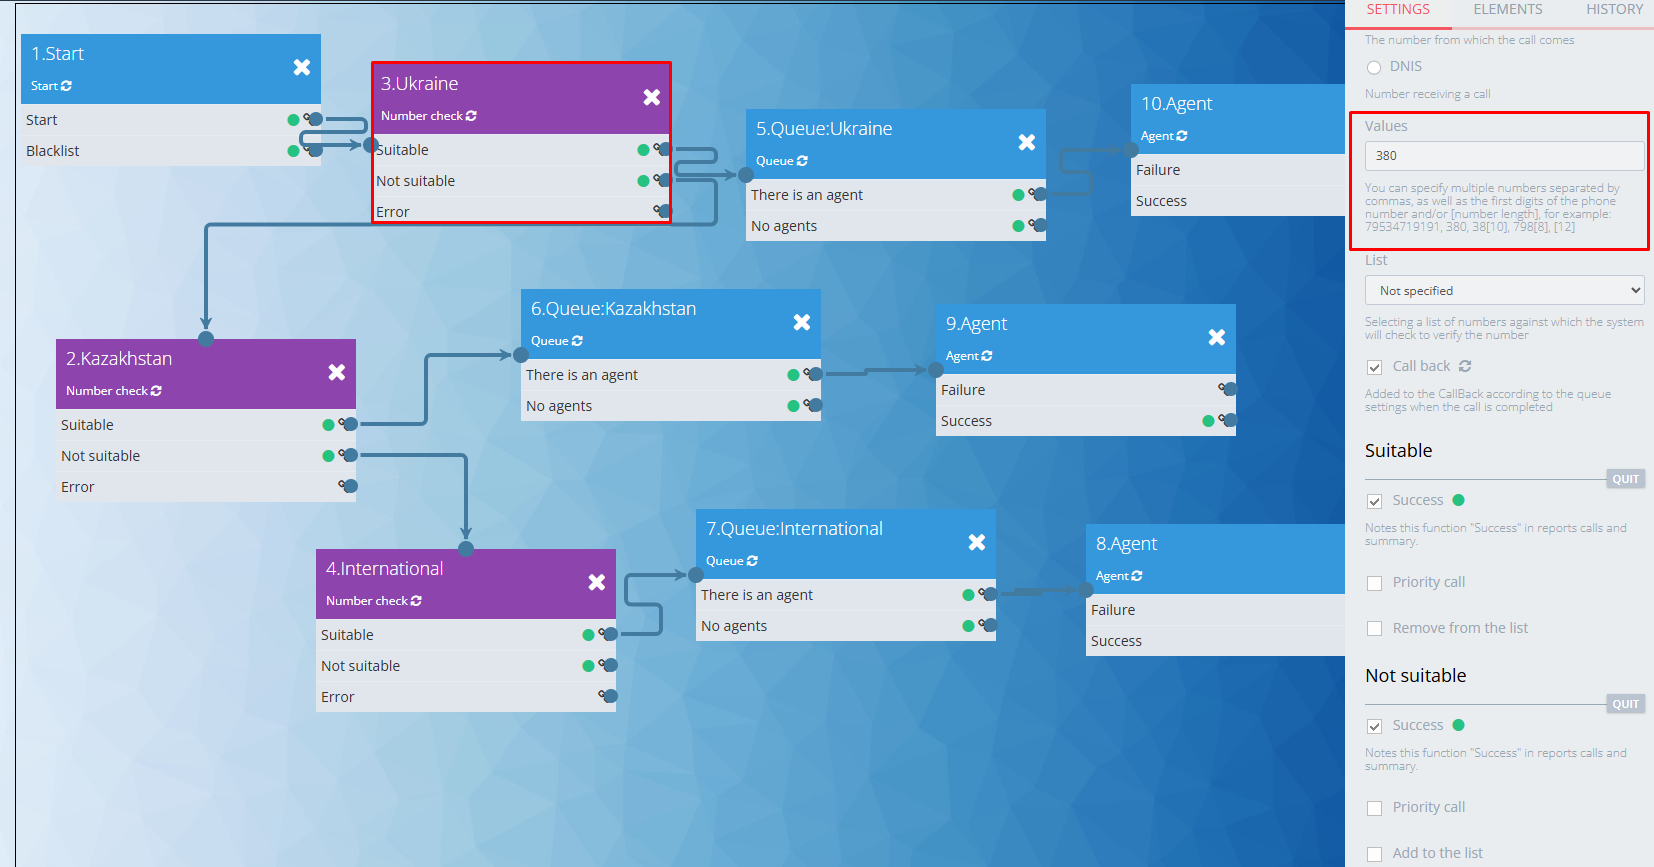
For example, numbers with prefix +3 go to the queue “Ukraine”, prefix +7 – to “Kazakhstan”, EU or other countries to the queue “International”.
For it to work – add to the call script a cube “Number verification” and set its parameters:
- Depending on the case, the “Number verification” cube can be placed after the “Start” or “Schedule” cube;
- In the cube settings, specify the required prefix;
- Choose the type of number to check: A-number — if you are checking incoming calls, B-number — for dialer calls with a script.
If the number matches the specified parameters — direct the client to the desired queue. If the number doesn’t fit, the branch moves to the next “Number verification” cube, and so on.
This way, you can set up a chain of checks to route calls to different teams depending on the country, telecom operator, or client segment.
Case 2. Call Distribution through IVR
If you add IVR to the call script – the client themselves can decide in what language they want the agent to communicate or which department they need.
How to set it up:
- Add the IVR cube with choice options, for example, language (Ukrainian, English, Spanish) or department (tech support, sales, finance);
- Choose the mode: voice recognition or DTMF-key pressing;
- Set up “Queue” and “Agent” cubes to the corresponding exit from IVR.
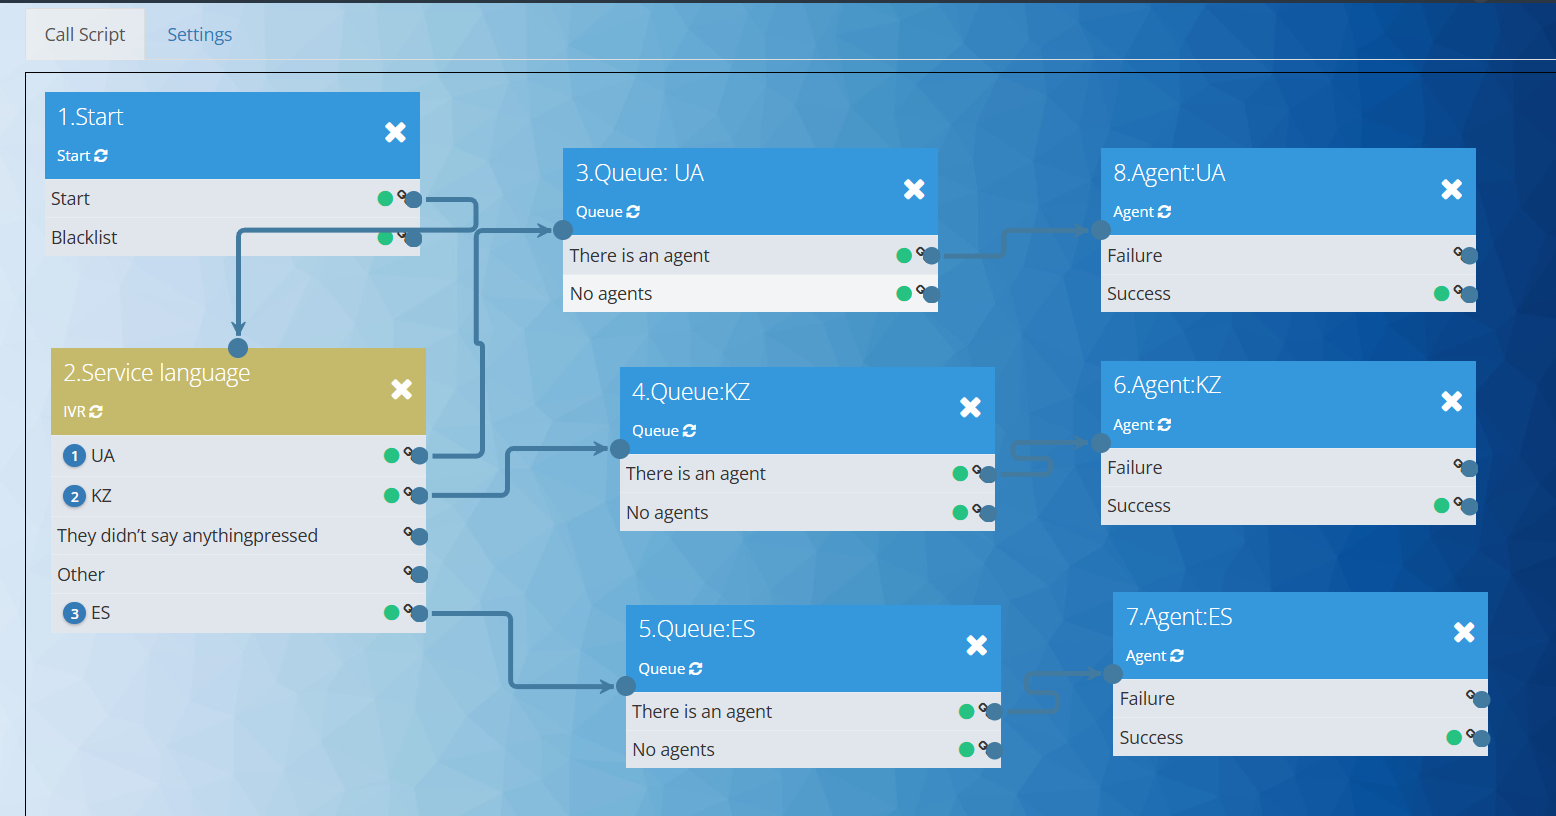
Important! Don’t forget to put an audio file for waiting in the “Queue” cube settings and specify the direction where the call will go.
This is the simplest scenario of IVR routing, which, is necessary, can be complicated by combining other cubes and conditions.
Case 3. Redirecting to a specific agent
If you need to direct a call to a specific specialist (for example, your VIP-client), specify the needed manager in the “Agent” cube of the script.
This is easily set up via client lists. Create a list with numbers and connect it to the “Number verification” cube. If the number is in the list – the call will “go” to the chosen agent. Such division allows for providing a high level ofservice for premium clients.
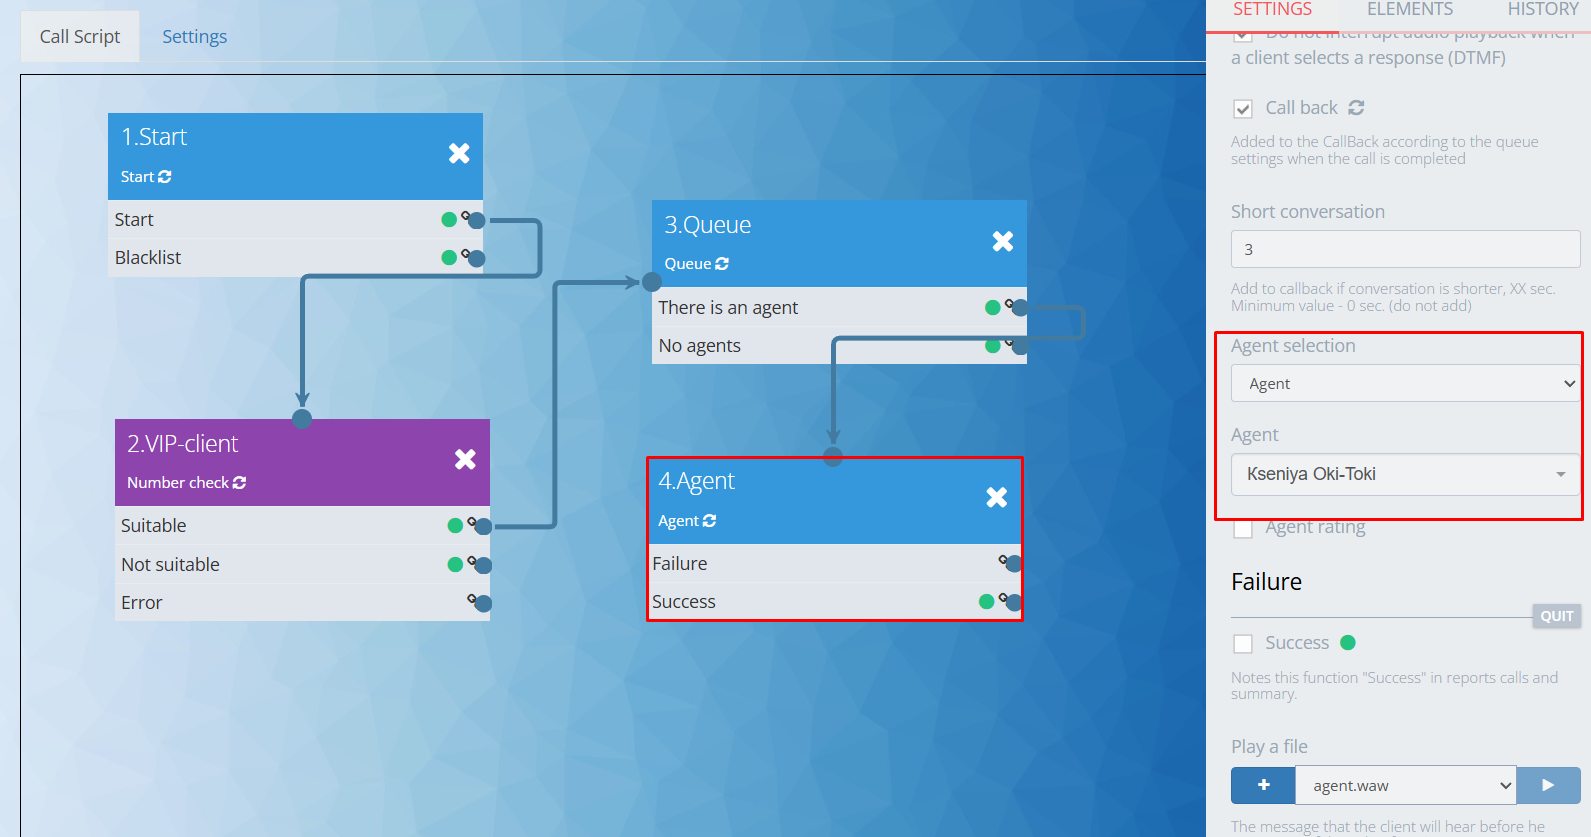
This scenario can also be applied to work with “difficult” clients. After verification, calls will only go to the most experienced and stress-resistant agents.
There can be many variations of lists; it only directly depends on the work case and imagination.
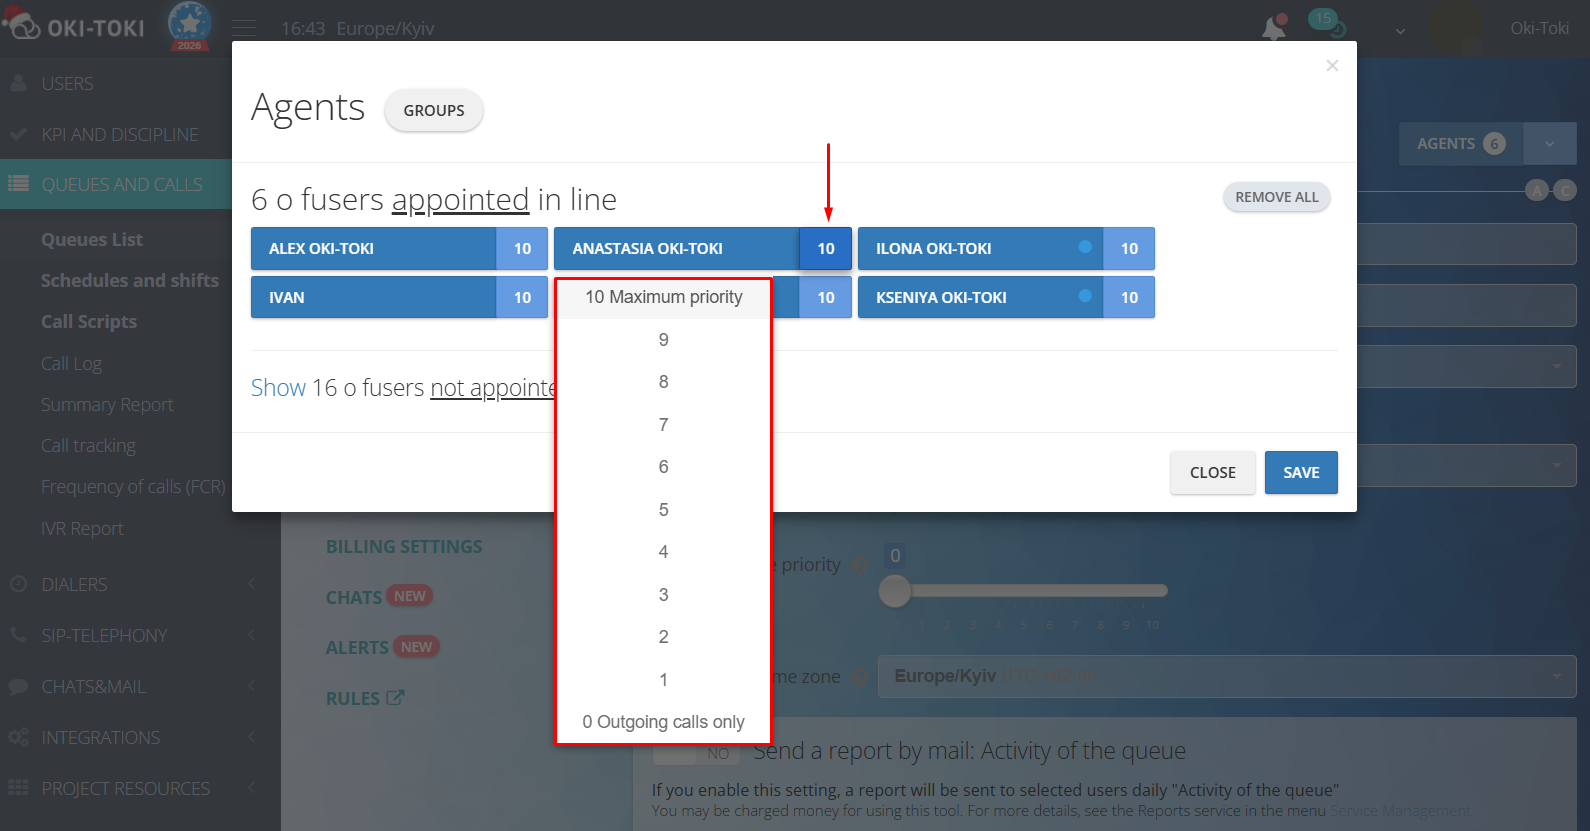
Priority of agents
Calls in Oki-Toki can be distributed using priorities. When assigning agents to a queue or a dialer, choose a priority level from 1 to 10.
Where 1 – calls come in at the lowest intensity, and 10 – at the highest. If you set it to 0, incoming calls will not be received, and the agent will only be able to make outgoing calls.
This feature will be useful in teams with different levels of training: for example, high – for experienced agents, lower – for beginners. And if agents are assigned to several dialers and queues, the right setting of priorities will help balance the workload.
In Oki-Toki, you can create unique scripts and combine approaches. By combining smart routing with priorities and stickiness, you can create a comfortable and effective call handling process. In the end, clients receive a personalized approach, and the team — a stable and clear workflow.