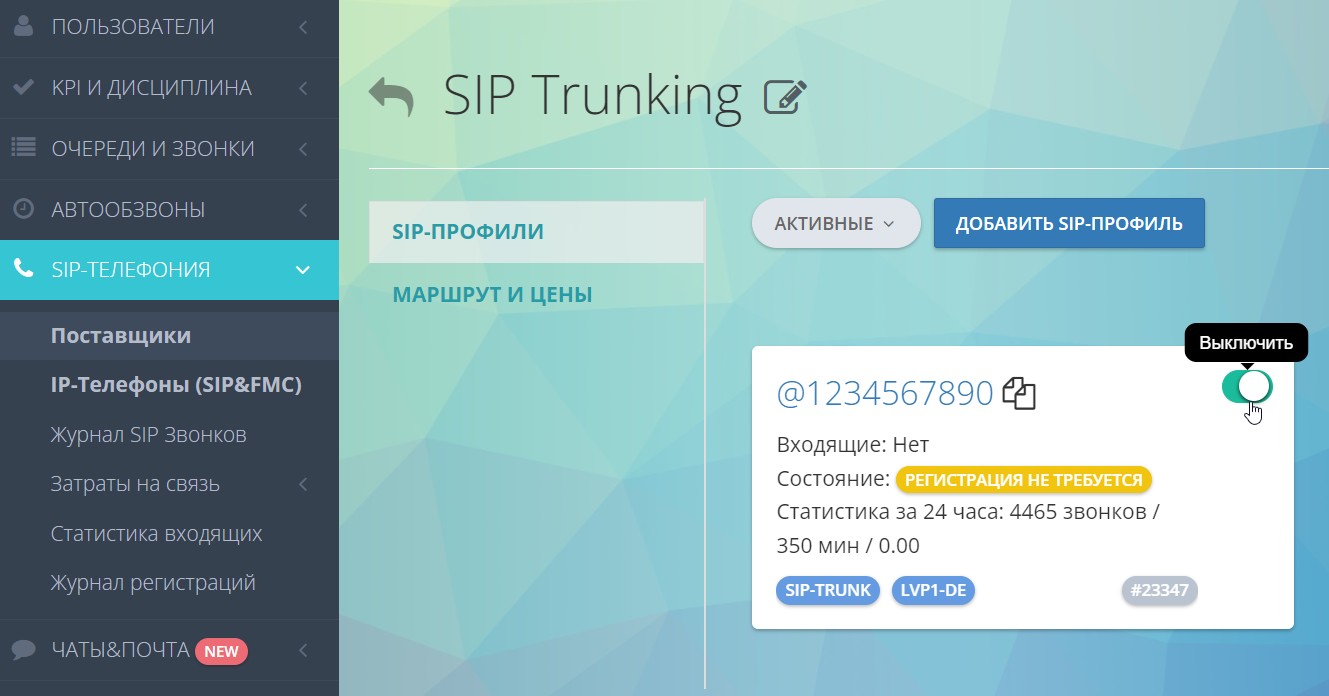
SIP-trunk, or Session Initiation Protocol Trunking, is an important aspect of modern telephone systems. It is a method of transmitting voice communication and other data via the internet. The SIP trunk allows communication between various telephone systems, both within a company and between companies. In this article, we will look at what a SIP trunk is, how it works, and how to set it up in oki-toki.
What is a SIP Trunk in telephony
The SIP trunk in telephony is a communication method that allows voice signals to be transmitted between different telephone systems via the IP protocol network. It’s like a bridge connecting different telephone systems, allowing them to communicate with each other. At the heart of the SIP trunk is a SIP server*, which controls the flow of information. Choosing a SIP-trunk connection – telephony** becomes more flexible and economical.

What is a SIP server?A SIP server is software or a server that implements the SIP (Session Initiation Protocol) for establishing, managing, and terminating communication sessions in IP networks. The SIP server performs a number of functions related to the management of communication sessions, such as setting up and breaking connections, call forwarding, etc. What is SIP telephony?SIP telephony is a technology that allows phone calls to be made over the internet using the SIP (Session Initiation Protocol). Instead of the traditional telephone network, voice communication is transmitted over the Internet, making calls more flexible and economically advantageous. SIP telephony allows the transmission of voice and other data, providing modern communication capabilities.
Key features of the SIP trunk include the use of the IP protocol for data transmission, the ability to route calls, as well as convenience and scalability. With a SIP trunk, multiple simultaneous connections can be established and various types of data transmitted.
One of the features and advantages of using the SIP trunk is the ability to integrate with other communication methods, such as traditional telephony or VoIP. You can connect a large number of lines, which is especially useful for companies with a high volume of communications.
Overall, the use of SIP trunks in telephony offers organizations efficient and improved communication. It simplifies the process of exchanging information, reduces communication costs, and improves business productivity.
Creating a SIP trunk in oki-toki
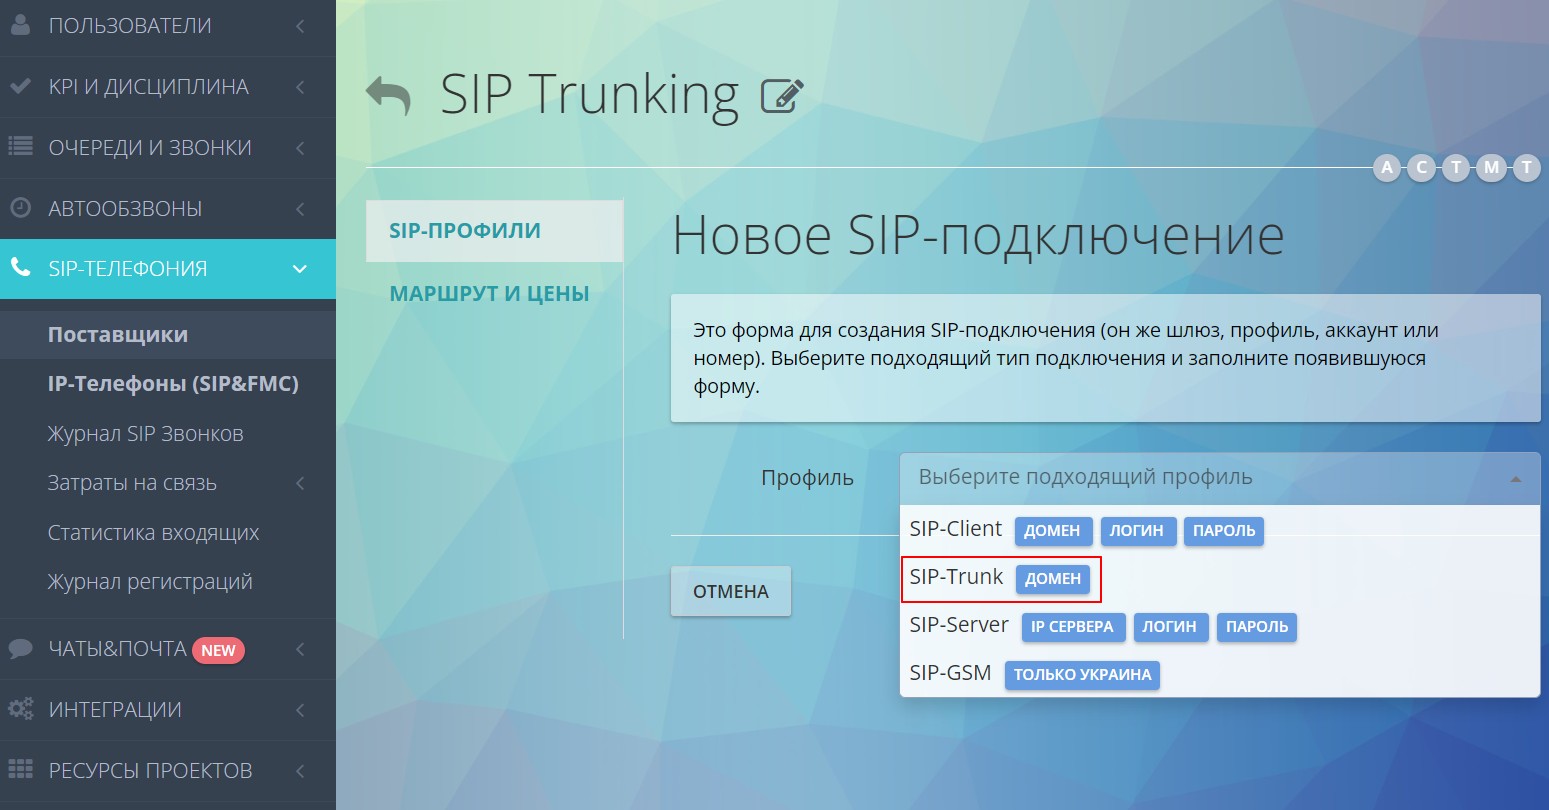
A SIP Trunk, unlike other Sip connections (SIP-Client, SIP-Server), has its own characteristics, as reflected in its name (SIP-Trunking). Many settings use registration with a username and password, which are key data for connecting to the SIP provider. In the case of a SIP trunk, there is no need for such a “key”, the SIP provider provides special access, which can be used without a key, however, by passing it individual parameters.
Let’s examine the method of connecting SIP trunk telephony in oki-toki:
- In the SIP telephony – SIP providers section create a new connection with the connection type “SIP-Trunk”. This is a simplified version of SIP connection with trusted IP addresses between oki-toki and the SIP provider.

- Specify the domain (IP) and port of the SIP provider — usually, this is enough. In special cases, SIP providers require additional parameters. Later, you can change or supplement them if required.
- Communication node (aka IP/domain from the side of oki-toki) — this address needs to be reported to the SIP provider so that it allows receiving calls from it. You can choose the suitable one from the list.

- Don’t forget to save the settings so that oki-toki can start sending calls to the SIP provider. The SIP trunk does not have a registration indication, so it is necessary to perform a test call check through oki-toki.
- To make and receive calls – in the settings of Queue and Dialer in the SIP providers and prices menu specify the desired Communication SIP provider and prefixes numbers.
About customer call service and dialer can be read in a separate article on the site.
So what is so good about SIP-Trunk in particular and SIP telephony in general?
- Reliability: The SIP trunk provides high reliability of communication, as it is based on IP technologies, which provide a stable connection and minimize the risk of failures or communication problems. SIP trunks can switch calls to backup numbers in case the main one is unavailable. These backup numbers can be tied to different locations, ensuring uninterrupted communication.
- Economy: The SIP trunk significantly reduces communication costs. Compared to traditional analog or ISDN lines, the SIP trunk does not require a physical line and additional equipment. You can use the existing IP infrastructure, which reduces costs for equipment and maintenance.
- Real-time statistics and analytics: Modern virtual PBXs collect statistical data and analytics about calls through the SIP trunk in real-time. This helps companies track and analyze their communication activity to optimize business processes.
- Centralized communication management: The SIP trunk provides centralized management of all communication flows of the company. This allows for easy setup and control of all aspects of telephony, such as call forwarding, voicemail, and other features.
- Call quality: The SIP trunk ensures high quality of your phone connections. It uses modern audio codecs and protocols for voice transmission, which ensures a clear and reliable connection when communicating with clients. SIP trunks guarantee excellent call quality, even during peak loads, provided your telephone station is not overloaded.
- Security: One of the most important advantages of using a SIP trunk connection is the security of the connection, as the connection is made with binding between two IPs. The SIP trunk offers various security mechanisms such as data encryption and authentication to ensure protection from unauthorized access or adversaries.
- Flexibility: The SIP trunk has high flexibility and customizability. You can easily adjust communication functions and parameters according to company requirements, allowing the system to adapt to the unique needs and processes of the business.
- Integration: The SIP trunk easily integrates with other communication systems and software, such as CRM, contact centers, and other business applications. This creates a unified communication environment, improving customer interaction and business process efficiency.
- Multiple incoming lines: For the SIP trunk, multiple incoming lines (multi-channel) can be configured, allowing efficient handling of simultaneously incoming calls. As a result, the company can serve more customers concurrently, improving the quality of service.
In addition to the positive qualities of the sip trunk connection – there are also downsides – the same IP binding. If your SIP provider cannot maintain communication for any reason, your main communication system will fail along with it. But usually, both the SIP provider and the PBX have backup IP addresses for prompt connection.
Tips for optimizing settings and using the SIP trunk in oki-toki
- Familiarize yourself with the basic concepts and terms to correctly set up and use the trunk.
- Make sure you have received all parameters for setting up the SIP trunk in oki-toki from the SIP provider.
- If calls are not going through – check that you have specified the correct domain, port, and server in the settings, and also that you have assigned this SIP provider to the queue and dialer.
- Check the speed and stability of your internet connection, since they can significantly affect the quality of calls and data transmission from the oki-toki server via the SIP trunk. If necessary, contact your internet SIP provider to improve speed and stability of the connection.
- The communication node plays an important role as a link. Connection within the country is more reliable than, for example, a connection between a server in Ukraine and a telephony SIP provider in Kazakhstan.
- Conduct regular monitoring, track the performance of the SIP trunk in oki-toki, analyze logs and reports to quickly identify and resolve possible problems. If necessary, contact oki-toki’s technical support for additional assistance.
If calls are rejected with SIP errors: 100, 403, 404, 500, 503, 603, 984, 998 – this may indicate issues with the SIP provider or its settings, read more about SIP responses in a separate article on the blog.Following these tips, you can optimize the settings and use of the SIP trunk in oki-toki, ensuring the stability, reliability, and efficiency of your communications.
Additional features in oki-toki
- SIP call log – a detailed report of telephone calls, displaying subscriber numbers, direction, SIP providers, and cost duration of calls. Used for reconciliations with SIP providers and control of correct call routing.
- Communication costs – summary data on communication costs per queue and dialer. Displays the SIP provider, direction, duration, cost, CTR, ASR, ACD* for each queue and dialer. An excellent tool for outsourcing cost control.
* CTR is the number of calls, ASR is the percentage of successful calls, ACD is the average duration of the conversation.
- How to connect a SIP phone to oki-toki read in a separate article on the blog.
Use call center software oki-toki, configure telephony and manage the SIP trunk with a modern new interface. Oki-toki offers a wide range of tools for call center optimization and improving customer service quality.


