
In the call center, many tasks are associated with data transfer or sending notifications to other systems. It is important for the information to quickly be forwarded to CRM, the team, or other services. If done manually, some data can easily be missed. To automate this process, Oki-Toki has events and integrations. This article will cover the working principle, settings, and useful cases for call centers.
- What are events and why are they needed?
- How does the system know when to act?
- Integrations in Oki-toki: what happens after an event?
- How to configure Webhook in Oki-Toki?
- How to set up events in Oki-Toki?
- Cases for sending notifications to Telegram
- Case for sending to Discord
- Case for sending Mail SMTP
- Monitoring the work of events and integrations
What are events and why are they needed?
An event in Oki-Toki is something that happens in the system, a new record in our database. For example: completion of a call, change of agent status, customer’s response to a question, disciplinary violation, etc.
To automate the process, there must be a sequence: event → integration. Based on preset conditions, the system reacts to a specific event, and an integration performs an action — internal or external.
How does the system know when to act?
Trigger Conditions determine in which specific case an action should be taken.
This can include:
- a certain call feature;
- the result of task completion;
- status change;
- response to a specific survey question;
- speech analytics rule trigger;
- KPI violation, etc.
Any of these conditions can act as a trigger — a rule that defines that in this situation, the event should initiate further action.
Integrations in Oki-Toki: what happens after an event?
Integration is a way to “befriend” services with each other for data exchange. There are different methods of interaction between systems, for example:
- API-requests — one platform contacts another via API when it needs data;
- Webhook — sends data when a specified event occurs;
- Predetermined integrations — are templates for connecting to services with minimal settings.
- File integration — data exchange through files, such as uploading audio to Google Drive.
Oki-toki has two types of integrations:
- Internal — operate within the Oki-Toki platform. The system can automatically add or remove tasks from dialers, manage lists, users, etc.
- External — this is Oki-Toki’s connection with external services. You can send call results, customer responses, task statuses, and other information to CRM systems, messengers, analytical services, etc.
Integrations ensure data transfer or process initiation, both within Oki-Toki and beyond.
How to configure Webhook in Oki-Toki?
Webhook — is one way of data exchange. When an event occurs, the system automatically sends an HTTP request to another system.
The receiving party must support external request acceptance — through open API or incoming Webhook.
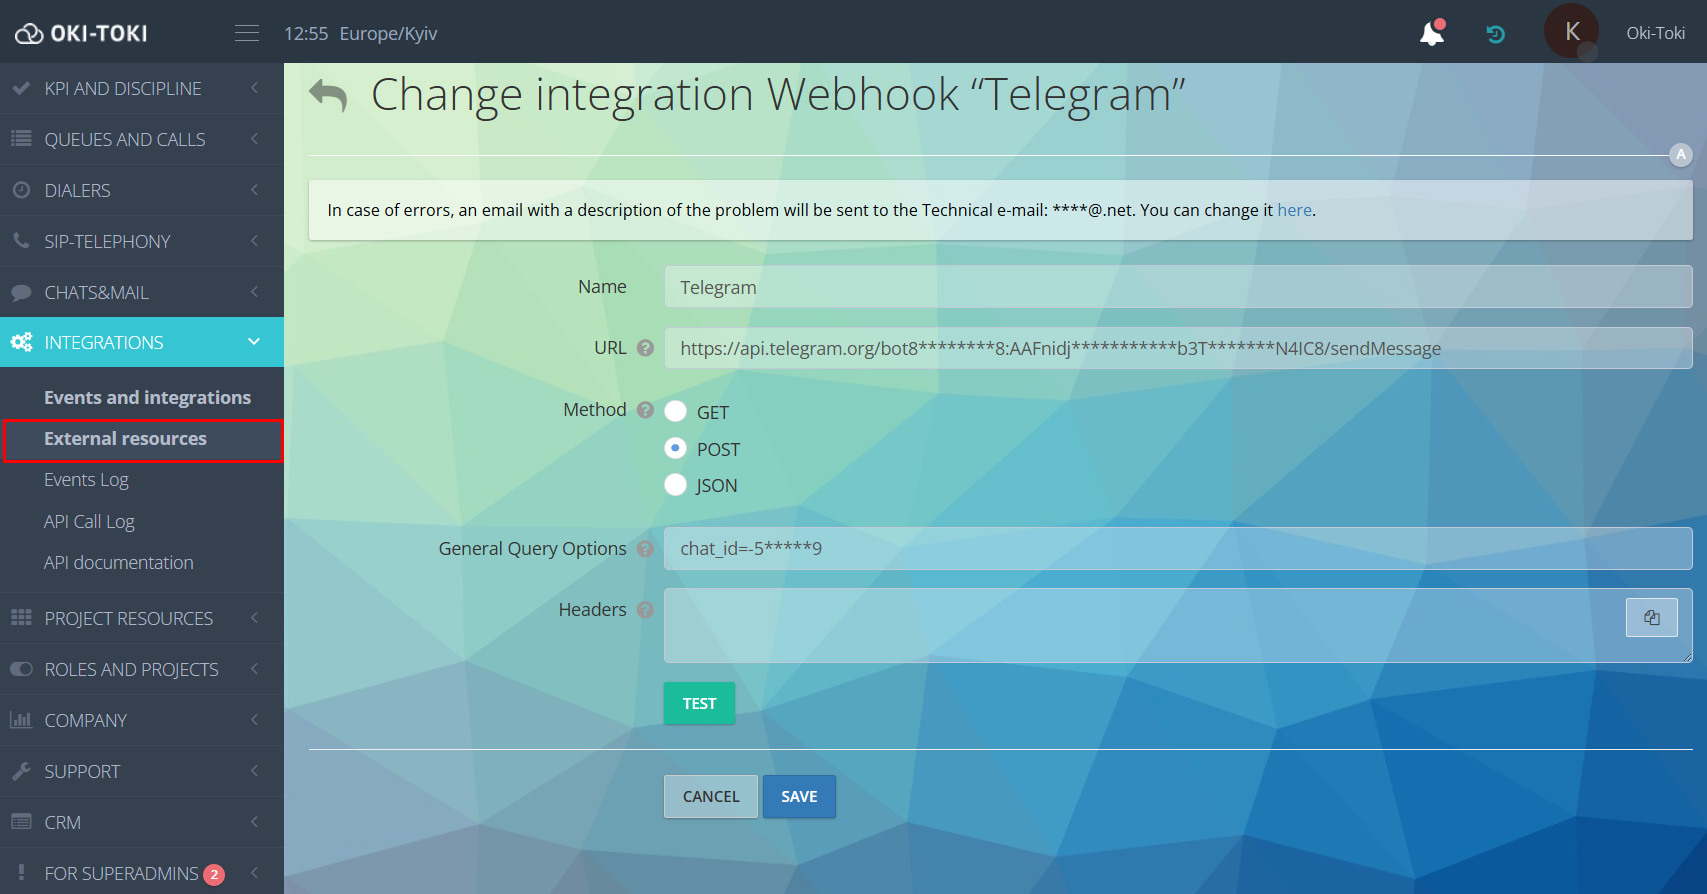
To configure in Oki-Toki, create a new integration type “Webhook” in the “External resources” section and fill in the parameters in the form:
- Name — any, by which the integration can easily be found in the list;
- URL — enter the address (endpoint) provided by the external service. Data will be sent to this address;
- Data transfer method — POST is most often used, but it depends on the requirements of the receiving party;
- General query parameters — constants, data that are the same for all events. For example, an API token, chat_id (for Telegram), or other values that should always be transmitted.
- Headers — are auxiliary data that help the other system understand who sent the request and how to process it. For example, Authorization — access token, source — where the data came from or other technical labels. If the service does not require special headers, this section can be left empty.

Click the “Test” button to check the correctness of the settings. If everything is filled out correctly and the service is available, the request will be successfully executed.
To transfer data, you only need to select the created Webhook when setting up the event (Step 3).
How to set up events in Oki-Toki?
The setup is done by creating a binding of an event to an integration in the “Events and Integrations” section. To start, press the “Create” button.
Next, we will look at the main steps.
Step 1. Naming and activating the event
In the “Name” field, specify the purpose of this event. The name should be clear and reflect the logic of operation.
The “Enabled” switch controls the activity. If it is turned on, the system will start processing events immediately after saving.
Step 2. Choosing the type of event
The “Event Type” field determines when the condition check will be triggered and what data can be used further.
Event types:
- Call function — everything that happens with the call: began, ended, reached or not, dropped, etc.;
- User status — status change at the workstation, for example, the agent “Left” for training, lunch, etc.;
- Task status — change of task status in the dialer: success, failure, cancellation, in queue;
- Disciplinary report — an agent breached KPI;
- List change— a value was added or removed;
- Auto-operator — something happened in the auto-operator script: answer or data not recognized, confirmation needed, request for a callback;
- Speech analytics — a given phrase was spoken in conversation or a condition was triggered.
- Shift violation — an agent deviated from the schedule: arrived late, left early, missed a shift.
- Quotas — a set limit was reached or exceeded.
The chosen event type affects:
- which parameters will be available in trigger conditions;
- which data can be passed to the integration;
- what actions the system will be able to perform next.
Therefore, when setting up, you should focus on what goal you are pursuing and what data you want to obtain.
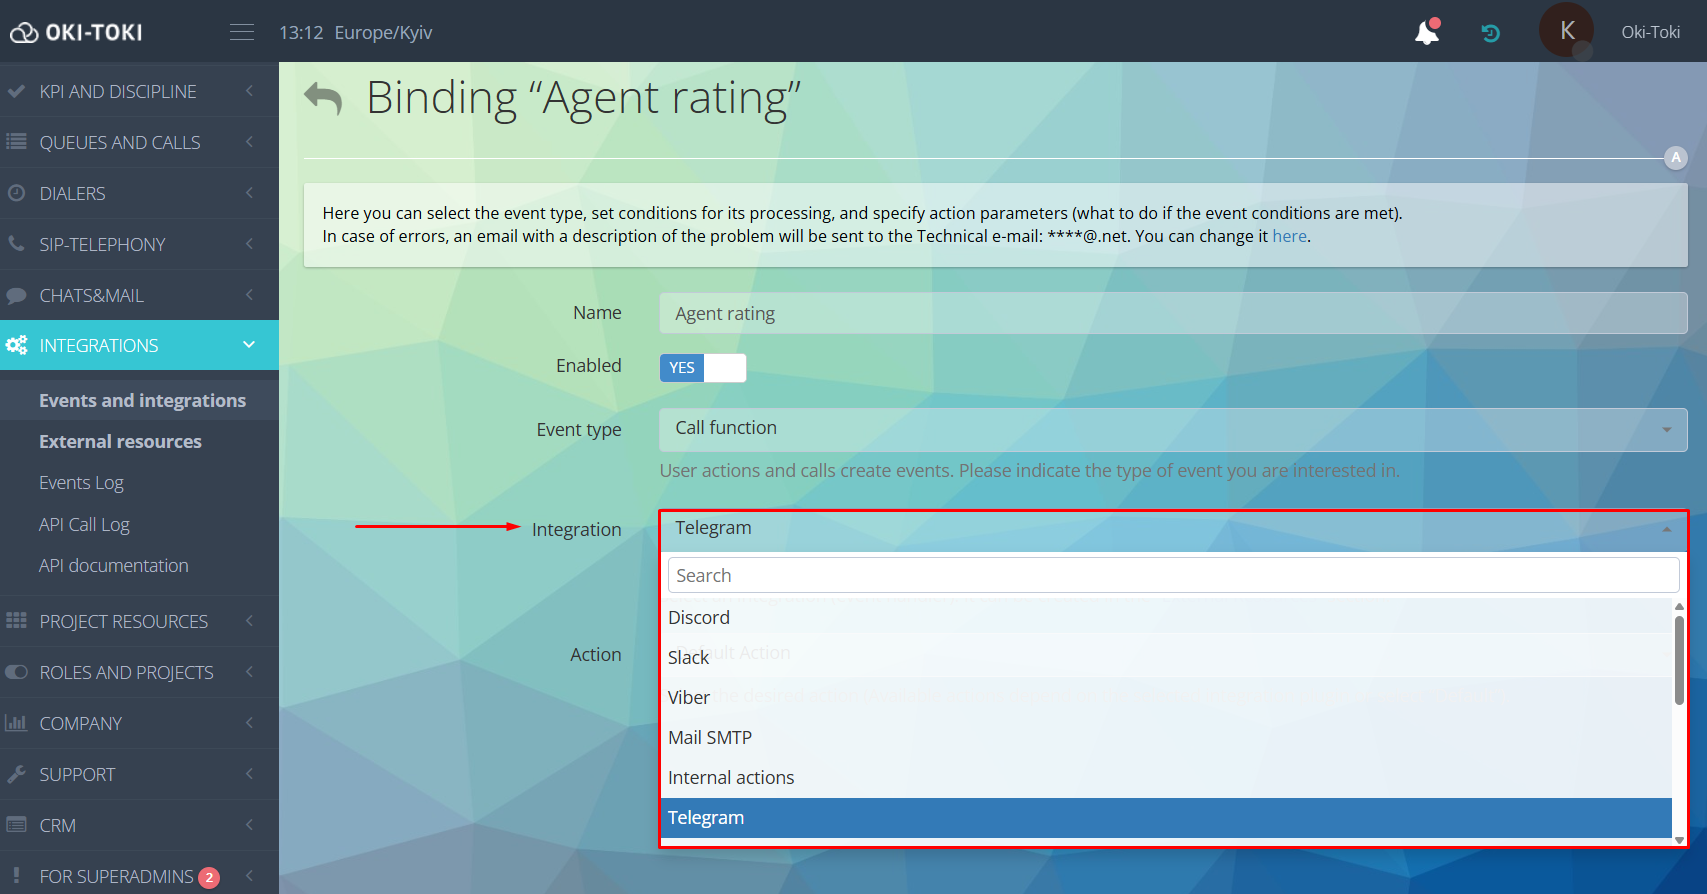
Step 3. Choosing integration (Webhook)
The integration acts as the event handler and determines where and what data will be transferred.
Depending on the task, Oki-Toki can send a notification to Telegram, Slack, or Discord, direct an email via Mail SMTP, or transfer data to Kommo CRM, etc.
You can send messages to WhatsApp and Viber, but the connection only works through the business API. This requires company registration and verification on the official business platform.
Choose a previously created integration from the dropdown list.
Step 4. Trigger conditions
Here, you can set rules for an event to trigger.
For each type of event, there is its set of parameters and values from which to form a trigger.
By default — specify parameters and values, if the conditions match — the event is triggered.
Logical conditions can be added to the parameters:
- “AND” — all conditions must be met simultaneously.
- “OR” — fulfilling one of the conditions is sufficient. For example, if you need to send a notification to Telegram with a low rating of an agent’s work, you can specify a rating of 2 or 3. The event will be triggered when choosing any of these ratings.
- “Equal” — the event will only be triggered when the value matches exactly, for example, the response in IVR equals 2 — the trigger will only work when button 2 is pressed.
- “Not equal” — the event is triggered in all cases except the specified value. For instance, the response in IVR is not equal to 2 — the trigger will work for any choice except for button 2.
For parameters related to time — Connect Time (call duration), Alert Duration (waiting time), and also Attempts Count (number of attempts) — not only “equal/not equal” values are available, but also “more/less”. This gives the ability to set the needed range.
Most parameters are straightforward — choose the type, queue, dialer, call script, or user. However,some have special attention points:
- Function — the call function. Choosing a function is necessary to specify during which part of the call the integration should trigger. For example, you can select script blocks like Start, Queue, Schedule, Connection with an agent, or functions like Hold, Transfer, etc.
- Function State (Function State) — each function goes through four states “Start”, “Connect”, “Stop”, “Finish”. Choosing a value determines the moment of event triggering. Most often used are “Connect” (the moment of connection) or “Finish” (complete end of the function), as these stages already have the main call data available. “Start” — fits for events where you need data at the moment a new function begins, for example — creating a conference, putting a client on hold, transferring to another agent.
Thus, first, select the call function (Function), and then — the moment within it (Function State). If you don’t specify the Function State, instead of one notification, you will receive four.
- Success Flag (Indicator of success) — each function in Oki-Toki ends either successfully or with a failure. The choice of value directly depends on what interests you — correctly completed actions or, conversely, problematic cases.
When conditions are met — the integration is triggered. If not — no action occurs.
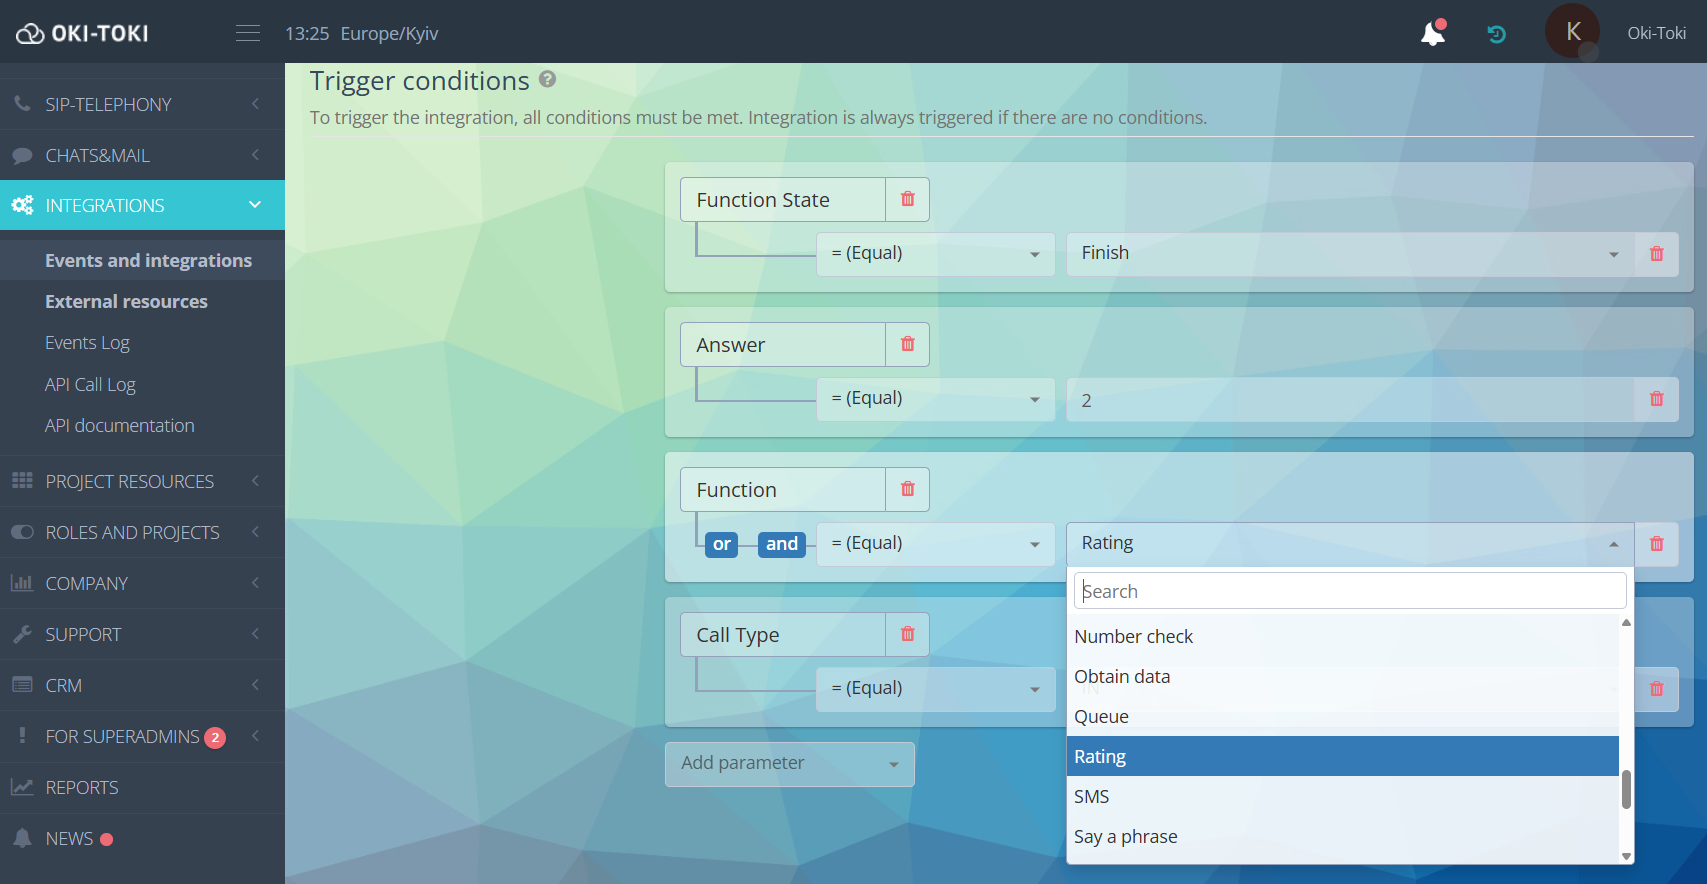
Important! If no conditions are specified, the integration will trigger with each selected event.
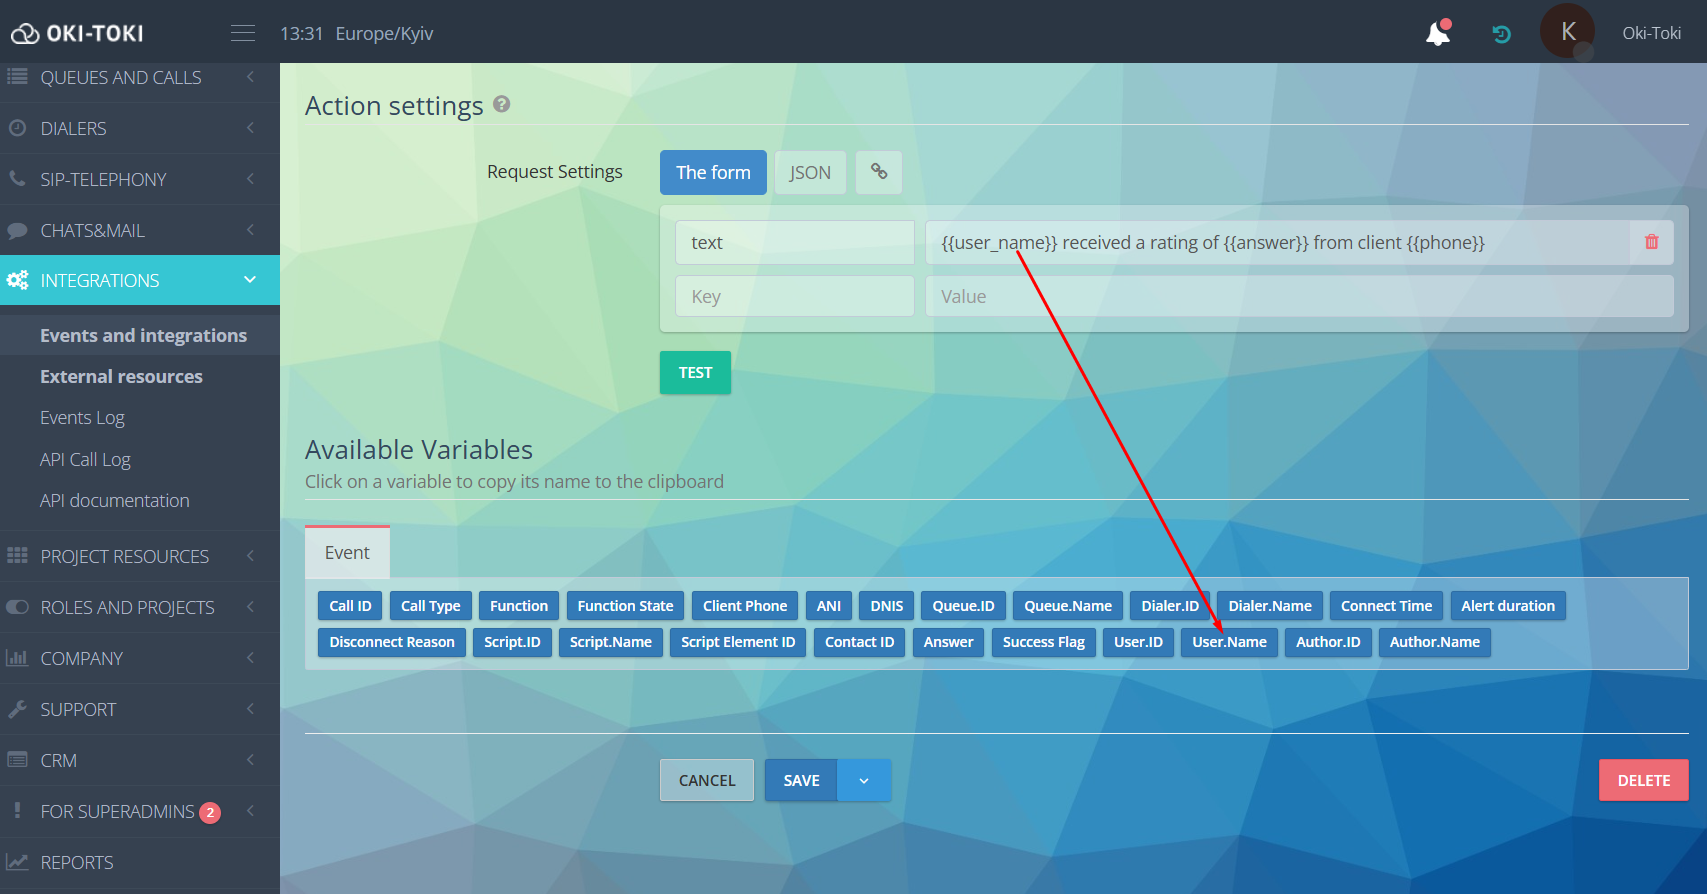
Step 5. Setting action parameters
In the “Action Parameters” block, indicate values from the event that need to be forwarded or used in the integration’s work.
The list of parameters depends on the selected type of event and integration.
For notifying in Telegram and Discord
Parameters are set in the form (key and value) or in the JSON editor.
For example:
- for the form: key — text, value: {{user_name}} received a rating of {{answer}} from the client {{phone}};
- JSON: {“text”:“{{user_name}} received a rating of {{answer}} from the client {{phone}}”};
In Telegram, the message would be: Kseniya Oki-Toki received a rating of 4 from the client *********333.
If a similar message needs to be sent to Discord, use the key — “content”. The format of the value remains the same — arbitrary text and variables.
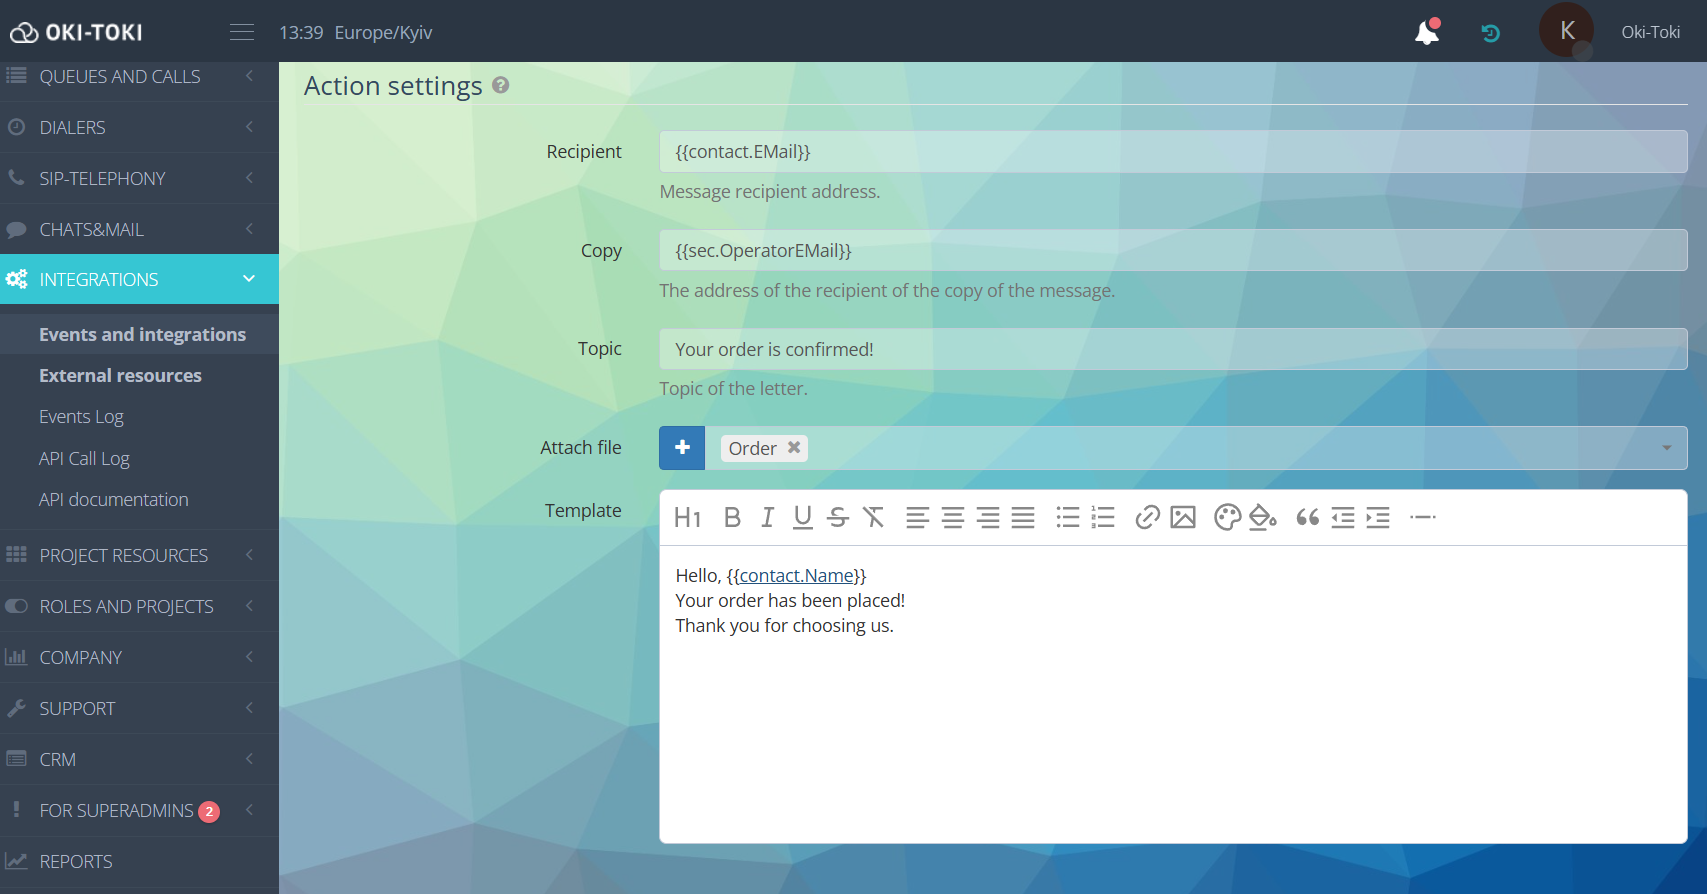
For notification via email
You need to fill out the email form.
In the “Recipient” field, specify the variable — for example, a CRM contact field where the client’s email is saved. Copy the correct variable format from the list at the bottom of the page.
The “Cc” field can be filled in statically. For example, if a contract is being sent to the client, then a copy of the letter immediately goes to the legal or financial department. To send an email to the agent who took the call, insert the variable {{sec.OperatorEMail}} in the field.
Enter text and variables for data substitution into the template. If you need to send additional files — attach the attachment.
Step 6. Saving settings and verification
After filling all the fields, save the binding. To check — press the “Test” button. A test notification will be sent to the messenger or email, and Oki-Toki will display a banner with the code 200, which means the request was sent successfully.
Important! In the test event, real data are not substituted, so variables will be displayed without values.
Cases for sending notifications to Telegram
Initially, you need to set up integration with Telegram. How to create it, read in the article Integration of a chat bot with Telegram. Next, we will cover settings for each event separately.
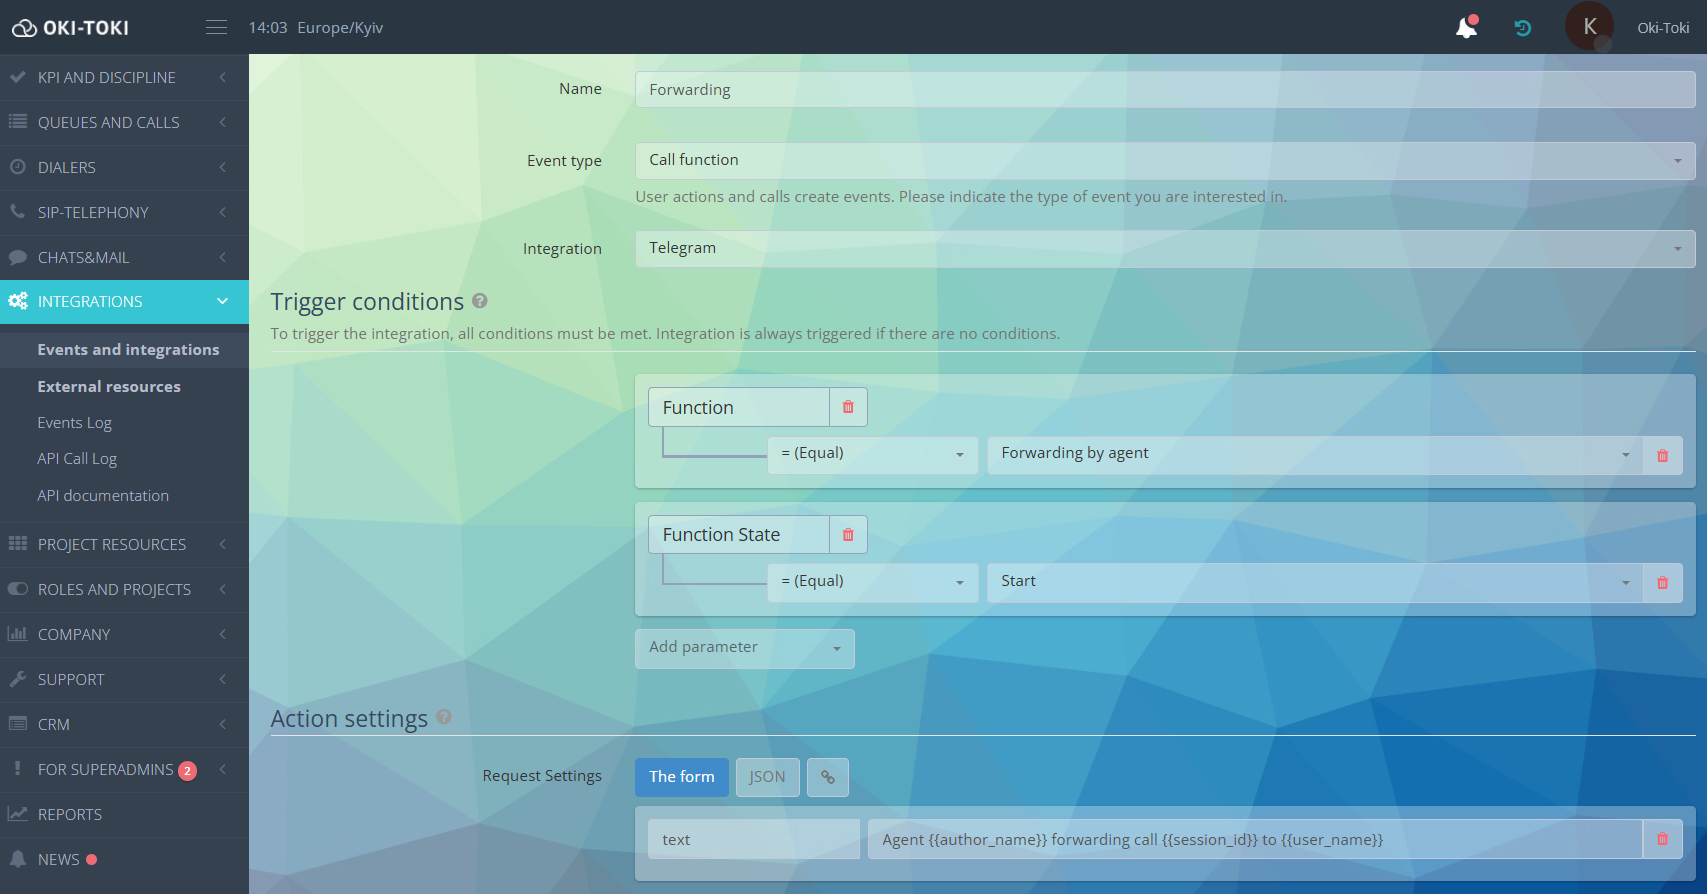
Case 3: Call forwarding
Type of integration: Call function
Trigger conditions: are set by example as in the conference:
- Function — Operator’s redirection;
- Function State — Start;
The event will trigger when pressing the “Redirection” button in the workstation. If you need to monitor redirections specifically — add conditions with parameters Call Type, Queue.ID / Dialer.ID, User.ID.
Action parameters:
- key — text;
- value: operator {{author_name}} redirected call {{session_id}} to operator {{user_name}}.
Case 5: NEW! Change of dialer status
Type of integration: Dialer status
Trigger conditions:
- Select the desired dialer from the dropdown list. If this parameter is not set, notifications about the status change will come for all dialers to which the user has access;
- Status ID — you can choose one status or several (condition “OR”) from the list. For example, no agents or no tasks in the dialer, etc.
Action parameters:
- key — text;
- value: {{dialer_name}} {{status_name}}.
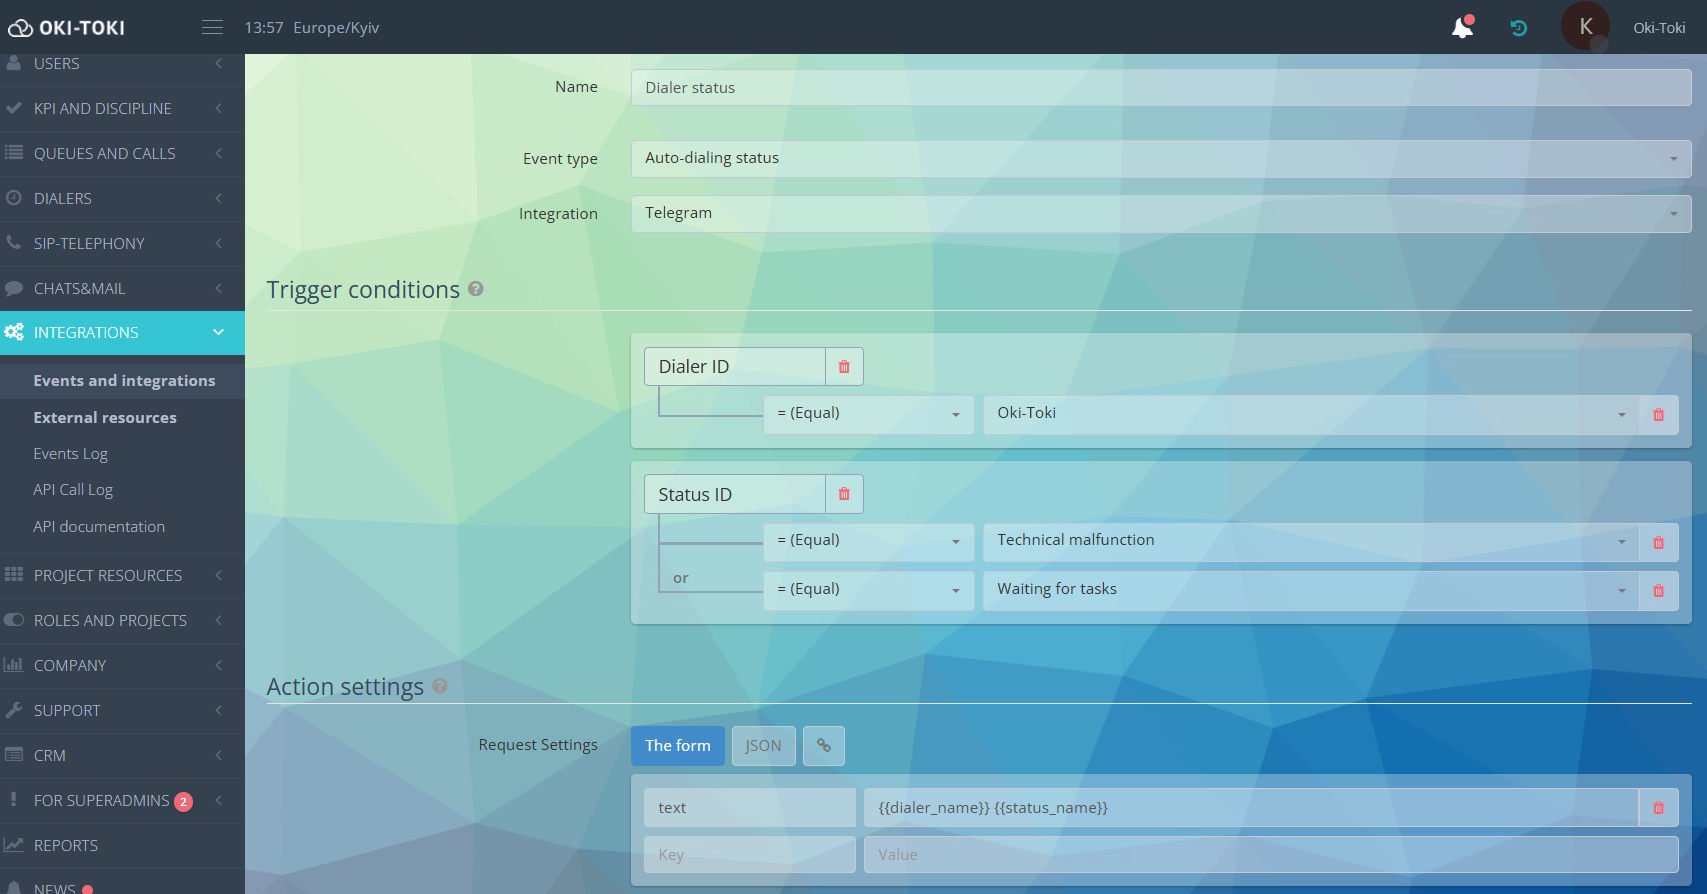
This way, you’ll be aware if the dialer was manually deactivated, stopped due to a technical fault, etc.
Case for sending to Discord
Case for sending Mail SMTP
Monitoring the work of events and integrations
To ensure events are triggered on time and data is transmitted without errors, there is Event Log. It’s a detailed “history” of events’ work, showing for each case:
- What happened: which exact event the system recorded and which integration was triggered in response;
- When: exact date and time;
- Result: processing status (everything went well or there was an error) and how long it took;
- Details: what exact data the event transmitted (Event Data) and what the integration received (Integration Data);
- Actions: re-sending failed events directly from the report.
For convenient search, use filters. Events can be sorted by:
- time (period);
- event name or type;
- status (success/failure);
- event number.
NEW! The report now includes search by event data. Now, the needed event can be found by phone number or call ID — just enter the value in the search bar.
Events and integrations are not a one-size-fits-all solution for all processes, but they are an efficient tool for automating daily tasks. Try starting with one simple case — for example, notifications about missed calls or low agent rating. Over time, you can expand the logic and add other scenarios — tailored to your call center’s tasks.