Article content outlining how to integrate a call center with AmoCRM:
Integration and capabilities;
Creating the integration;
Connecting the widget in AmoCRM;
Creating webhooks for:
a. Creating deals\contacts in AmoCRM during events from Oki-Toki (incoming calls, IVR presses, etc);
b. Call routing for events from AmoCRM: lead creation, lead status change.
This article belongs to the section IT department tools
Integration and capabilities
Oki-Toki and AmoCRM can exchange information about deals, leads, and calls. The code for this is ready and combined into a complete integration. Here’s what you can do with it.
Adding deals and leads from AmoCRM for automatic dialling in Oki-Toki when performing actions:
a. Deal creation;
b. Contact creation;
c. Creation of a contact and a deal;
d. Deal status update;
style=”padding-left: 40px;”> e. Manual addition from AmoCRM.
2. Creating deals in AmoCRM when:
style=”padding-left: 80px;”>a. Status changes of the call (task) in Oki-Toki;
style=”padding-left: 80px;”>b. Selected IVR events.
3. Making calls from the client’s card using the communication SIP provider in Oki-Toki.
Below you will find out how to integrate the call center with AmoCRM and set it up to solve popular tasks.
Creating an Integration
h5>
h5>
To configure the Oki-Toki and AmoCRM integration, you need to perform the following steps:
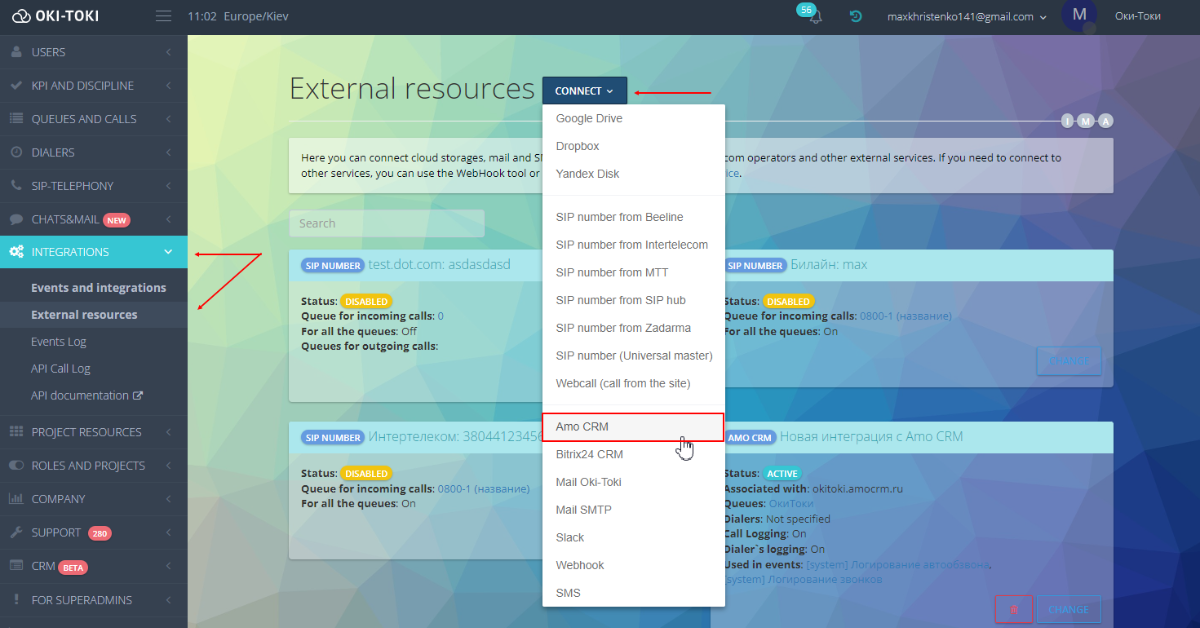
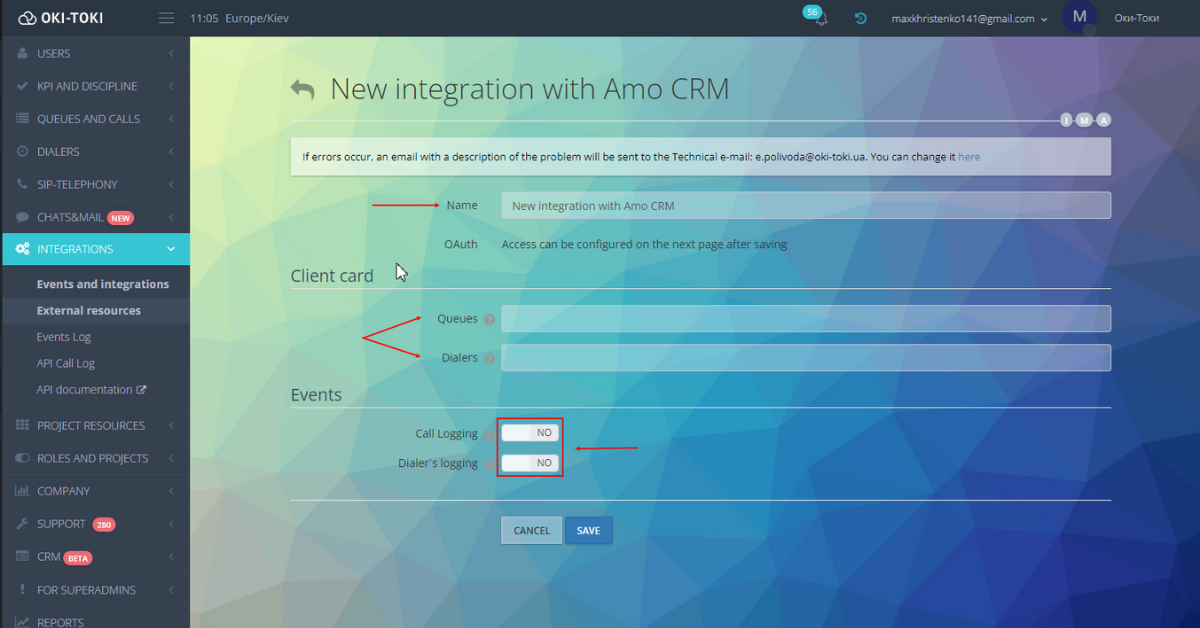
style=”padding-left: 40px;”>1. Log in to AmoCRM to connect to Oki-Toki. To do this, go to the “External Resources” menu and click “Connect”. Choose “AmoCRM” and specify the name of the integration/span>;
h5> /li> h5> “, in line with the settings in our integration, the AmoCRM creates a new deal or lead.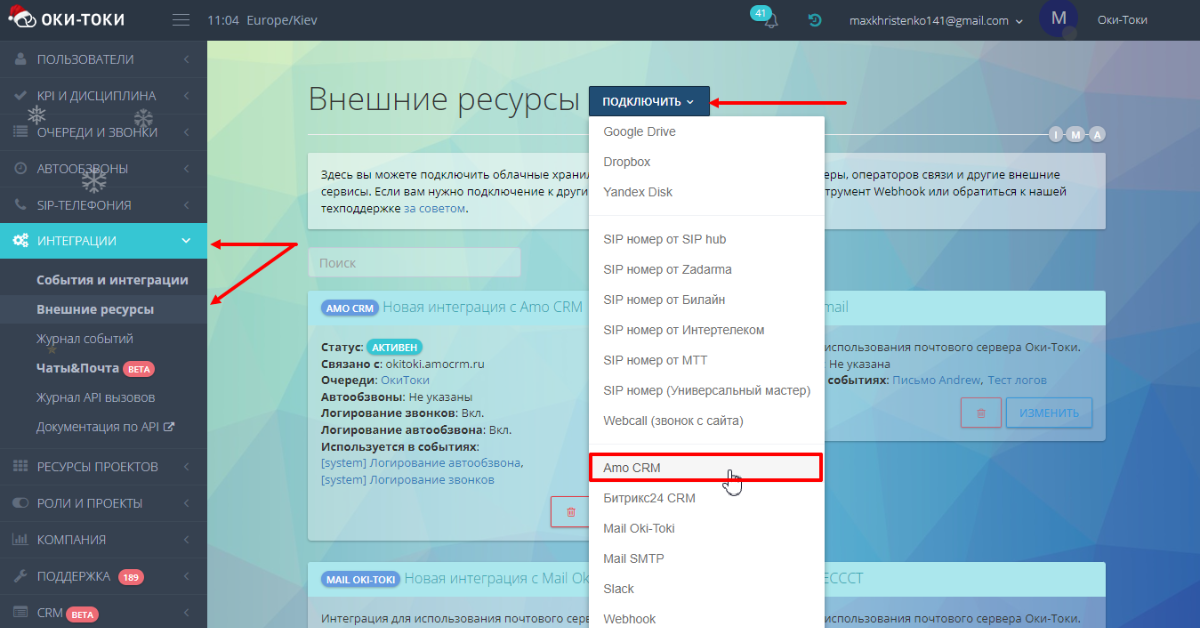
h5 style=”padding-left: 40px;”> 2. In integration settings, select queues and autodialers for automatic client card opening. Activate the “Call logging” and “Autodial logging” options to ensure all call attempts are recorded in the AmoCRM client card, and a player is displayed for playing audio recordings of the conversation/span>;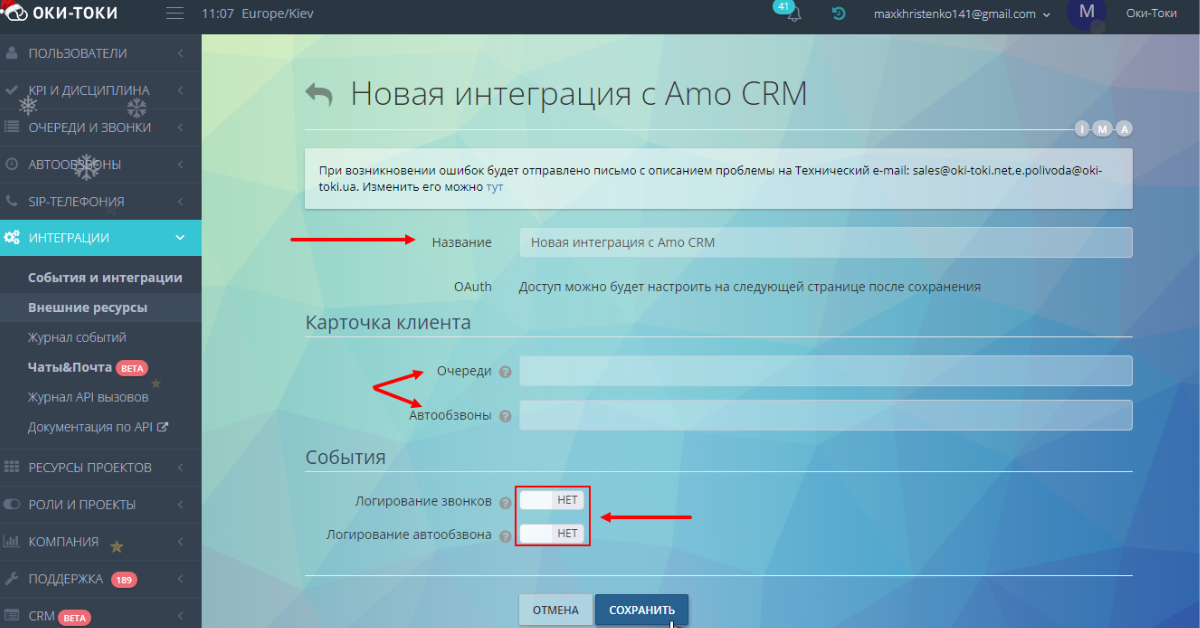
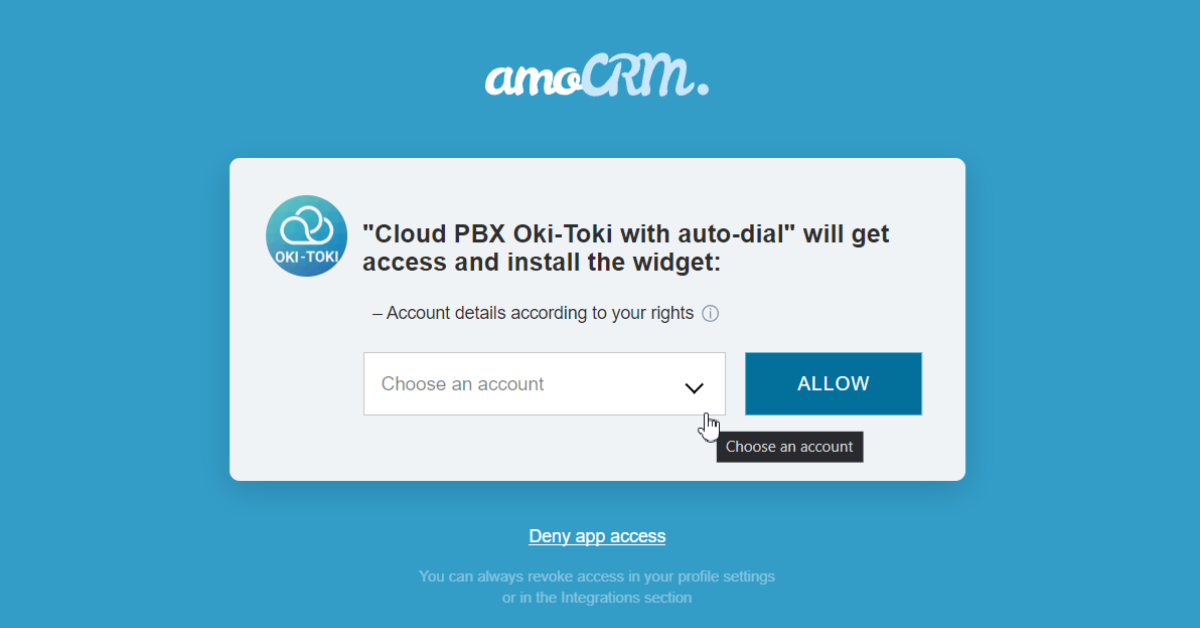
h5 style=”padding-left: 40px;”>3. Click the “Save” button. Then you will be asked to add authorization. Click the “Install integration” button and select the AmoCRM account to integrate with. Click “Allow”/span>;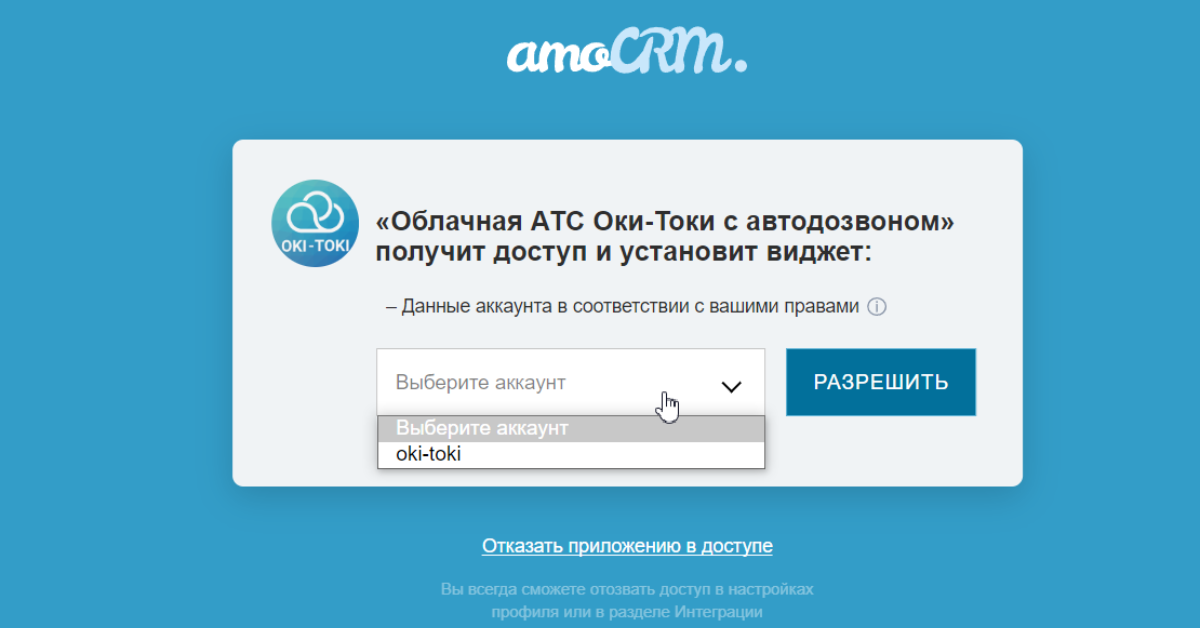
h5 style=”padding-left: 40px;”>4. The integration will be automatically installed. In the plugin settings, you will see that your AmoCRM account is linked with Oki-Toki.If you need to change the account in the plugin in the future, you can modify the current settings or create a new plugin.
Connecting the Oki-Toki widget in the AmoCRM service
h5> To set up the Oki-Toki widget in AmoCRM, you need to follow these steps:
style=”padding-left: 40px;”>1. Go to the AmoCRM account settings (appropriate rights required) and start typing the widget’s name in the search bar. Find the widget you need and click on “Install”;
style=”padding-left: 40px;”>2. Confirm the information transfer by checking the box and click on “Install”;
style=”padding-left: 40px;”>3. After the installation of the widget, you will need to add an API token, which can be found in your Oki-Toki profile settings, into the appropriate field of the AmoCRM employee. This will allow making calls from the lead card in AmoCRM through the agent panel.
(Important! For each user, it is necessary to generate and enter his API token separately into the widget).
h5>After the widget setup, the following functions will be available to you:
Click-to-call from the lead card in AmoCRM (the agent must be in their place to make a call);
Manual task addition via list management. Just highlight the necessary tasks and through the menu you can add or remove from the required autodial;
Logging of call history for dialers and queues, as well as listening to call records from the client’s card.
/ul>
/li>
/ul>
/li>
/ul>
h5>Webhook for creating deals\contacts in AmoCRM at Oki-Toki events
h5>Below is an example of using the system for automatically creating deals in AmoCRM when calling a client. In case the client, after listening to the message of the informer, presses the number “1”, the system will automatically create a new deal/lead in AmoCRM.To automatically create a deal in AmoCRM using events in Oki-Toki, you need to perform the following actions:
style=”padding-left: 40px;”>1. Go to the Events and Integrations menu in Oki-Toki.
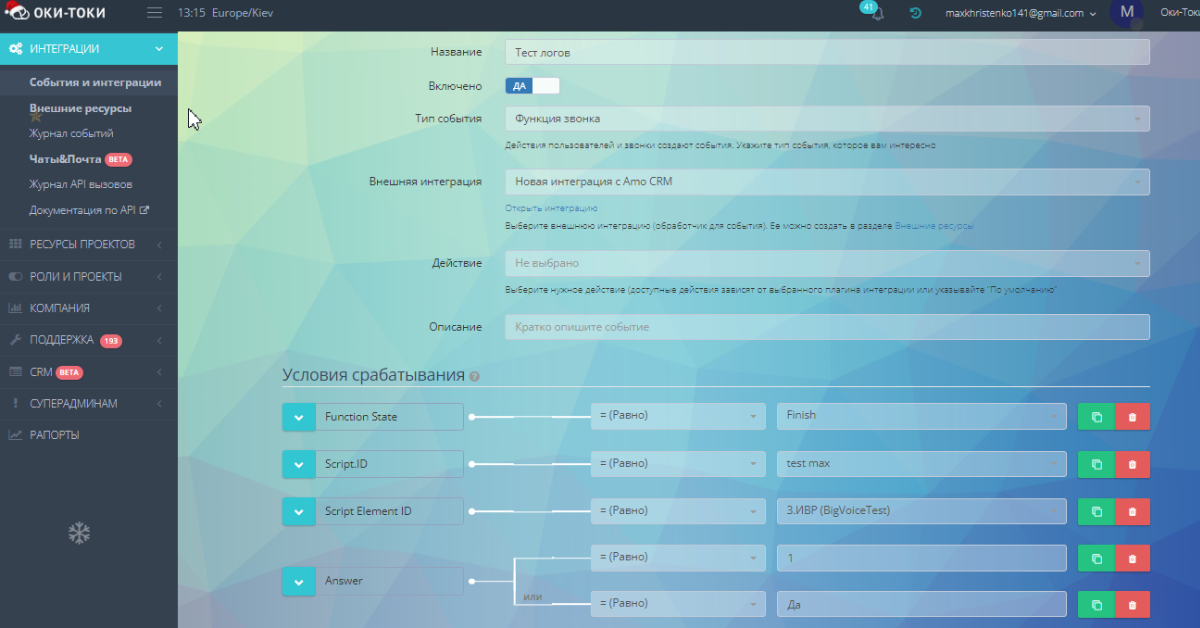
style=”padding-left: 80px;”>a. Name the integration and choose the necessary event, for example, “Call function” ;
style=”padding-left: 80px;”>b. Select the previously installed AmoCRM plugin and the necessary action, for example, “creating a deal and contact in AmoCRM”;
style=”padding-left: 80px;”>c. Set up the triggering conditions, specifying that when the number “1” is pressed in the IVR, a deal needs to be sent to AmoCRM;
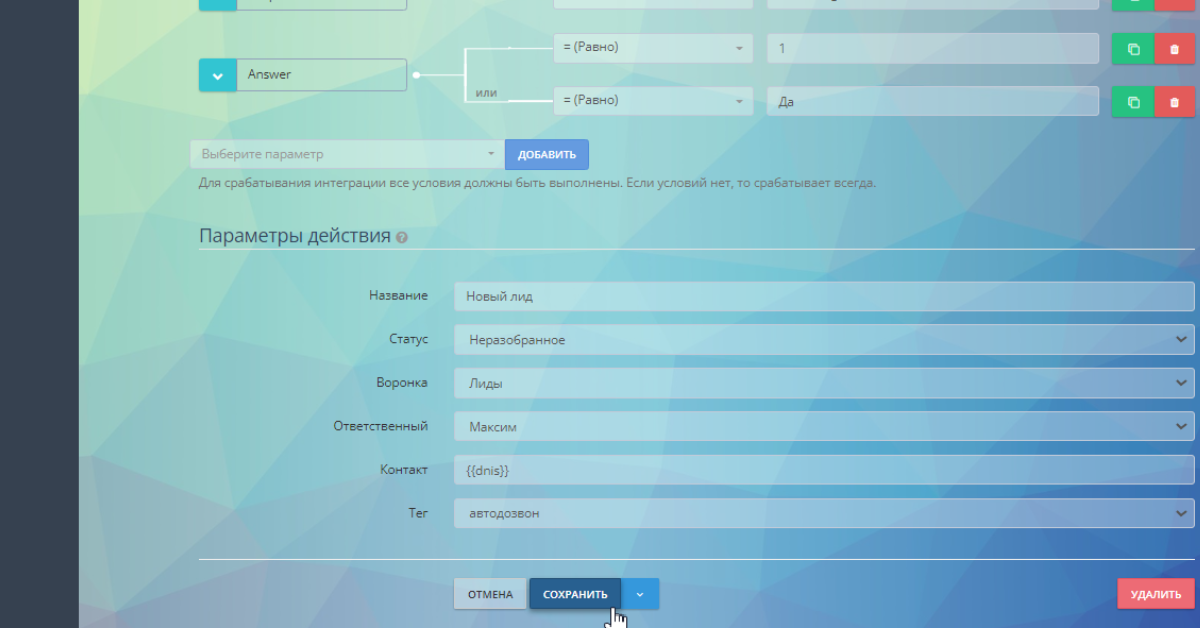
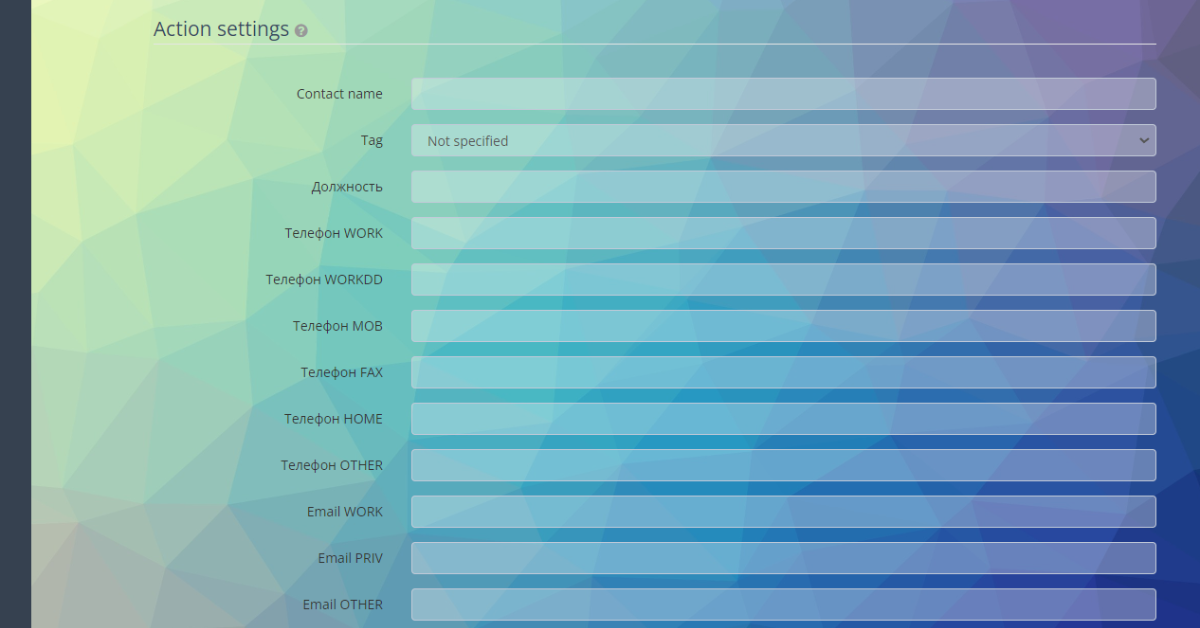
h5 style=”padding-left: 80px;”>d. Set up the action parameters, specifying the name of the deal in AmoCRM.
style=”padding-left: 40px;”>2. Fill in all the mandatory fields (name, status, funnel, responsible, contact) according to the settings in AmoCRM to correctly create a lead or deal with the necessary information;
h5>style=”padding-left: 40px;”>3. After all the fields have been filled in and configured, we can save our integration and activate it.
After the conducted modifications, when the client dials the number, listens to the IVR message and presses the number
The content of the article describing how to integrate a call center with AmoCRM :
1. Integration and opportunities;
2. Creation of integration;
3. Widget connection in AmoСRM;
4. Creating webhooks for:
a. C creation of transactions\contacts in AMOCRM in case of events from Oki-Toki (incoming calls, clicks on the IVR, etc.);
b. Calling on events from AMOCRM: lead creation, lead status change.
The article belongs to the section IT department tools
Integration and features
Oki-Toki and AmoCRM can exchange data about deals, leads and calls. The code for this is ready and merged into a ready-made integration. Here’s what you can do with it.
1. Adding deals and leads from AmoCRM for automatic calling to Oki-Toki when performing the following actions:
a. Creating a deal;
b. Create a contact;
c. Creating a contact and deal;
d. Deal status update;
e. Manual addition from AmoCRM.
2. Creating deals in AmoCRM when:
a. Changes in the status of a call (task) in Oki-Toki;
b. Selected events in the IVR.
3. Making calls from a customer card using a SIP provider in Oki-Toki.
Below you will learn how to integrate a call center with AmoCRM and set it up to solve popular tasks.
Create an integration
To set up the integration of Oki-Toki and AmoCRM, you need to follow these steps:
1. Log in to AmoCRM to connect to Oki-Toki. To do this, go to the “External resources” menu and click “Connect”. Select “AmoCRM” and specify the name of the integration;
2. In the integration settings, select queues and dialers to automatically open a customer card. Activate the option “Call logging” and “Autocall logging” so that all call attempts are recorded in the client card in AmoCRM and a player is displayed for playing audio recordings of the conversation;
3. Click the “Save” button. After that, you will be prompted to add authorization. Click the “Install Integration” button and select the AmoCRM account you want to integrate with. Press “Allow”;
4. Integration will be installed automatically. In the plugin settings you will see that your AmoCRM account is linked to Oki-Toki.
If you need to change your plugin account in the future, you can change the current settings or create a new plugin.
Connecting the Oki-Toki widget in the AmoCRM service
To connect the Oki-Toki widget in AmoCRM, you need to complete the following steps:
1. Go to your AmoCRM account settings (appropriate rights are required) and start typing the widget name in the search bar. Find the desired widget and click “Install”;
2. Confirm the transfer of information by checking the box and click “Install”;
3. After installing the widget, you will need to add the API token, which can be found in your profile settings in Oki-Toki, to the corresponding field of the AmoCRM employee. This will allow you to make calls from the lead card to AmoCRM through the operator panel.
(Important! For each user, you need to generate and enter his api-token into the widget separately).
After configuring the widget, the following functions will become available to you:
Calls from the lead card in AmoCRM on click (to make a call, the operator must be in the opera place);
Manual addition of tasks through list management. You just need to select the necessary tasks and through the menu you can add or remove from the desired dialer;
Logging the history of calls on dialers and queues, as well as listening to records of conversations from the client card.
Webhook for creating deals\contacts in AmoCRM for events from Oki-Toki
Below is an example of using the system to automatically create deals in AmoCRM when calling a client. In the event that the client, after listening to the message of the informant, clicks on the number “1”, the system will automatically create a new deal/lead in AmoCRM.
In order to automatically create a deal in AmoCRM using events in Oki-Toki, you need to do the following:
1. Go to the Events and Integrations menu in Oki-Toki.
a. Give the name of the integration and select the desired event, for example “Call Function”;
b. Select the plugin for AmoCRM installed earlier and the required action, for example, “create a deal and contact in AmoCRM”;
c. Set trigger conditions by specifying that when you click on the number “1” in the IVR, you must send the deal to AmoCRM;

d. Set up the action parameters by specifying how the deal will be called in AmoCRM.
2. Fill in all the required fields (name, status, funnel, responsible, contact) according to the settings in AmoCRM in order to correctly create a lead or deal with the necessary information;
3. Once all the fields have been filled in and configured, we can save our integration and activate it.
After the manipulations, when the client dials the number, listens to the message from the IVR and presses the number “1”, in accordance with the settings in our integration, a new deal or lead is created in AmoCRM.
Creating a task in Oki-Toki dialer in case of events from AmoCRM
Let’s consider another important case – creating a task for calling in case of events in AmoCRM. To implement it on the AmoCRM side, you need to perform a number of actions:
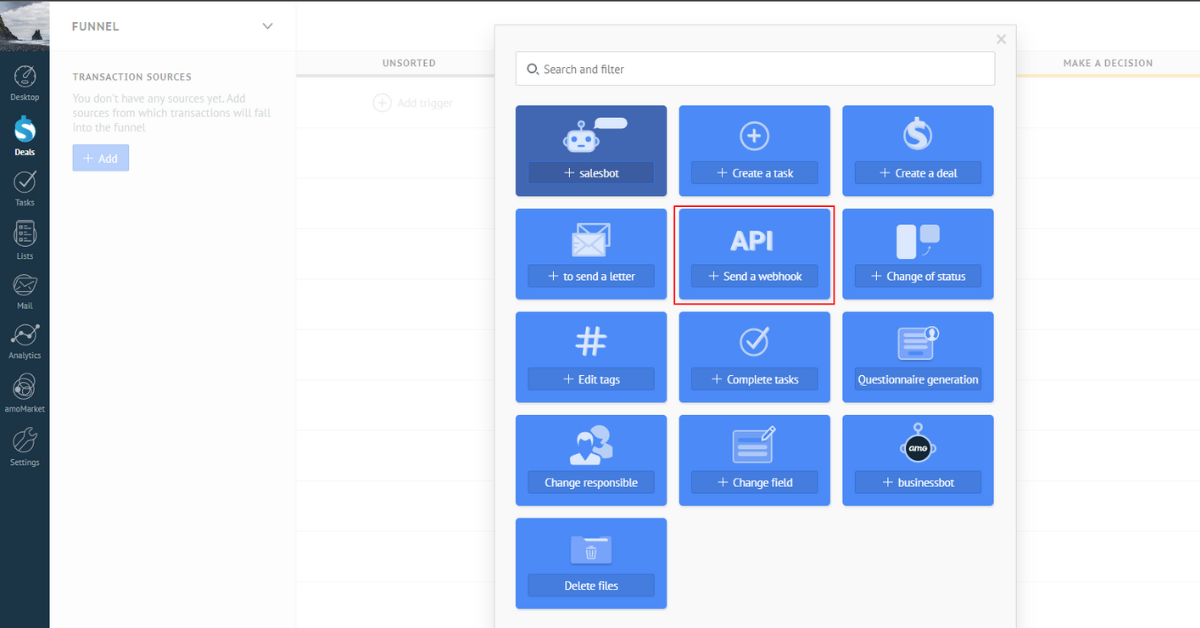
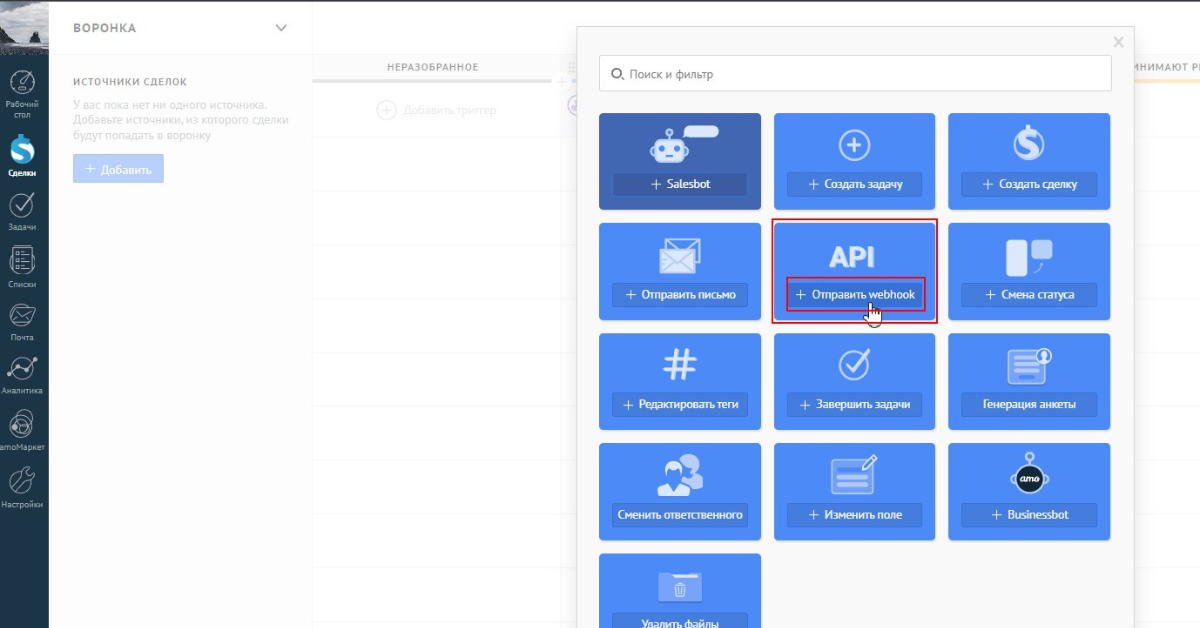
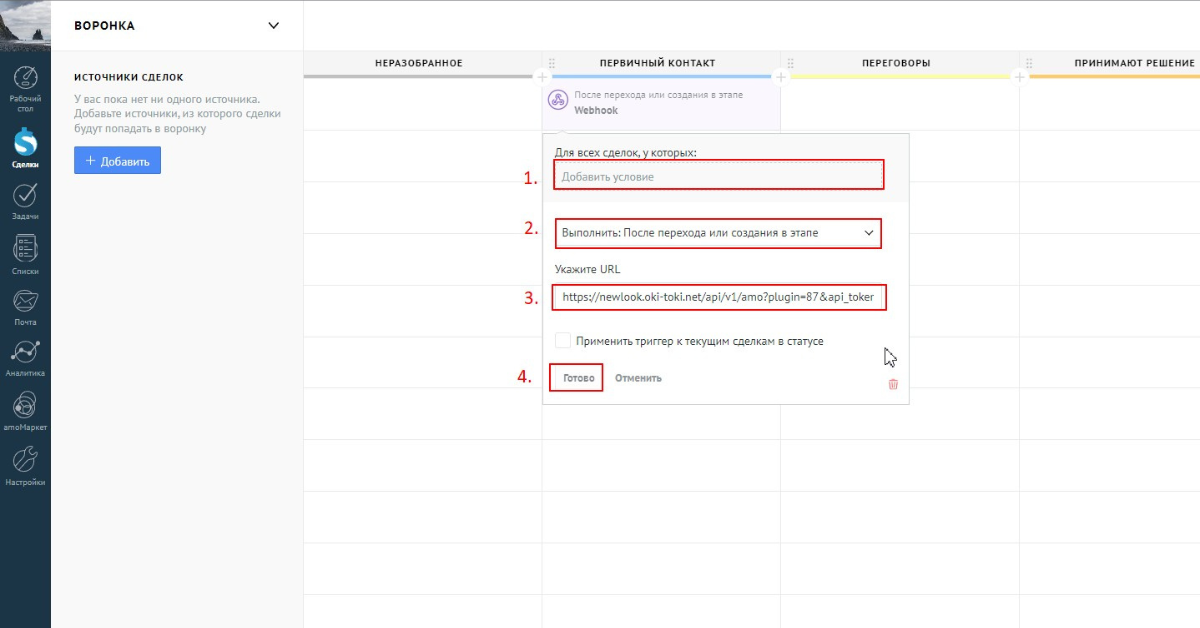
1. Go to AmoCRM in the deal menu and click on the “Set up funnel” button in the right corner:
a. Select the desired funnel and click on it ;
b. From the modal that appears, select “Send webhook”;
2. In the field “Specify URL” add a link from our integration. Link example: https://newlook.oki-toki.net/api/v1/amo?plugin=87&api_token= (user token).
After adding, you will need to add the user’s api-token to the link, which is generated in the user settings in Oki-Toki.
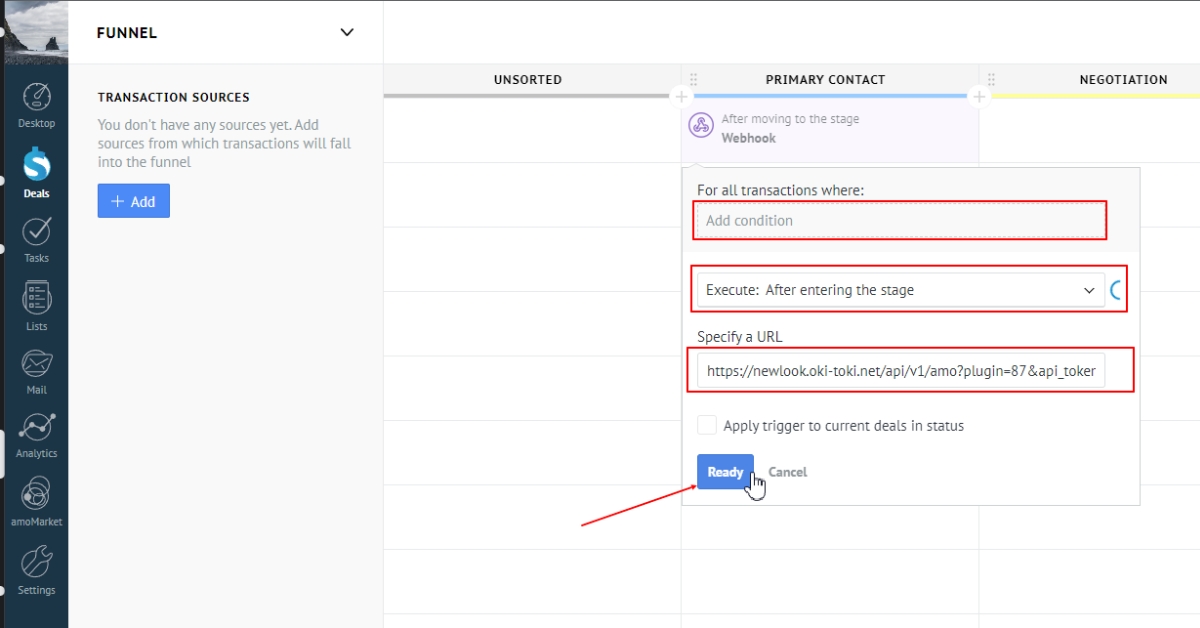
Important! It is advisable to leave only those webhook trigger parameters for which an event is expected, otherwise AmoCPM may take many requests for spam and disable webhook processing.
Next, to continue the implementation of the case, you need to go to the Oki-Toki interface and perform a series of actions:
1. Initially, you need to create a webhook, for this you need to go to “External Resources”, and then select a webhook from the drop-down list on the “Connect” button:
a. Specify in the “URL” field a link from the api documentation for creating a task in autocall. Link example: https://noname.oki-toki.net/api/v1/dialers/create_task ;
b. Select the post method and in the field “General query parameters”;
c. Then in the field “General query parameters” specify api_token = (user token in Oki-toki)
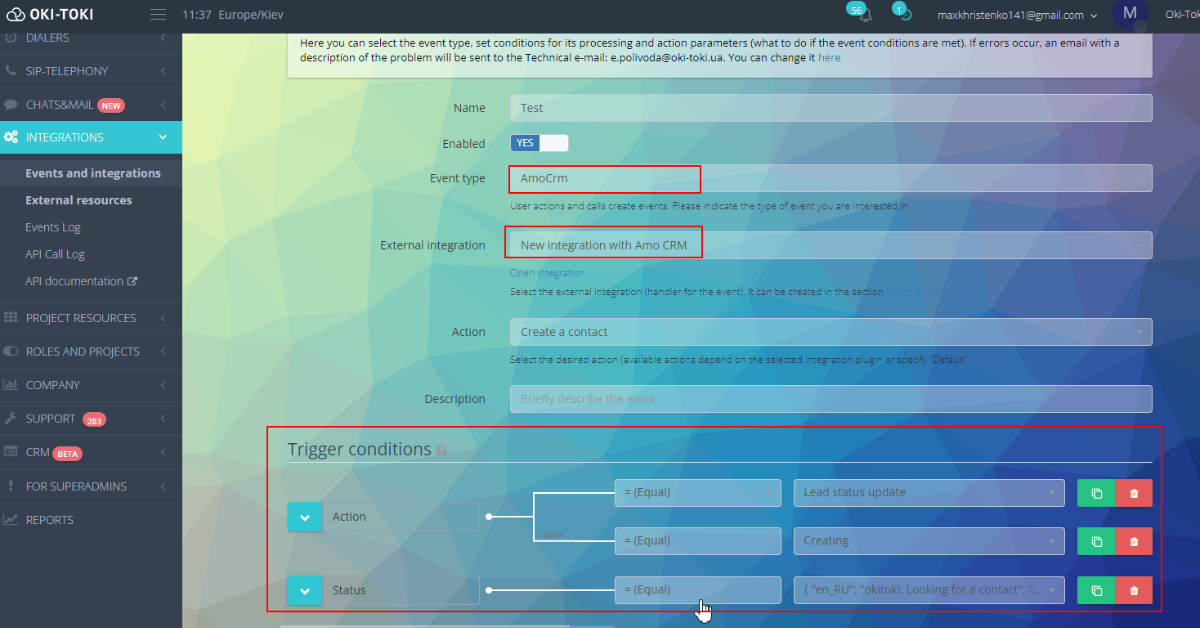
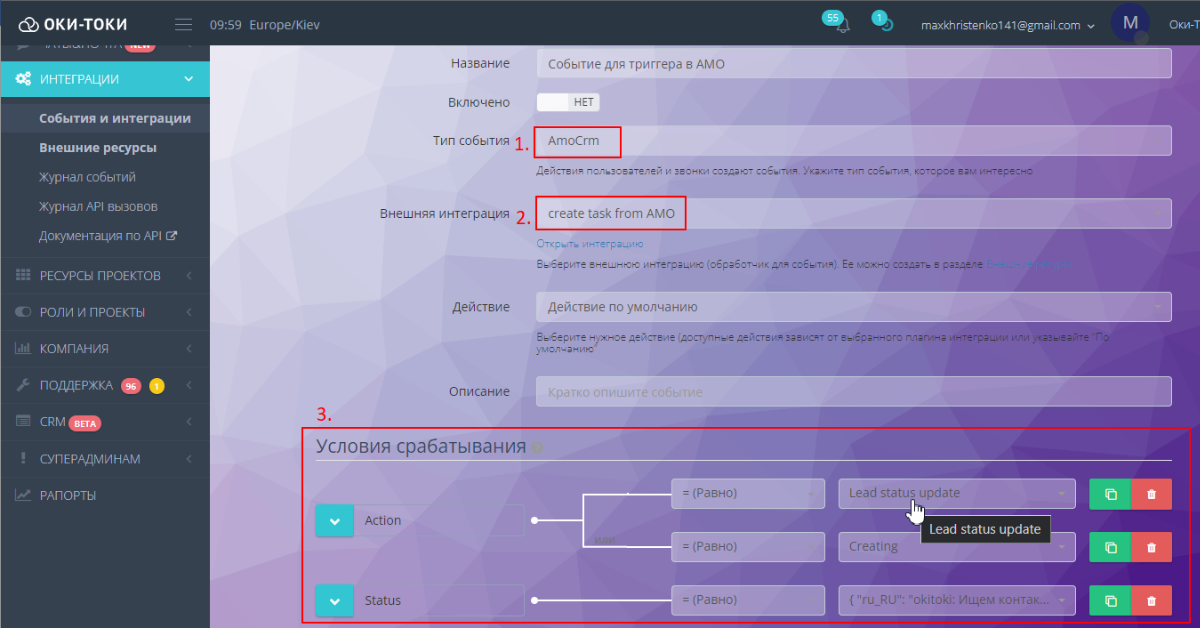
2. Next, create an event for the trigger by selecting:
a. in the field “Event type” – AmoСrm;
b. in the line “External integration” specifying the previously created webhook;
c. in “Trigger conditions” it is necessary to set the parameters previously configured in Amo, namely the status of the event and the action under which it is triggered;
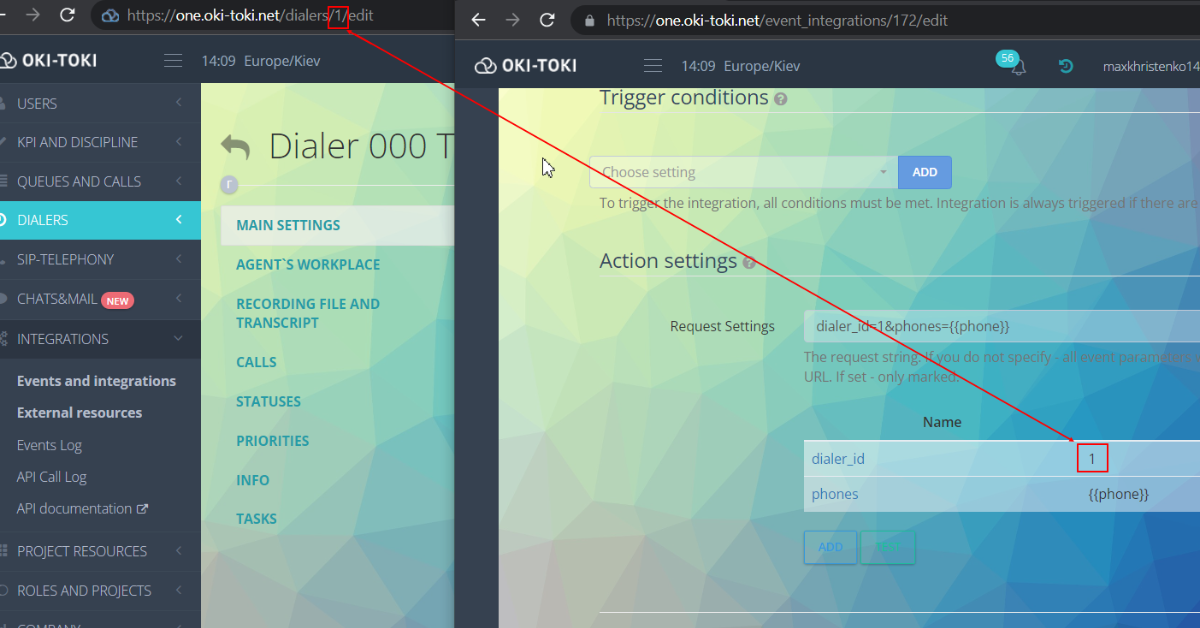
d. in the “Action parameters” it is necessary to specify such variables for creating a call in a specific auto-dial, as dialer_id=1, where 1 is the id of the auto-dial, phones = is the user’s phone from Amo.
Check that all fields are filled in correctly and trigger conditions are configured correctly and proceed to integration testing. In our case, the received task for calling in dialering will be considered a successful setting.
PS Video on Youtube and description of possible cases on the blog page “ AUTOMATIC CALL AND SALES SERVICE IN AMOCRM ”
PSS Read others found notes about “ Call Center Integrations ” in a separate section.
Creating a task in Oki-Toki robocalling for events from AmoCRM
h5>
h5>Let’s consider another crucial case – creating a callback task when an event occurs in AmoCRM. To realize it on the AmoCRM side, a series of actions need to be performed:
style=”padding-left: 40px;”>1. Go to the deal menu in AmoCRM and press the “Configure funnel” button in the right corner:
style=”padding-left: 80px;”>a. Select the necessary funnel and press it;
style=”padding-left: 80px;”>b. From the appeared modal, select “Send webhook”;
style=”padding-left: 40px;”>
h5>
style=”padding-left: 40px;”>2. In the “Enter URL” field, add a link from our integration. Link example: https://newlook.oki-toki.net/api/v1/amo?plugin=87&api_token=(user’s token).
After adding, you will need to specify the user’s api-token in the link, which is generated in the user settings in Oki-Toki.
Important! It is advisable to leave only those webhook triggering parameters for which an event is expected, otherwise AmoCRM may consider a large number of requests as spam and disable the processing of webhooks.
To continue implementing the case, you need to proceed to the Oki-Toki interface and perform a series of actions:
1. Initially, you need to create a webhook. To do this, you need to go to “External Resources”, then select webhook from the dropdown list on the “Connect” button:
a. Specify in the “URL” field a link from the api documentation to create a task in autodial. Example link:https://noname.oki-toki.net/api/v1/dialers/create_task;
b. Select the post method and fill in the “General Request Parameters”;
c. Then in the “General request parameters” field specify api_token = (user token in Oki-Toki) /h5>
h5 style=”padding-left: 40px;”>2. Next, create an event for the trigger by choosing:
style=”padding-left: 80px;”>a. in the “Event Type” field – AmoCRM;
style=”padding-left: 80px;”>b. in the “External Integration” line, specifying the previously created webhook;
style=”padding-left: 80px;”>c. in the “Condition Triggers” you need to set parameters previously configured in Amo, namely the event status and the action on which it triggers;
h5 style=”padding-left: 80px;”>d. in “Action Parameters” you need to specify such variables for creating a call in a specific auto dialer, such as dialer_id=1, where 1 is the id of the autodial, phones = this is the user’s phone from Amo.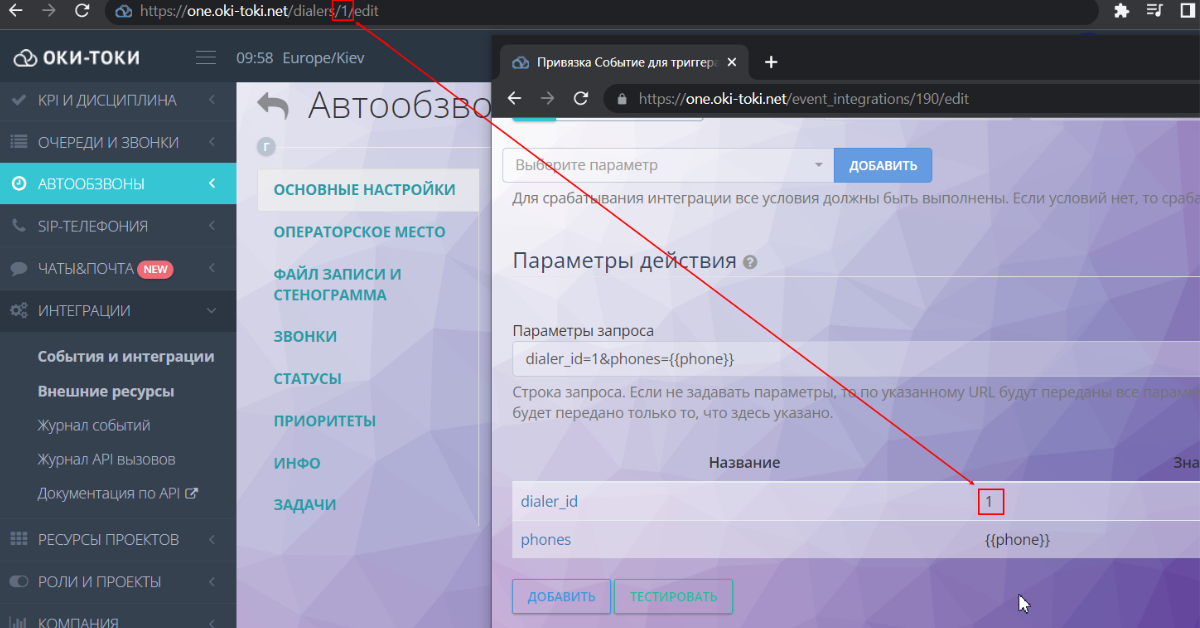
Ensure all fields are filled in correctly and the trigger conditions are set up properly before you move on to testing the integration. In our case, we will consider the successful setting to be the task received for a call in the auto dialer.
P.S. Check the video on Youtube and the description of possible cases on the blog page “AUTOMATIC CALL SERVICE AND SALES IN AMOCRM“.
P.S.S. Please read our other notes about “Integrations at the call center” under a separate category.