To improve the quality of call center agents’ work, it’s useful for them to have convenient conversation scripts at hand. In this article, we’ll look at how to work with agent scripts and configure permissions for performing certain actions in Oki-Toki.
What is an agent script for?
An agent script is a guide for agents on how to work with clients. It contains a list of pre-prepared questions, fields to fill in, and even hints. Agents don’t need to figure out what to ask or how to record answers. The benefits of using this tool for call centers:
- Unified conversation structure: The agent follows a ready-made plan — knows how to start a dialogue, what questions to ask, and how to conclude the conversation. Nothing important will be missed.
- Error reduction: When tired or stressed, it’s easy to forget important details. The script serves as a reliable prompt that’s always at hand.
- Accelerated work: The agent doesn’t need to think through every step. The script guides through the dialogue sequentially — the client receives help faster.
- More sales: Ready-made phrases in the script help present the product and engage the client’s interest.
- Unified standards: All agents work according to the same scheme, clients receive equally high-quality service regardless of who takes the call.
- Training: A new employee doesn’t need to figure out what to say — they need to follow the instructions and learn on the job.
Well-crafted and configured scripts solve several tasks: new agents adapt faster, experienced ones work more efficiently, and managers get a complete picture of service quality.
How to create a form template in Oki-Toki?
To create a conversation script in Oki-Toki, go to the “Agent Scripts” section and add a new template. You can create your own form from scratch or choose a ready-made template.
Link the form to a “Queue” or “Dialer”. Now, agents will automatically have a tab open with the necessary questions for the client, where they can fill in data according to the ready-made script. This will speed up work and simplify the process of communicating with clients.
Step-by-step instructions on how to create a form template in Oki-Toki — in a separate article.
Importing scripts from Google Docs to Oki-Toki
Don’t want to create questions and answers manually in the script editor? They can be easily imported into Oki-Toki.
- Document preparation: create a file in Google Docs with questions and answers separated. Make sure the questions are structured. Use text styles for separation:
- H2 (Heading 2) — for questions;
- H3 (Heading 3) — for answers;
- H4 (Heading 4) — hint for the agent;
- H5 (Heading 5) — help.
- Import: upload the prepared file to Oki-Toki. If the document structure is correct, the system will automatically create a script. After that, it can be adjusted — add additional elements or configure conditions and dialogue branches.
How to import a form from Google Docs to Oki-Toki, read in the article.
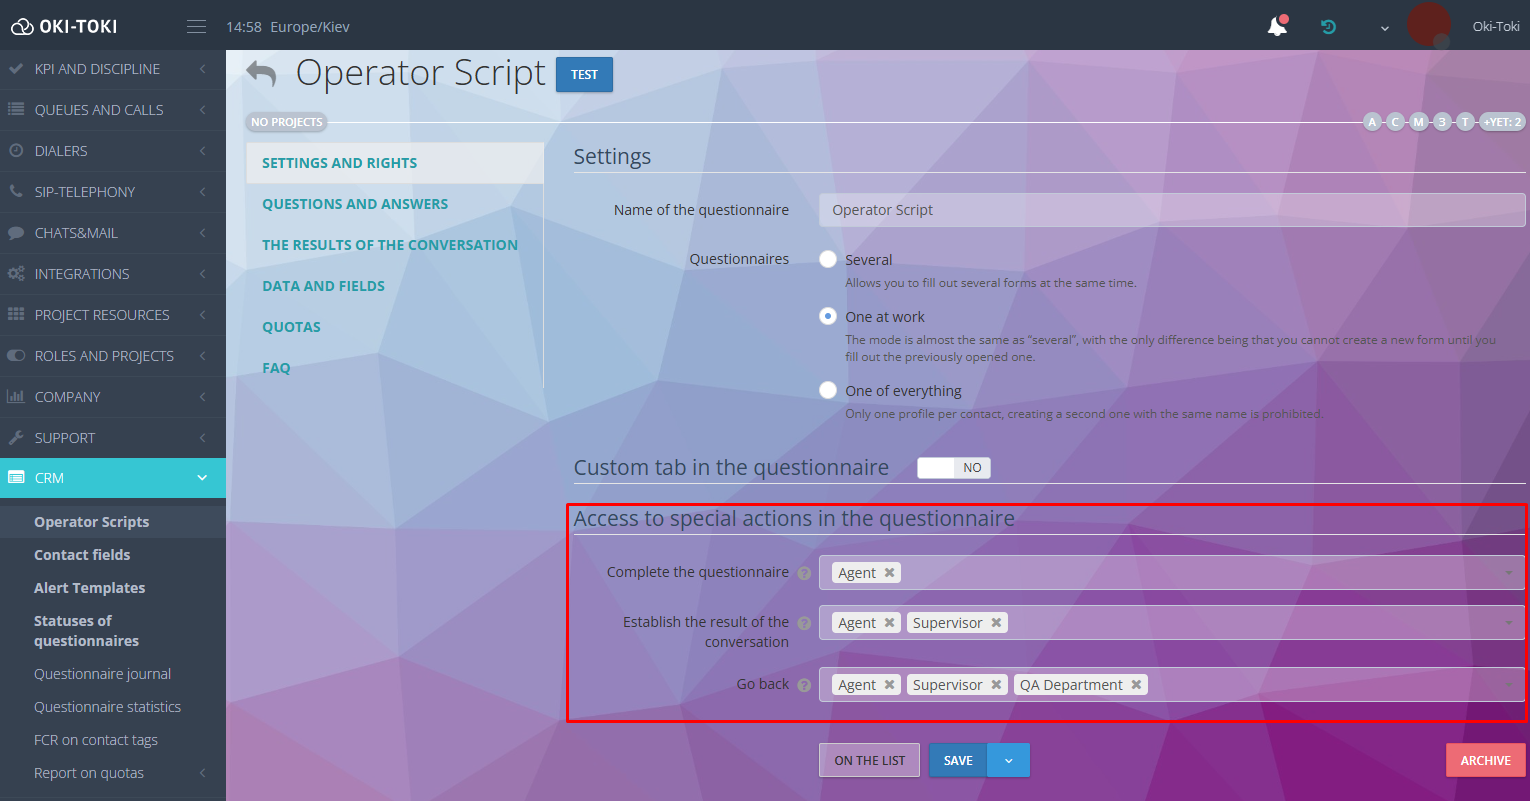
Configuring permissions for special actions in the Oki-Toki form
In Oki-Toki, you can configure access to additional functions for employees when working with a client form:
- return to previous questions;
- forced completion of the form;
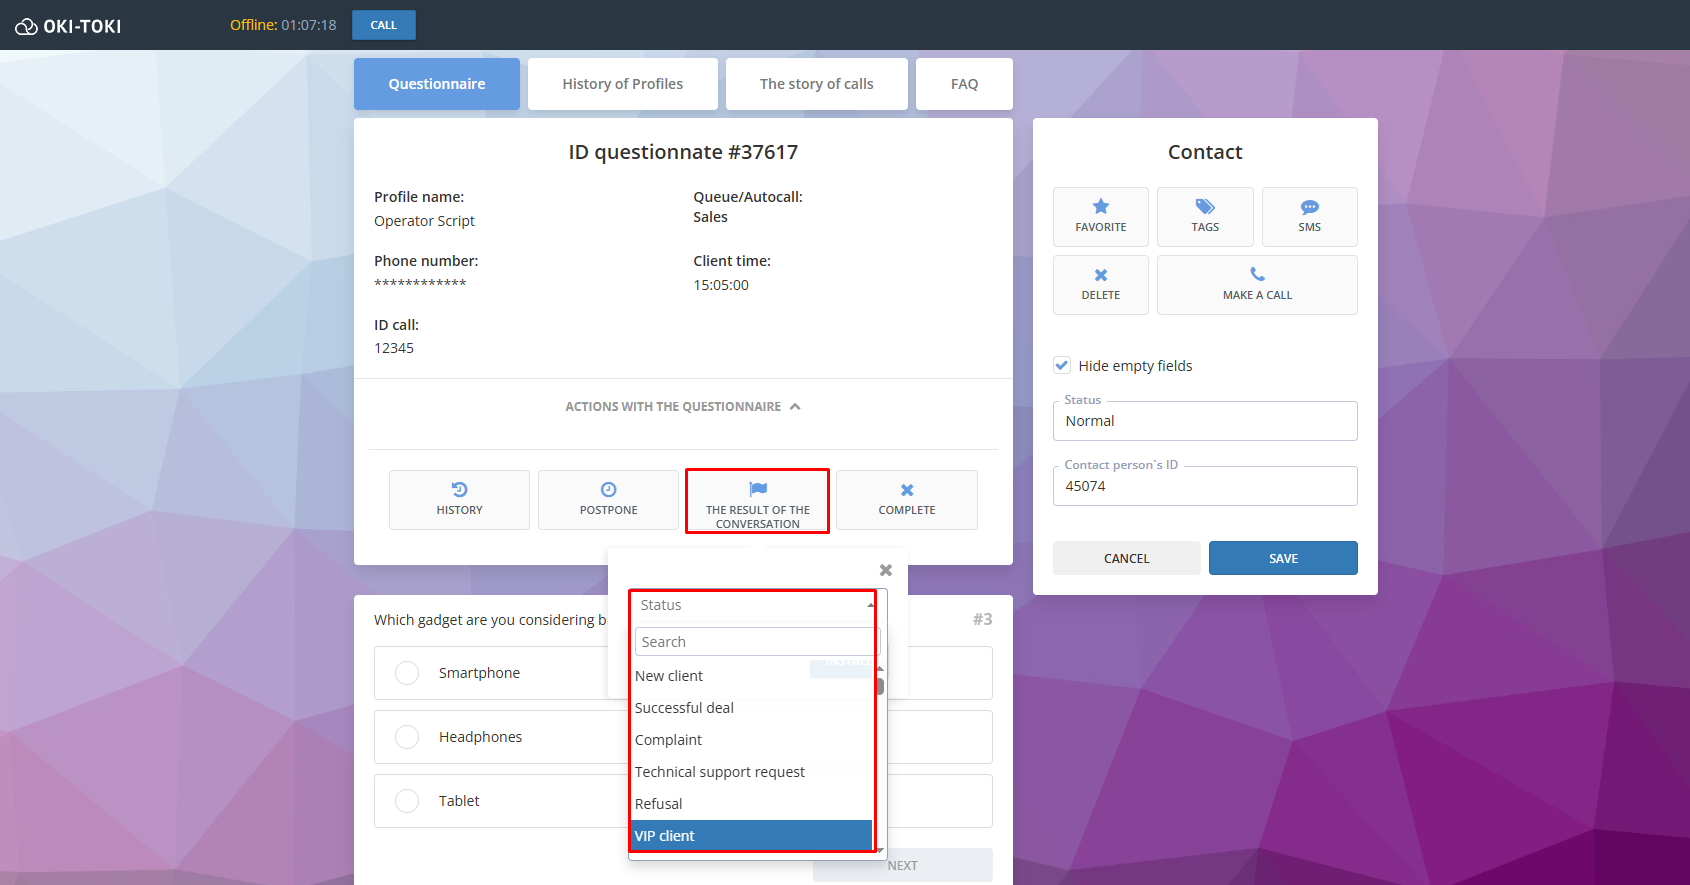
- setting the final conversation status.
Specify the roles of employees who will be allowed these actions in the form settings.
How does it work?
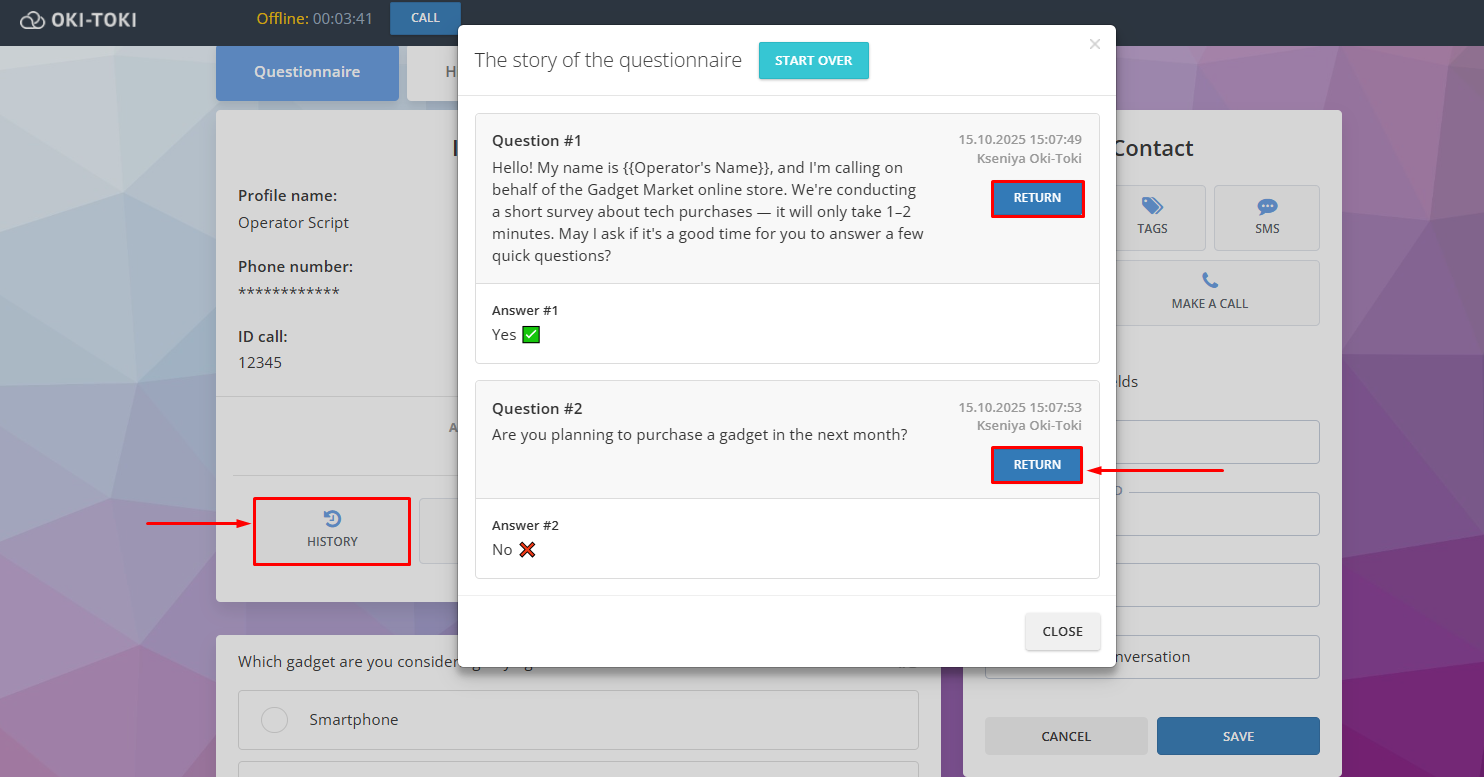
Going back: If the agent made a mistake or the client changed their decision — you can return to the desired question through the “History” section.
Restarting the form: The “Complete” button closes the current form. After that, you can start filling it out again.
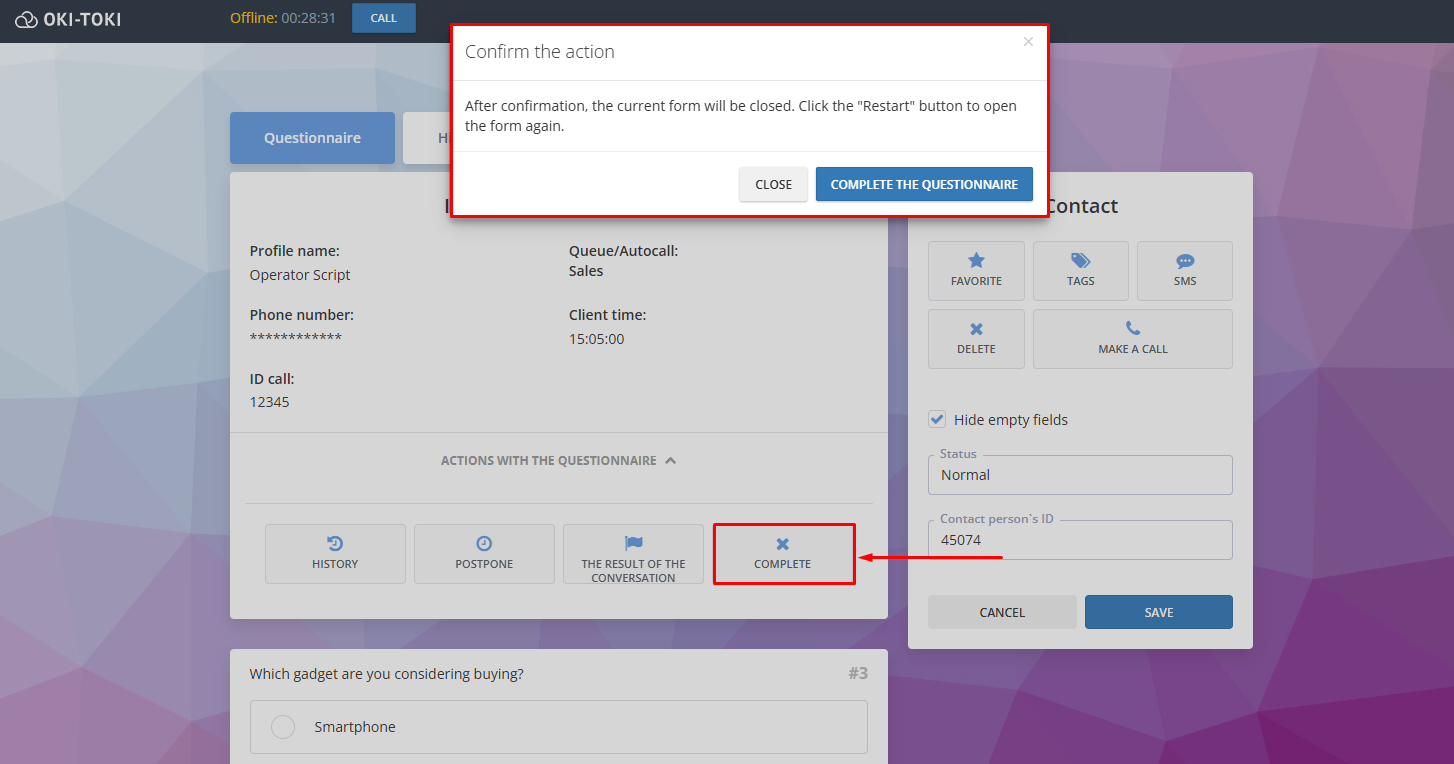
Work pause: Click the “Postpone” button to pause filling out. Set the time and return to the form when convenient.

Final status: This is an additional label for the conversation, which is visible in “Form History”. You can create the necessary options in the “Form Statuses” section. The agent will be able to select the appropriate outcome from the list.
Additional sections:
FAQ — a section with answers to frequently asked questions. Add a list of current questions and answers that may be useful to the agent in the work process.
Form history — a list of forms the agent has worked with.
Call history — complete call history for the contact: date, duration and type of call, agent name, tags.
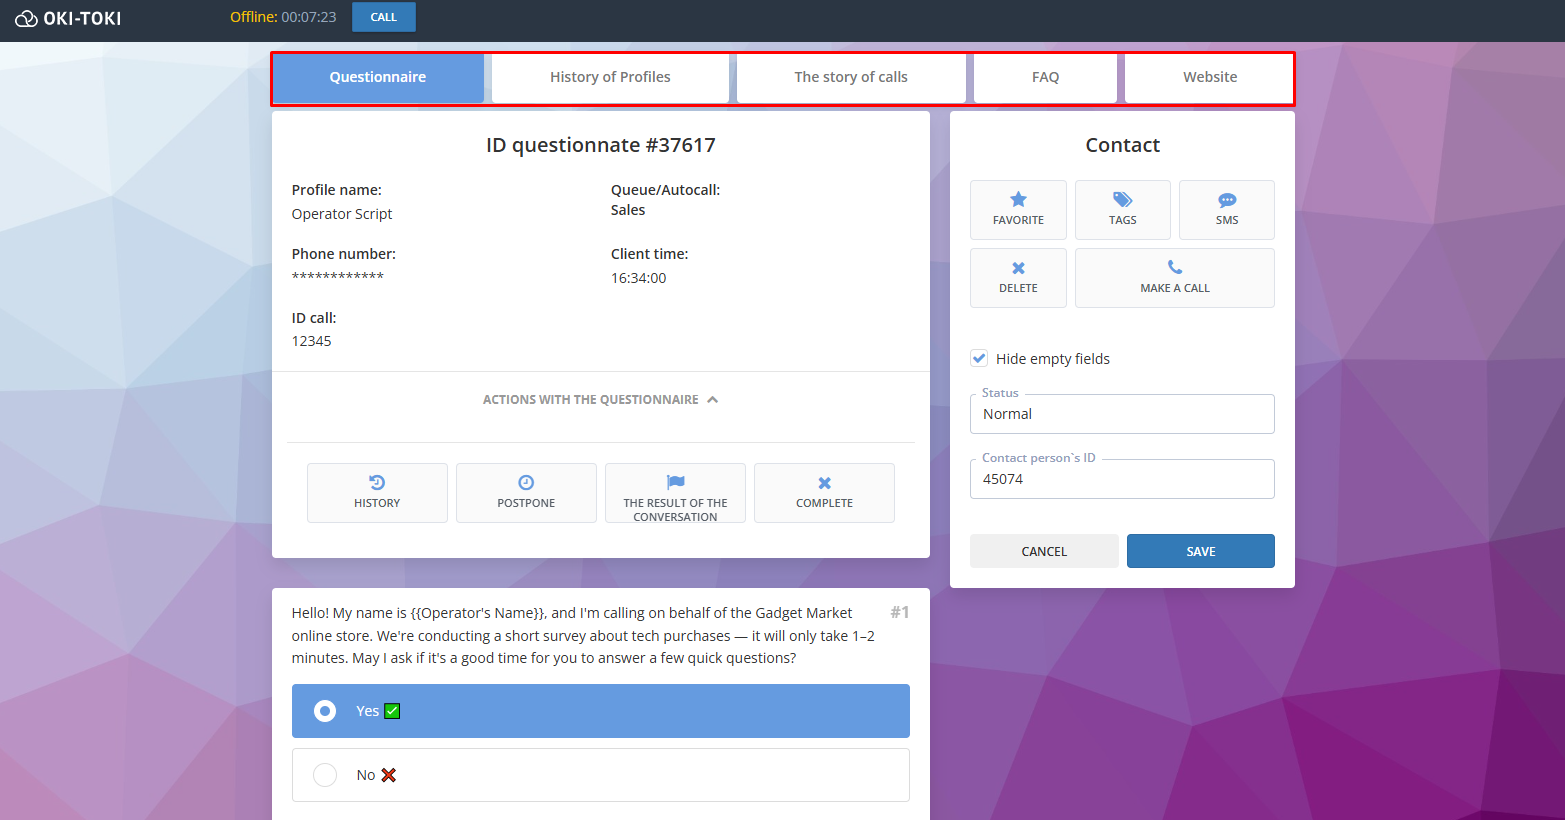
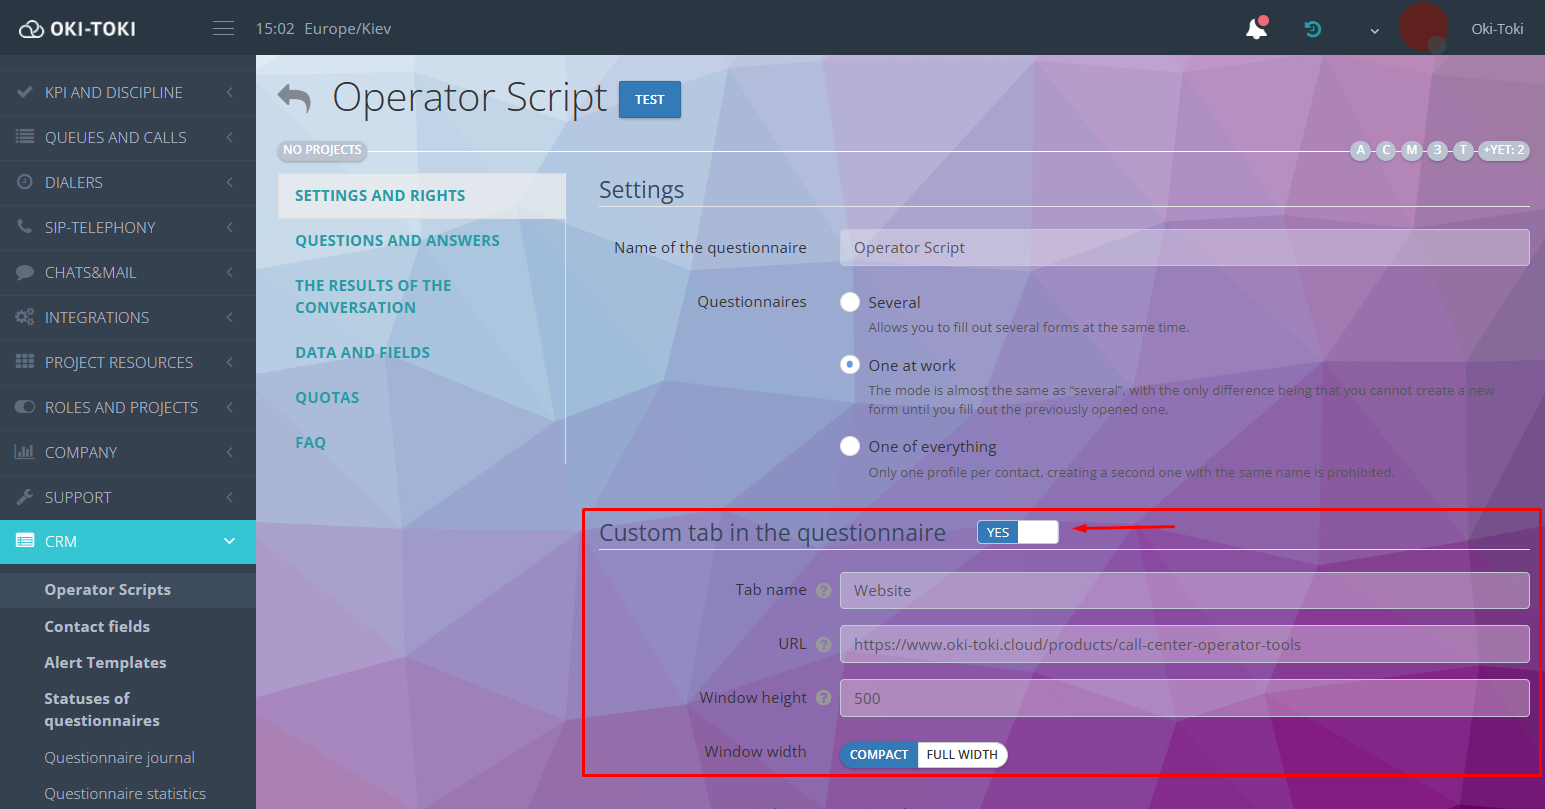
Custom tab in the form — quick access to the sales website, informational or reference materials, so the agent can quickly find the necessary information. To configure, you need to specify the name of the future tab and paste the website link in the URL field.
Additional features in the CRM form
The agent must quickly navigate the form, collect data, enter information, and at the same time not lose focus on the client. Oki-Toki solves this task through dialogue automation and additional tools.
Automatic form opening
When a call comes in to the agent, the form will open automatically in a neighboring tab. This is configured in the user profile. If auto-opening is disabled, the form can be opened manually in the agent workplace.
Presence control
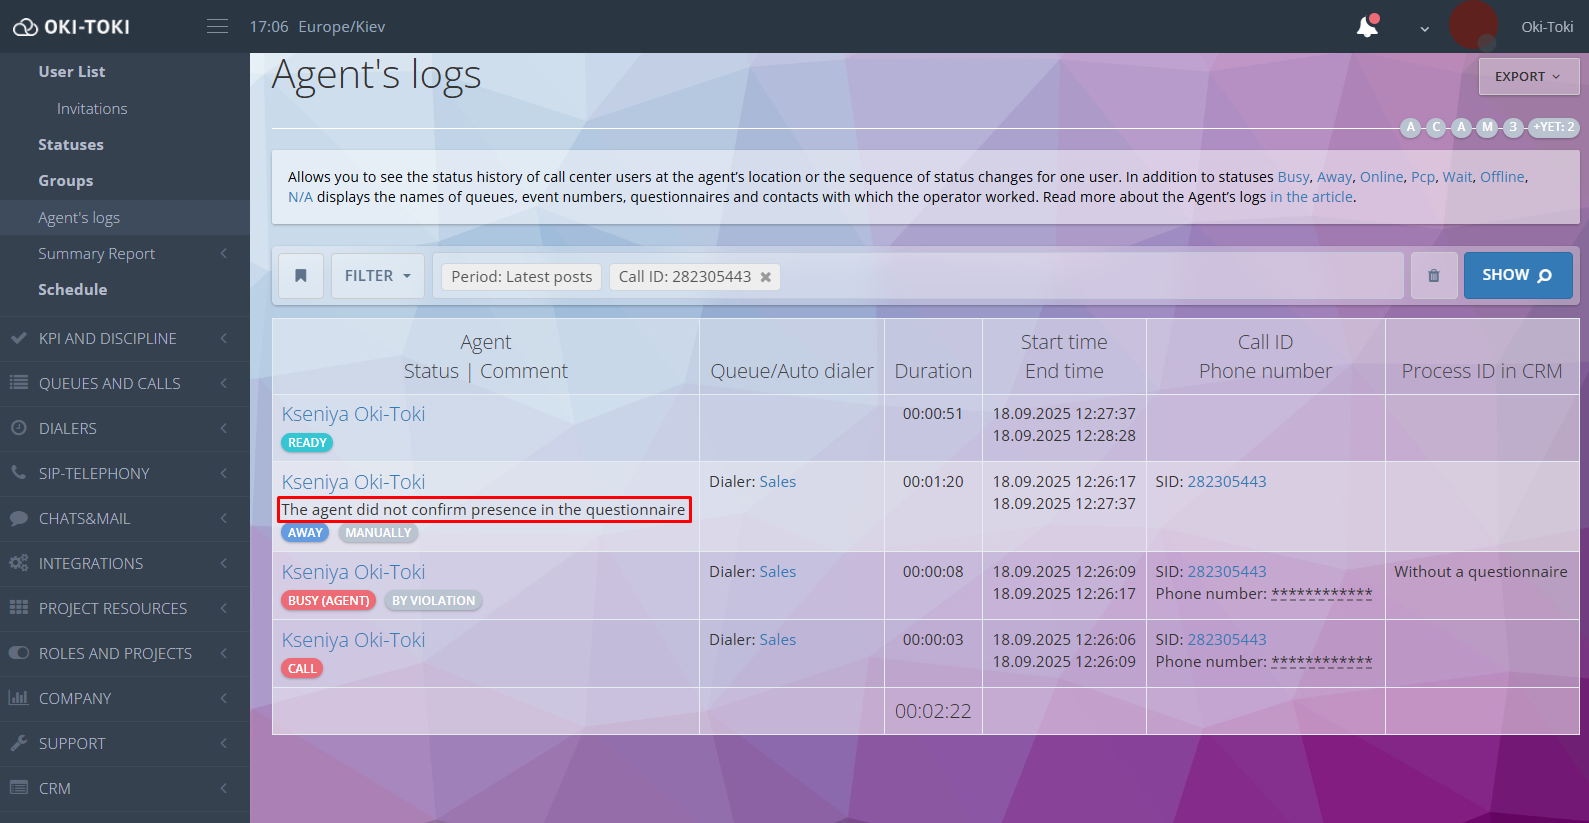
Monitoring agent activity — used with “auto-answer”. In the Queue or dialer settings, you can set the acceptable response time in the form (for example, mouse movement).
If the agent doesn’t perform an action within the set time, the call returns to the queue and is directed to another agent (for dialer calls — automatic drop). The system will switch the agent to “Away” status, and the report will record a comment: “Did not confirm presence in the form”.
This is useful when agents work from home and go to make tea without setting the “Away” status.
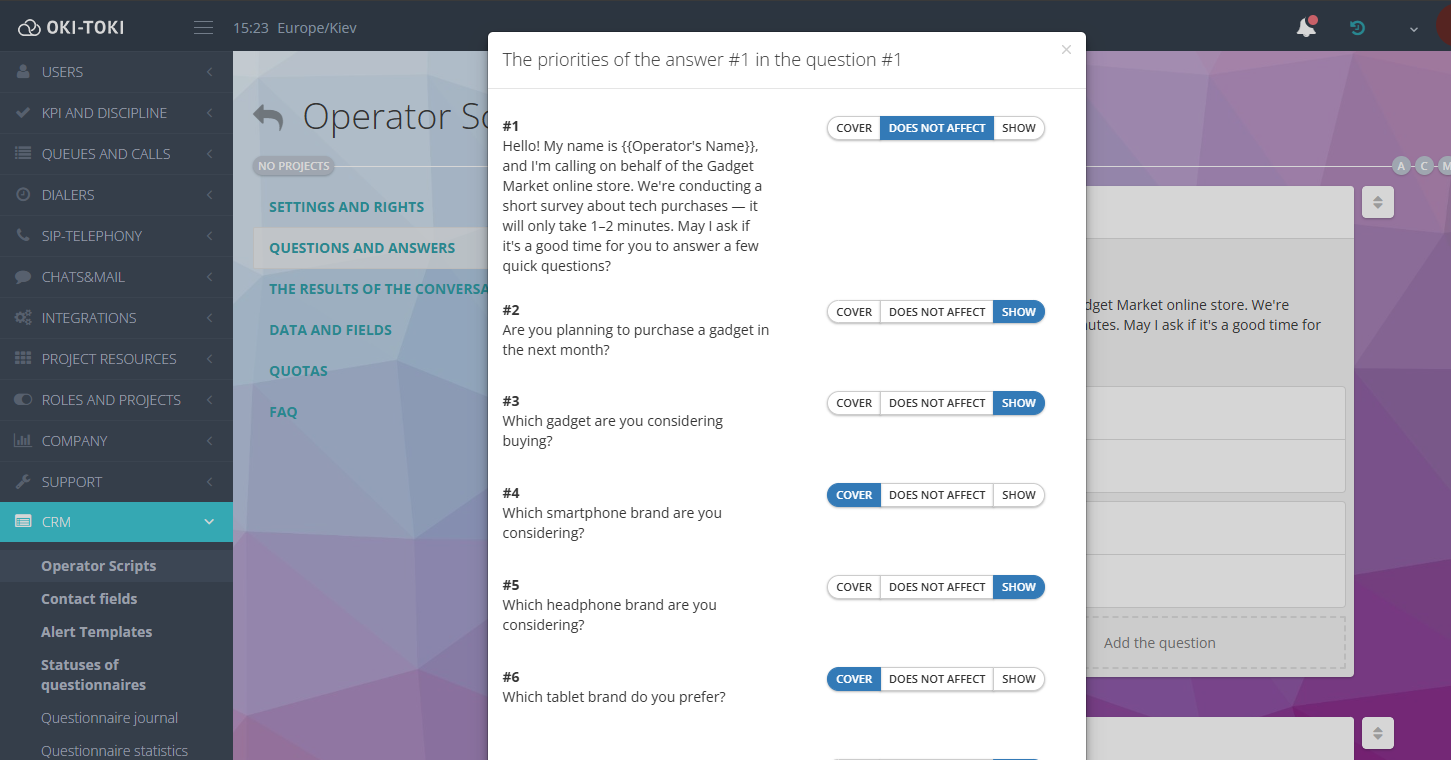
Priorities and question connections
The dialogue with the client is built, depending on questions and answers. That is, in Oki-Toki you can configure the logic of sequential questions. For example, the client says they have payment problems — the agent selects the appropriate option in the form, and the following questions will already be related to solving the payment problem. You can configure conditions and dialogue branches using priorities.
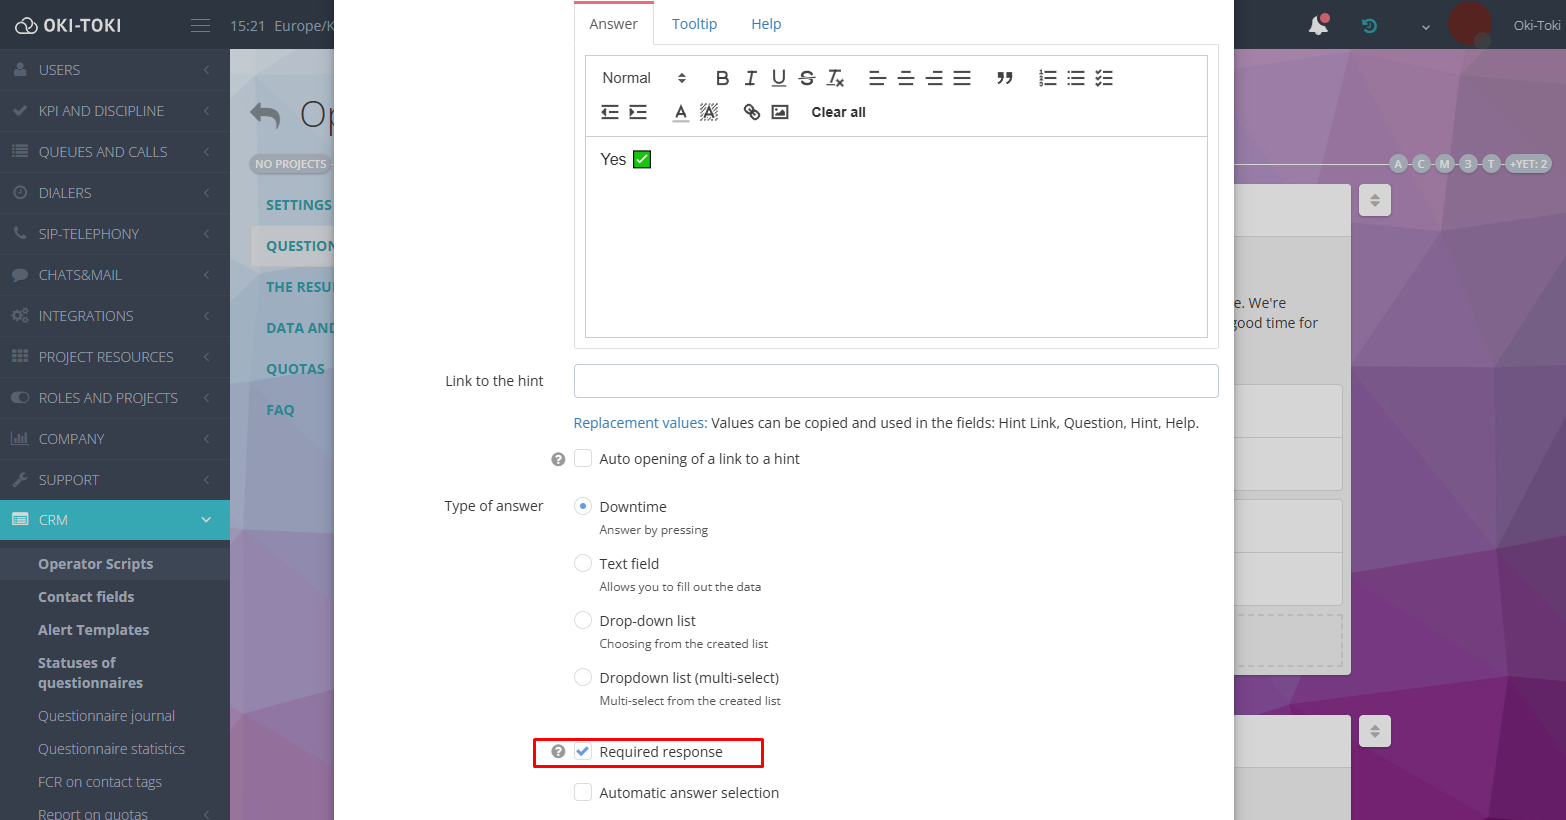
Required fields
In the form, you can specify required fields for the agent that they must fill in. For example, the agent must ask “Client name” and enter it in the form response, otherwise the next question won’t open.
Triggers
In the form, you can configure automatic events. When a specified condition (trigger) is met, you can launch various actions: sending SMS to the client, notifications in Telegram to colleagues, adding or removing a contact from the dialer, assigning an agent or group of agents to the client.
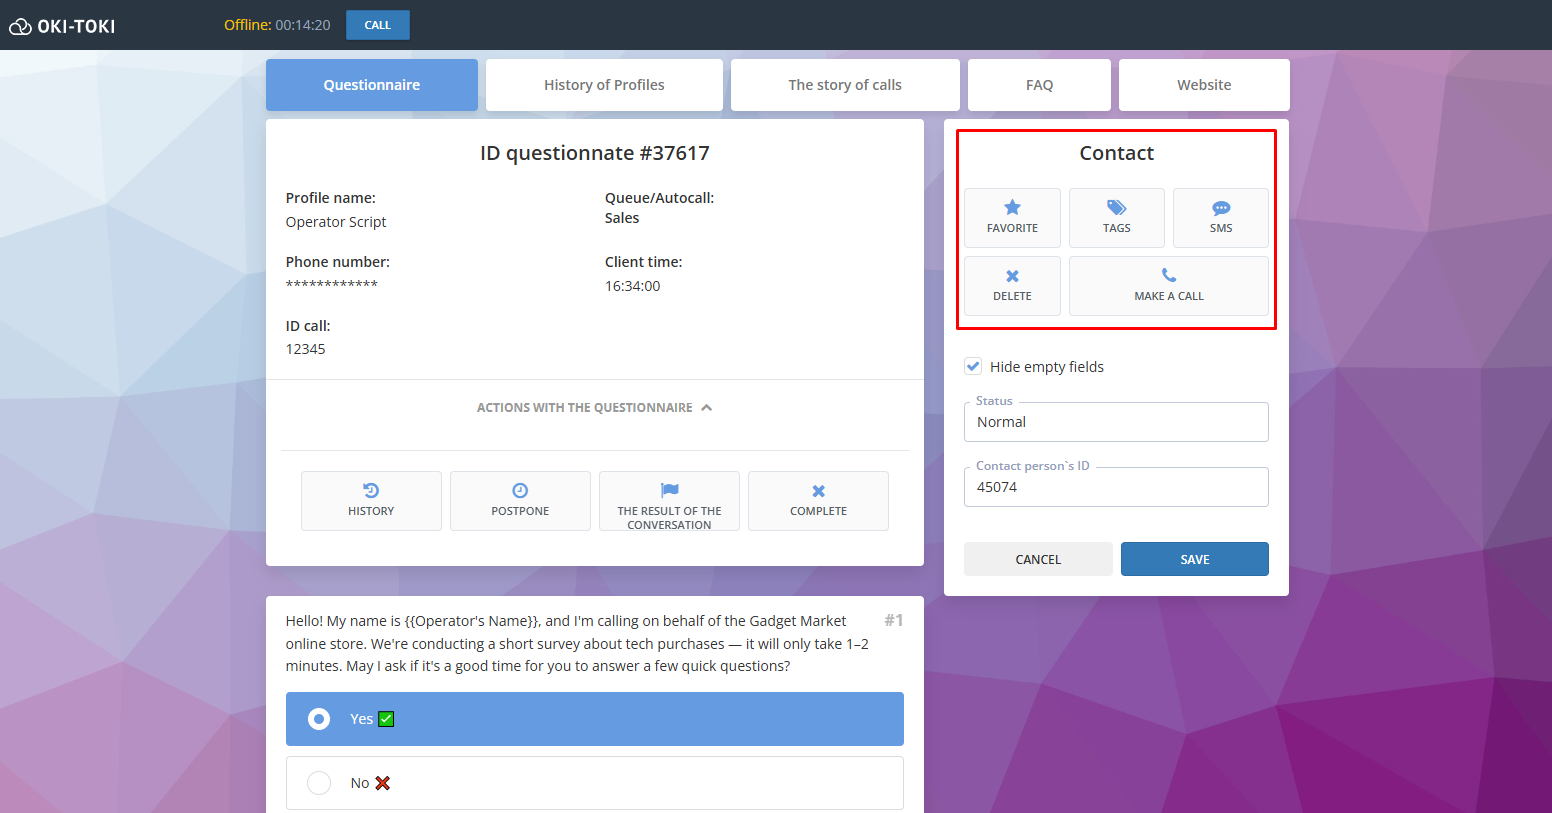
Additionally:
- Favorites — the agent can mark the necessary form with a “star”.
- Calls from the form — the agent can call the client directly from the form, provided they have the agent workplace open.
- SMS — sending a message to the client without switching to the agent workplace or third-party services. You can choose a ready-made template or enter text manually, while the client’s number will be substituted automatically.
- Tags — the agent can manually assign a specific label in the form. More about call tagging in a separate article
- Delete — completely removes the contact along with all interaction history. This action is final, it will be impossible to restore the data.
Thanks to such automation, the agent will be able to focus on communicating with the client, while the system will take care of all routine actions. As a result, work speed will increase, the number of errors will decrease, and it will be much more convenient to work in general.
Scripts help agents not only follow the script and always know what to answer the client, but also for training new employees. This approach forms the basis for professional work — agents act confidently, follow standards and solve client tasks. More details about training agents using scripts in a separate article.