To easily and smoothly set up an agent in Oki-Toki, we have prepared a step-by-step guide to creating a new user, as well as instructions for setting up roles and access within the company.
How to create an agent
For mass user creation, in the “Invitations” section, list the email addresses to which the invitations will be sent, then select the Role and Project for the agents (if utilized).

For more detailed agent settings in Oki-Toki:
- Go to the section “Users“, click on the “Add” button and then “Create”;
- Enter the user’s Name and E-mail, and also indicate his Role and Projects to configure access to company tools.
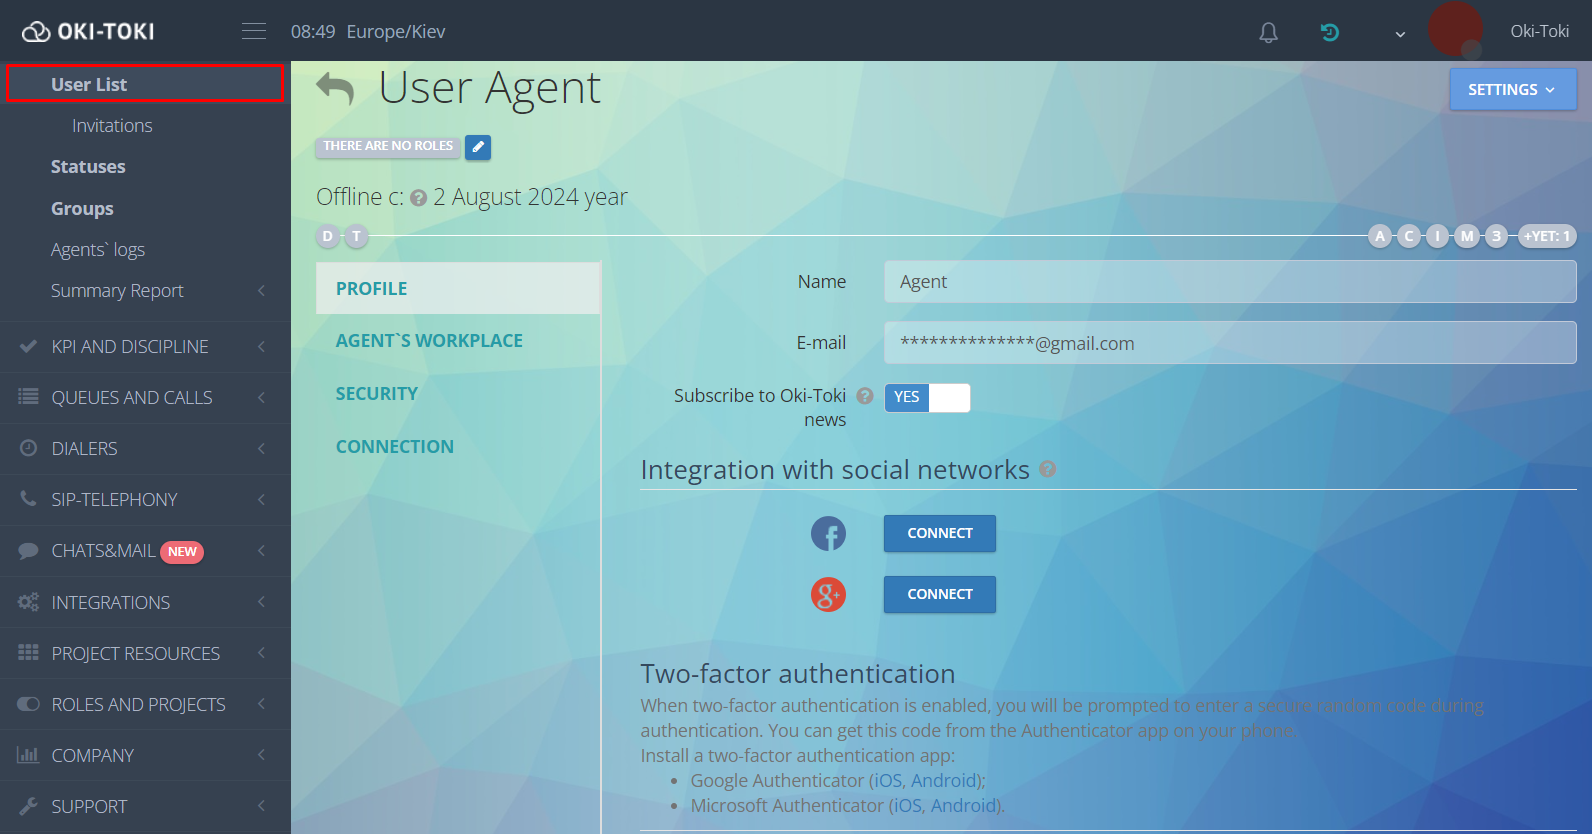
- В In the “Communication” section, you can specify how the agent will receive and make calls: agent station, softphone (SIP&FMC), agent’s work phone number (INT) or agents personal phone number (EXT).
- After selecting the means of communication, click the “Save” button, an account will be created and an email will be sent with a link to create a password to log into the system.
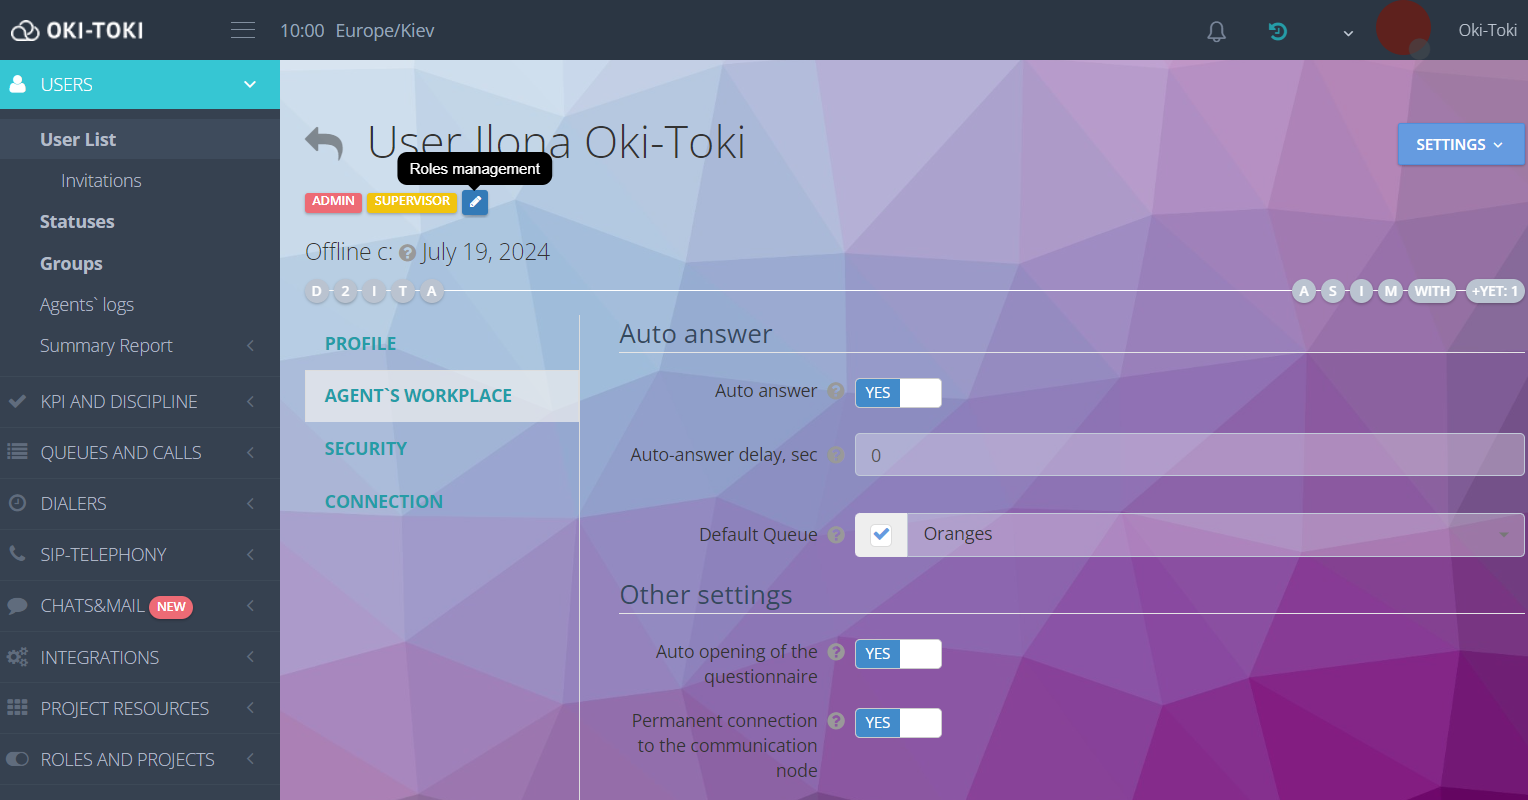
After creating a new agent, the settings for auto-response, auto-opening of the questionnaire and work shift schedule in the agent‘s place section are activated.
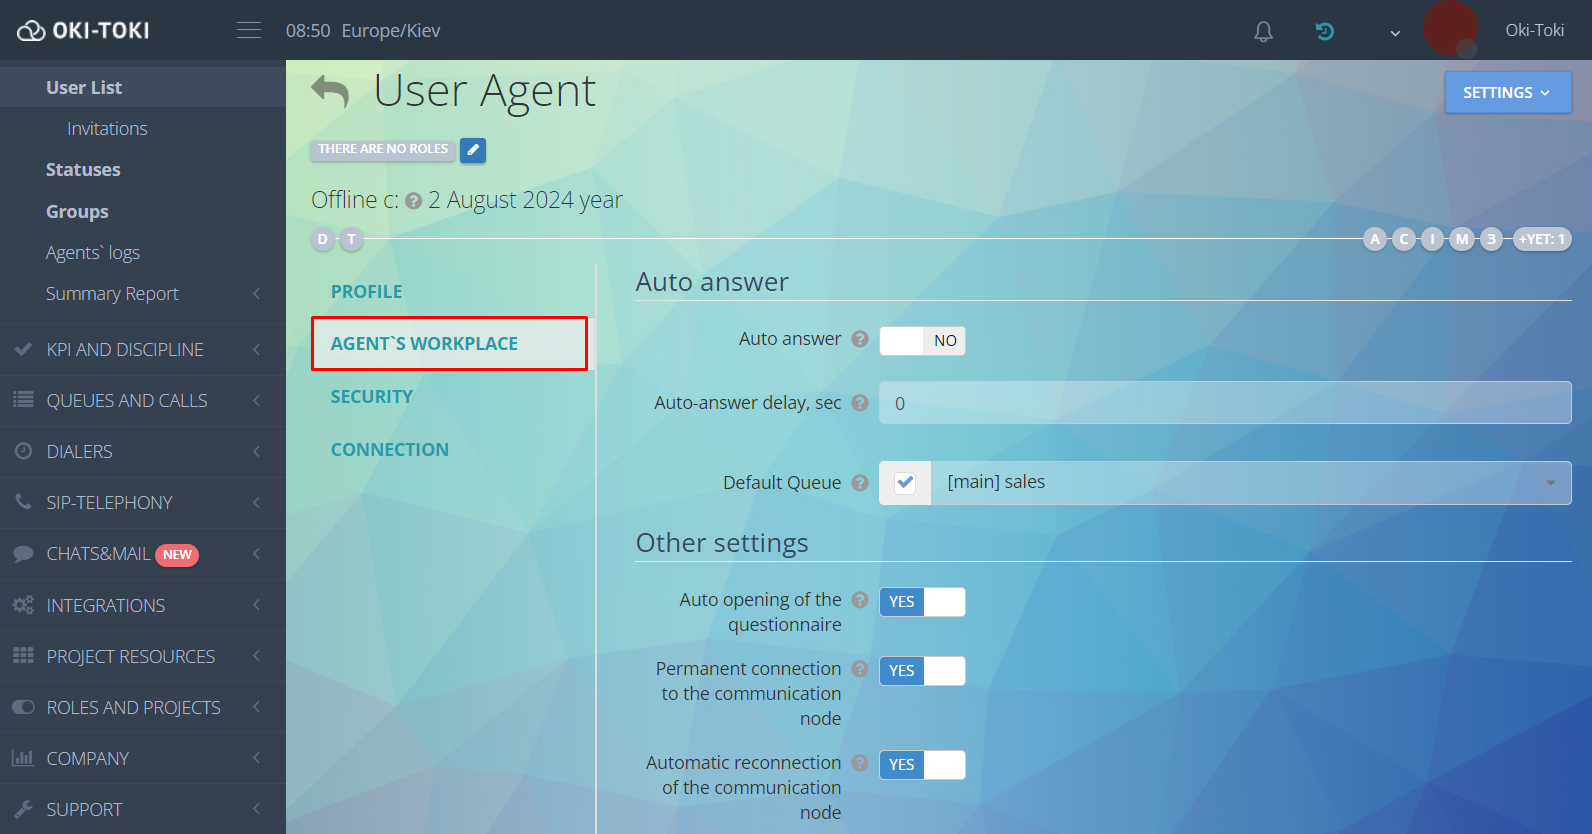
The remaining parameters can be left at default: they do not directly affect the user’s performance, but are more about access to personalization and selection of the most suitable communication server.
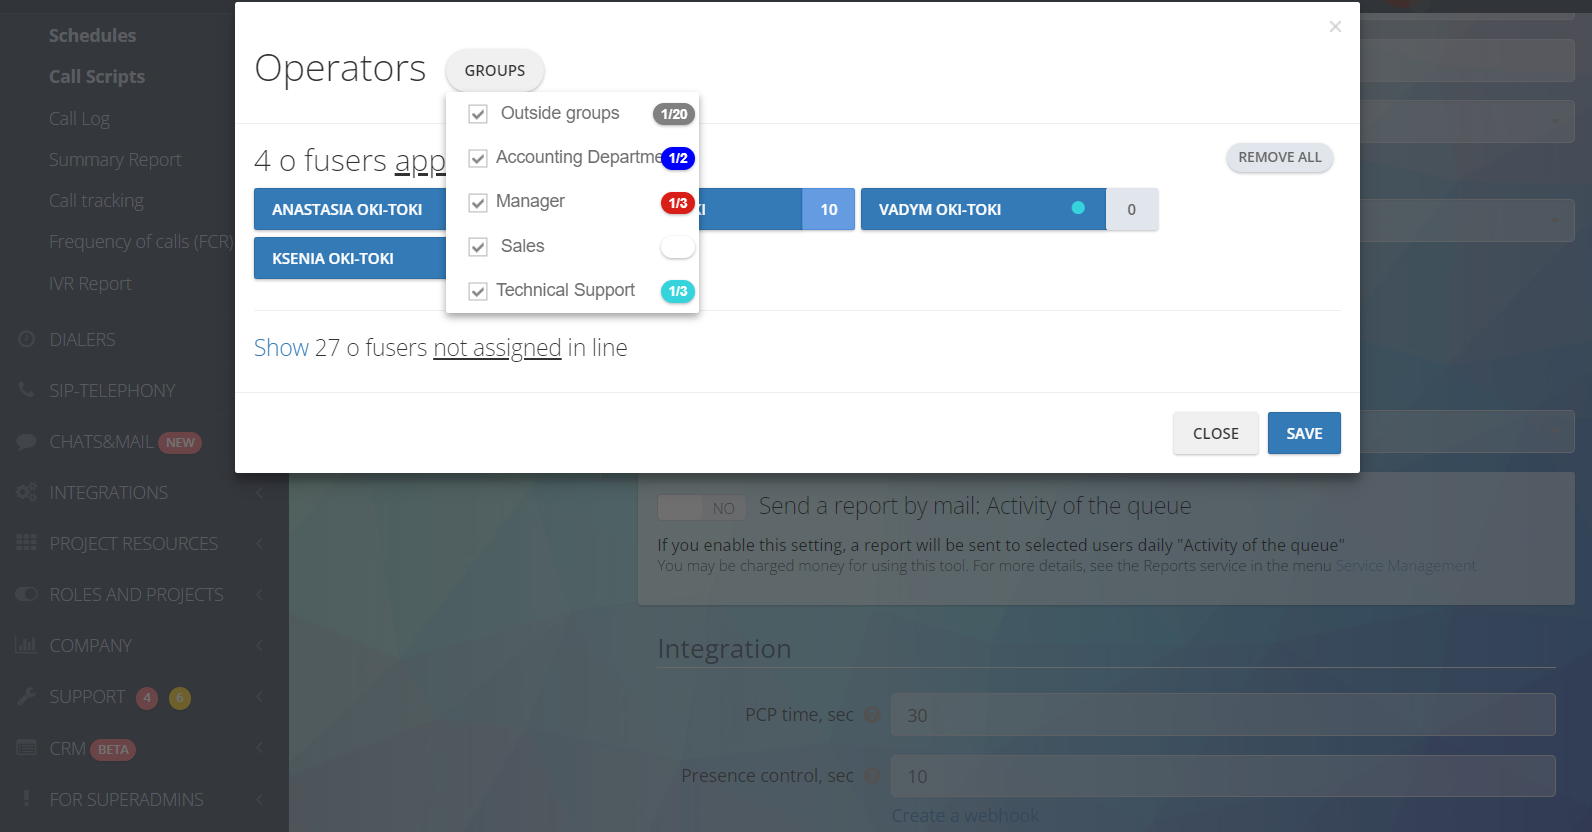
How to assign an agent to a queue and auto call
The agent needs a queue to receive incoming calls and make outgoing calls, and an auto call is needed to receive automated calls. Queues and auto calls are selected in the user settings.
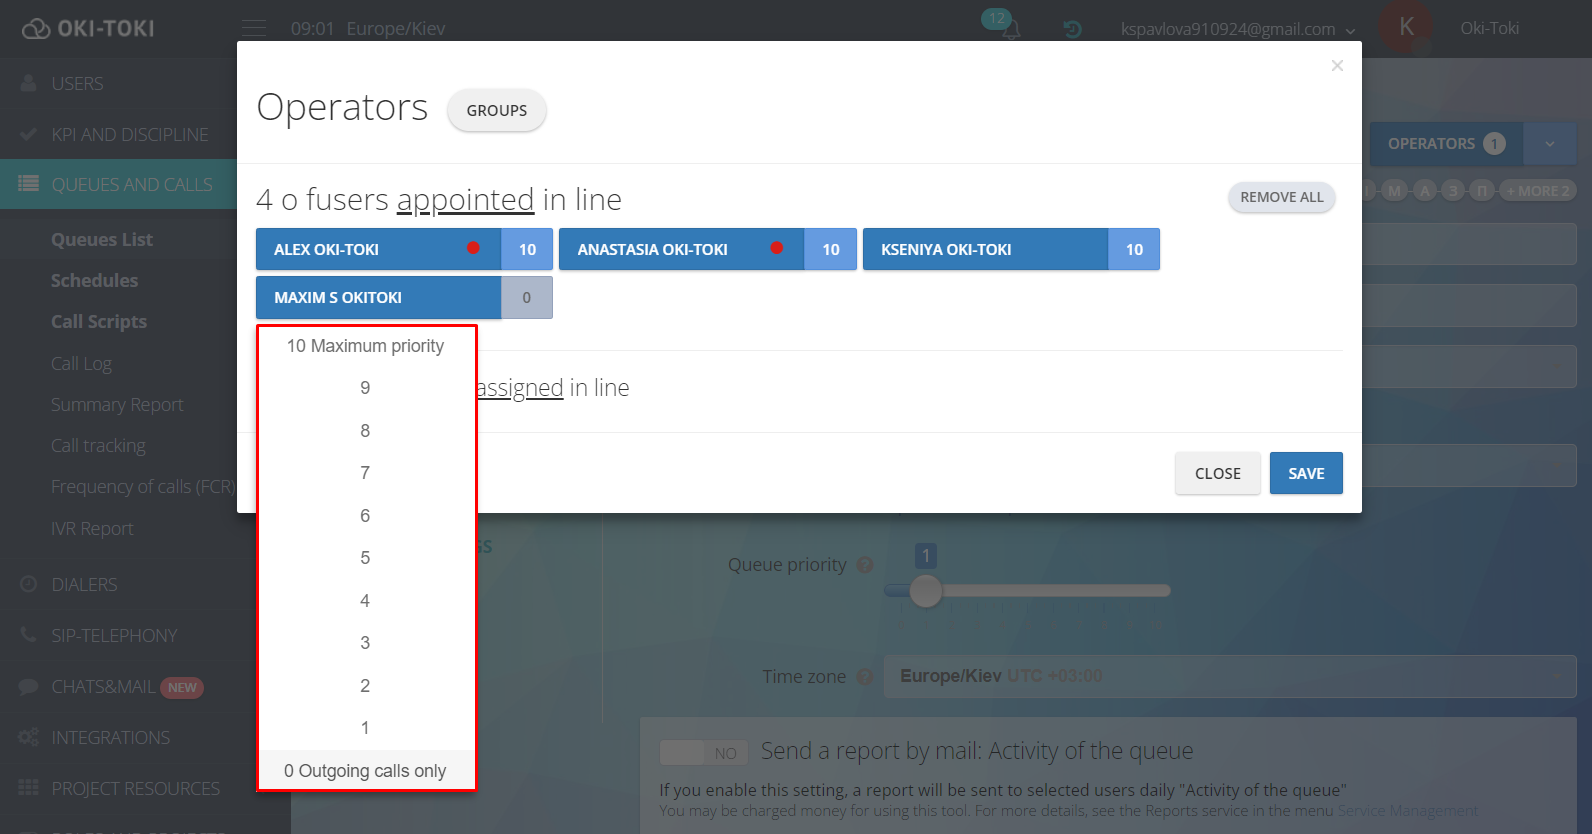
When assigning an agent to a queue and auto-dialing, you must set his priority higher than “0” . Priorities affect several factors:
In Queue: If an agent is assigned with 0 priority, he will be able to make manual outgoing calls, but will not receive incoming calls. Incoming calls are distributed among agents depending on the priority set. An agent with a high priority will be busier than an operator with a low priority (this is useful during trainee training).
On Auto Call: If an agent is assigned priority 0, he will not accept automated calls. An agent with a higher priority than his colleagues receives calls from autodialing more often.
How to create groups of agents
In large companies, agents are often grouped for ease of filtering reports, visual identification and user management. This allows you to create a convenient structure where agents can be logically combined, which greatly simplifies data analysis and work coordination.
Groups are created in the “Users“, in the “Groups” subsection. Give the new group of agents a name, select a marker color, and save.
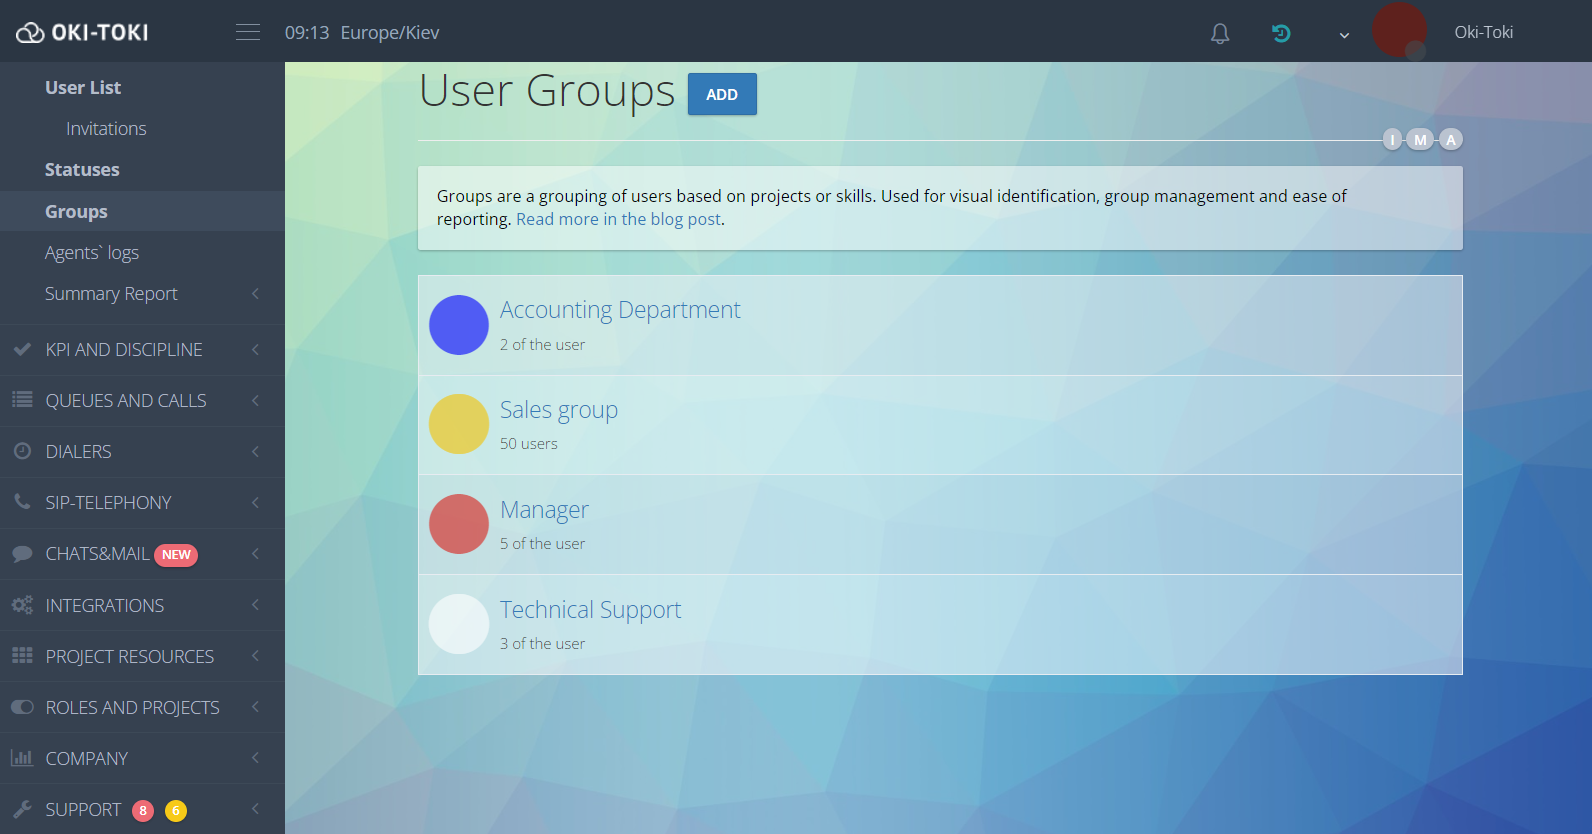
To add an agent to a group, go to the user settings, select the previously created group and save.
Groups are convenient to use for visual distinction in an agent station or user list, and it also simplifies the procedure for adding agents to a queue and auto-dialing.
More about User groups can be read in a separate article on blog.
What role to give to the agent
Within our interface, it is possible for users to grant access rights to tools. This is implemented using roles. By default, ready-made roles “Agent”, “Supervisor” and “Administrator” have already been created, but you can create your own with a suitable set of rights.
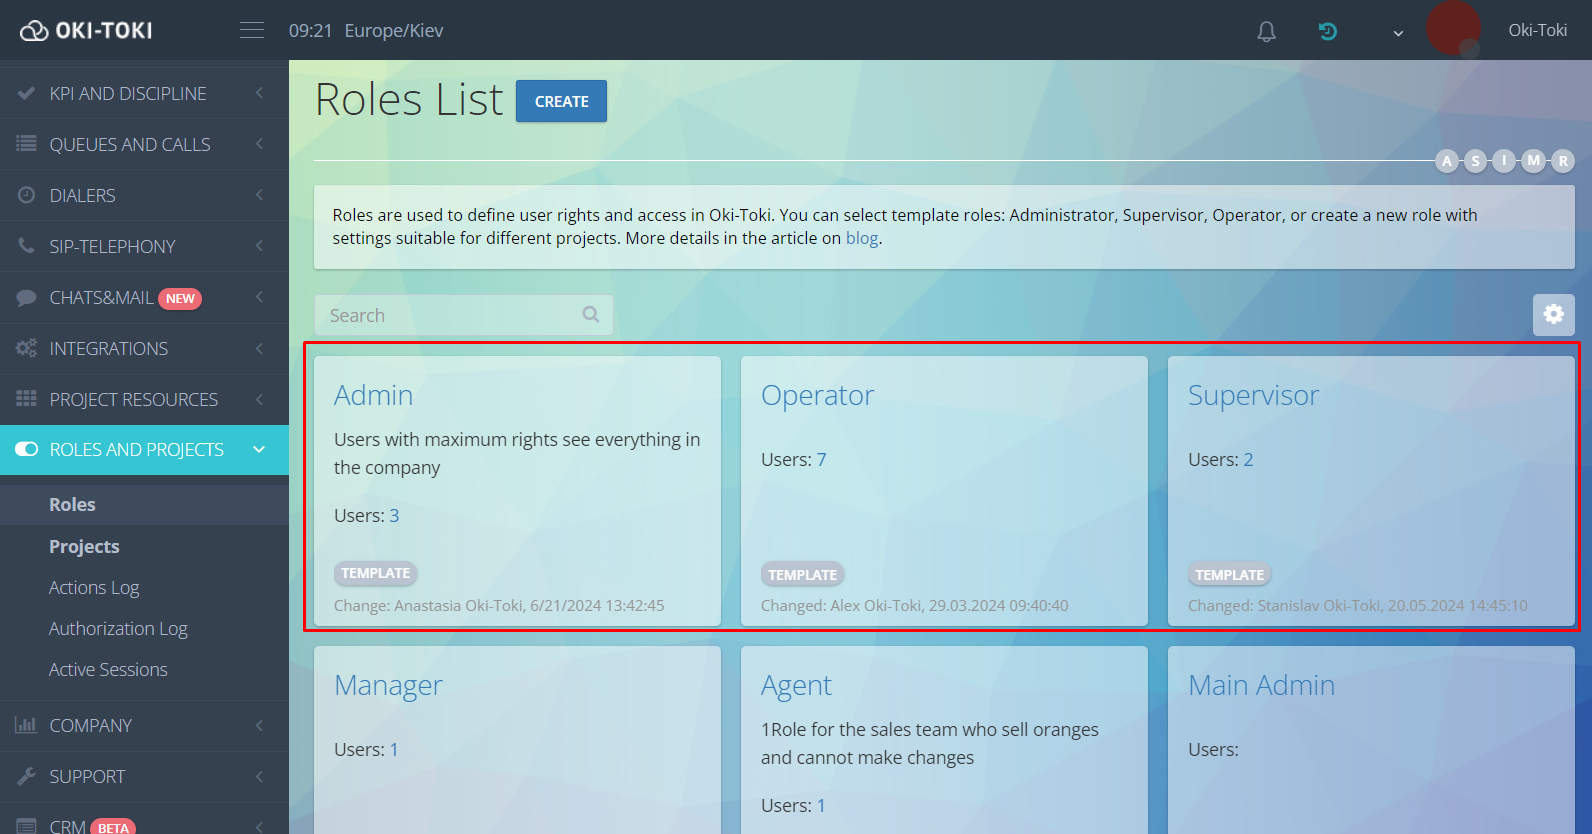
To create a role, go to the “Roles and projects”, click “Create” and select access rights.
The assigned role will be indicated in the user settings.
Using Roles, you can configure access to each section depending on the user’s role in the company. And with the help of Projects you can organize the work of departments of your company.
This completes the basic training. The agent just needs to log in to the agent station to start working. When you first log in, you need to allow access to the headset and pop-up windows, after which you can receive and make calls. Read more about setting up the agent’s seat there is a short video on YouTube.
How to improve the quality of work of call center agents?
To make the work of call center agents even better, you can use the following approaches:
- Training and preparation:Equip your agents with the knowledge and skills they need to provide superior customer service. Regular trainings and educational programs will help them develop and keep abreast of the latest changes.
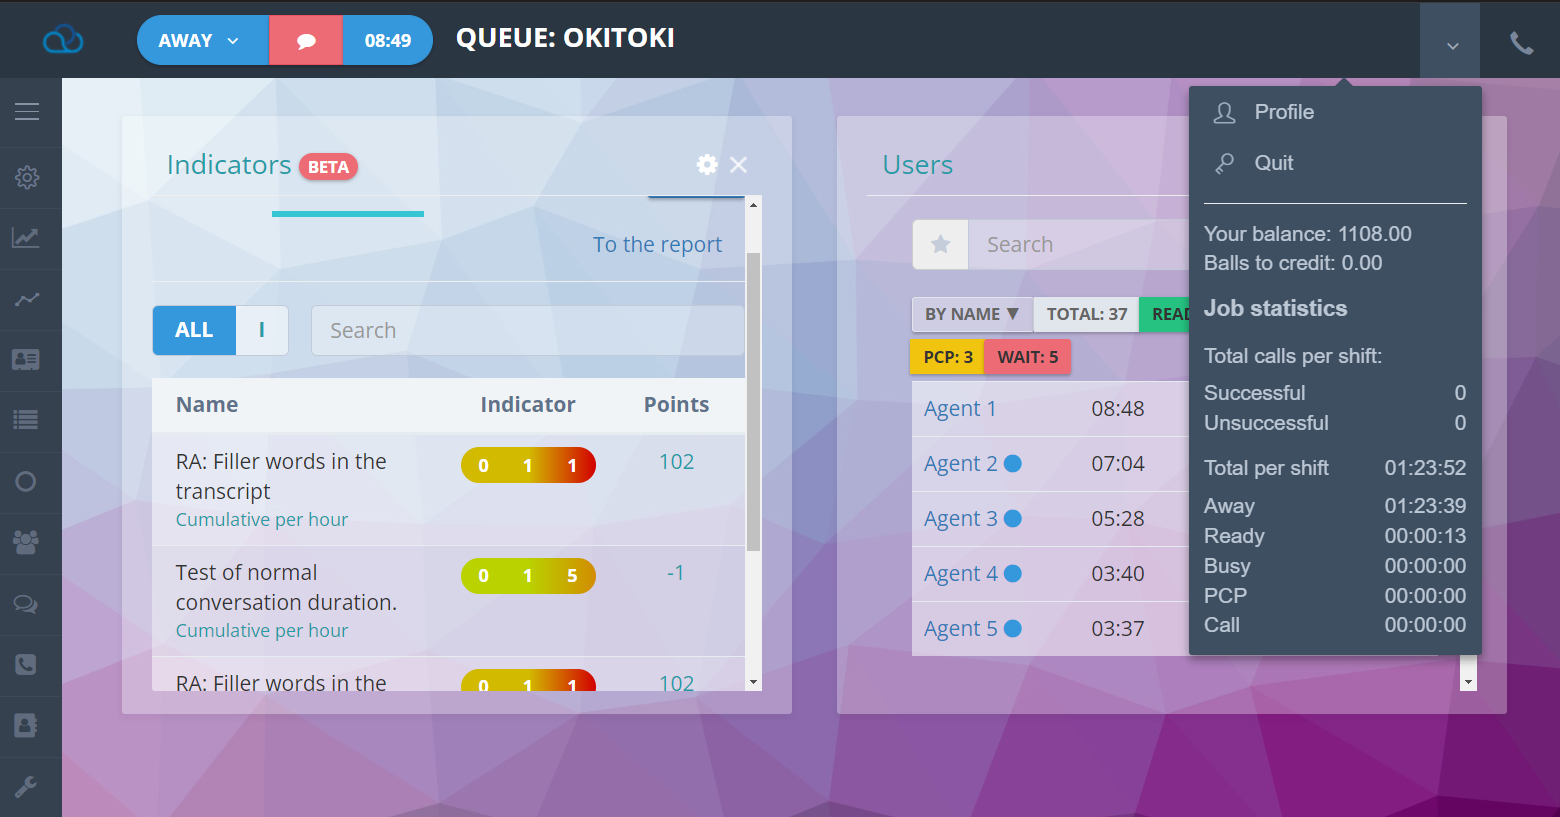
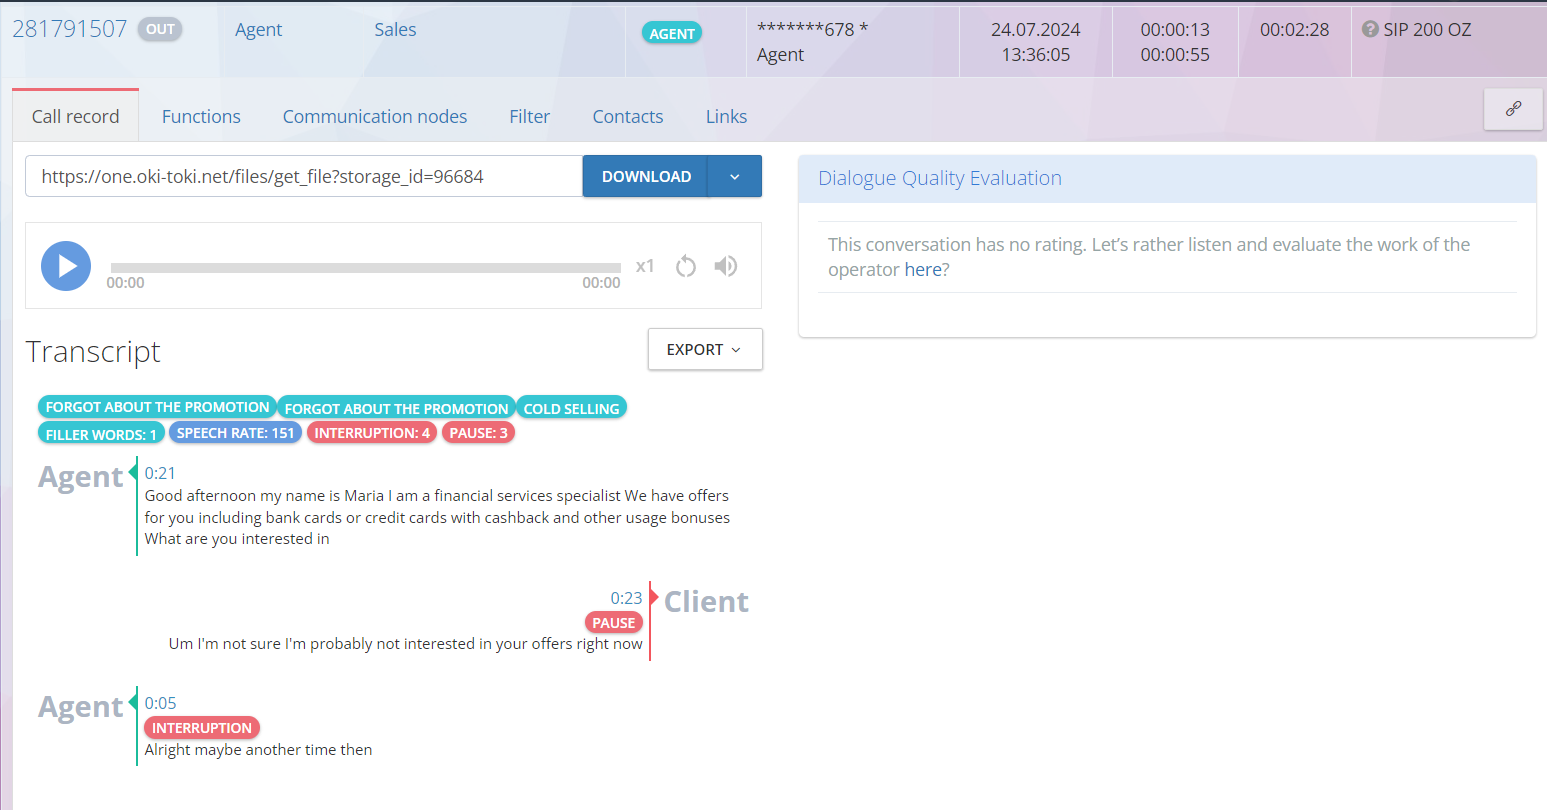
- Monitoring and evaluation: Monitor the work of agents, record and analyze their conversations with clients. This will help identify agents strengths and weaknesses, as well as areas where they can improve. Give them feedback and guidance so they can grow and develop. Tools from Oki-Toki will help with this: Transcript of conversations, speech analytics and evaluation of agent dialogues.
- Use technologies: Implement modern customer relationship management (CRM) systems and other technologies that will improve the efficiency of agents. Automation of routine tasks will allow them to devote more time to important customer issues.
- Support customers: Agents must be friendly, empathic and able to listen to customers. They should strive to solve customer problems and provide a high level of service. Teach them how to effectively communicate with dissatisfied customers, handling objections and the ability to resolve conflicts.
- Continuous improvement: A call center should continually strive to improve its processes and practices. Analyze statistical data, identify the most frequently occurring problems and look for ways to prevent them. Introduce new technologies and methods to be one step ahead, Call center software from Oki-Toki.
Applying all of these approaches will improve the quality of work of call center agents, improve their interaction with customers and provide a more efficient and pleasant service.
About how to calculate cost of call center tools and how to open a call center from scratch read on the Oki-Toki website.
How to organize the work of a call center?
Do you want your call center to work at the highest level? Follow these simple but effective steps:
- Define your goals: Decide what you want to achieve with the help of a call center. Maybe it’s customer support or increasing sales. Know where you’re going.
- Create a maintenance strategy: Determine how you will communicate with clients. Decide what communication channels you offer (phone, email, chat) and set quality standards and response times.
- Provide the necessary infrastructure: Make sure you have the software and technical support to run your call center effectively. For example, customer auto-call system, IVR voice menu, virtual agent etc.
- Hire and train staff: Hire qualified employees and train them in customer service skills, communication and the use of necessary tools.
- Establish a monitoring and evaluation system: Develop a quality control system to monitor the performance of agents, evaluate their performance and analyze customer feedback . Use this information to improve processes.
- Continue to improve: Regularly analyze the performance of the call center and look for opportunities for improvement. Listen to feedback from customers and agents to find and fix problems.
- Maintain team spirit: Create a work environment where employees feel valued and motivated. Provide opportunities for their growth and development, conduct training and organize events to strengthen team spirit.
Follow these steps will help you organize your call center and ensure high quality customer service.
We have collected 12 tips how to improve the work of a call center in our blog article.
What should an agent in a call center not say?
An agent in a call center should be attentive to his statements and avoid the following unwanted phrases :
“I don’t know” – instead, the agent should strive to find an answer or offer an alternative solution.
“It’s not my responsibility” – instead, the agent should be ready to help the client or refer him to the appropriate specialist.
“You do not understand correctly” – the agent must be patient and strive to explain the information more clearly and understandably.
“We can’t do this” – the agent must look for opportunities and offer alternative solutions, instead of simply refusing the client.
“I’m busy ” – the agent must always be ready to serve customers and not demonstrate reluctance to help.
“This is not our mistake” – the agent must be responsible and ready to help the client solve the problem, regardless of the source of the error.
Avoiding these unwanted statements, a call center agent can create a more positive and professional impression on customers, providing better service and meeting their needs. You can learn more about agent conversation scripts in a separate article on our blog.
If you have any difficulties setting up the agent’s work in Oki-Toki, write to us and technical support will be happy to help you!